EXTERIOR PANELS / TRIM ROOF DRIP SIDE FINISH MOULDING INSTALLATION
CAUTION / NOTICE / HINT
- HINT:
- ·
Use the same procedure for the RH side and LH side.
·The following procedure is for the LH side.
PROCEDURE

 75561
1.INSTALL NO. 1 ROOF DRIP SIDE FINISH MOULDING CLIP
75561
1.INSTALL NO. 1 ROOF DRIP SIDE FINISH MOULDING CLIP
- NOTICE:
-
When installing new No. 1 roof drip side finish moulding clips, remove any double-sided tape remaining where the No. 1 roof drip side finish moulding clips will be installed on the vehicle body and clean the vehicle body with a non-residue solvent.
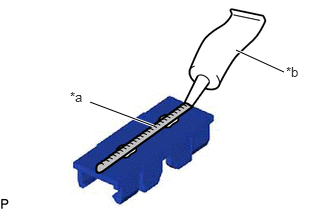
| *a | Adhesive |
| *b | 2 to 3 mm Bead of Adhesive |
Apply a 2 to 3 mm (0.0787 to 0.118 in.) bead of adhesive (3M DP-105 or equivalent) to each new No. 1 roof drip side finish moulding clip.
- HINT:
-
Adhesive strength (tensile strength): 13.7 MPa (140.0 kgf/cm2, 1987 psi) or more (when the temperature is 23°C (73°F).)
Install the No. 1 roof drip side finish moulding clips to the positions on the roof panel shown in the illustration. Determine the locations and firmly press and install the No. 1 roof drip side finish moulding clips.
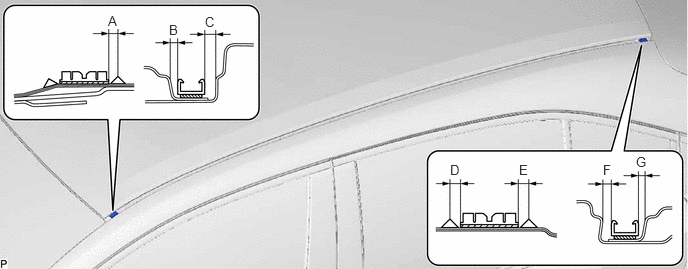
- Standard Measurement:
Area Measurement Area Measurement A 3.5 to 4.5 mm (0.138 to 0.177 in.) B 1.7 to 2.7 mm (0.0669 to 0.106 in.) C 3.4 mm (0.134 in.) D 4.0 mm (0.158 in.) E 3.5 to 4.5 mm (0.138 to 0.177 in.) F 2.7 mm (0.106 in.) G 1.5 to 2.5 mm (0.0591 to 0.0984 in.) - -
Install the roof drip side finish moulding when 40 minutes or more have elapsed since the No. 1 roof drip side finish moulding clips were installed.
- HINT:
- ·
Initial hardening time: 40 minutes
·Complete hardening time: 24 hours
75556C
2.INSTALL CENTER ROOF DRIP SIDE FINISH MOULDING
Engage the 2 clips to install the center roof drip side finish moulding as shown in the illustration.
