K313 CVT OIL PAN INSTALLATION
PROCEDURE

 35330D
1.INSTALL OIL STRAINER ASSEMBLY
35330D
1.INSTALL OIL STRAINER ASSEMBLY
- HINT:
-
Perform this procedure only when replacement of the oil strainer assembly is necessary.
Coat a new O-ring with Toyota Genuine CVT fluid FE and install it to the oil strainer assembly.
- NOTICE:
-
Ensure that the O-ring is not twisted.
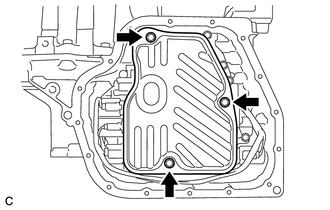
Install the oil strainer assembly to the transmission valve body assembly with the 3 bolts.
- Torque:
- 10.8 N*m (110 kgf*cm, 8 ft.*lbf)
- NOTICE:
- ·
Make sure that the transmission wire is not pinched.
·Be careful not to damage the O-ring.
- HINT:
- Bolt Length:
- ·
Bolt (A): 16 mm (0.630 in.)
·Bolt (B): 25 mm (0.984 in.)
35394D
2.INSTALL OIL CLEANER (CVT) MAGNET
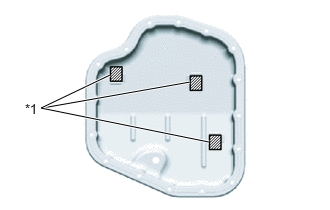
| *1 | Oil Cleaner (CVT) Magnet |
Install the 3 oil cleaner (CVT) magnets to the transaxle oil (CVT) pan sub-assembly as shown in the illustration.
35106L
3.INSTALL TRANSAXLE OIL (CVT) PAN SUB-ASSEMBLY
Clean the transaxle oil (CVT) pan sub-assembly installation surface of the transaxle case.
When using the precoated bolt:
Clean and degrease the 16 bolts and installation holes in the transaxle case.
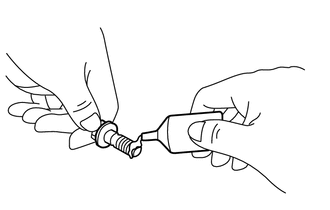
| *a | Adhesive |
Apply adhesive to 2 or 3 threads on the ends of the 16 bolts.
- Adhesive:
Toyota Genuine Adhesive 1324, Three Bond 1324 or equivalent
- NOTICE:
-
In order to ensure proper sealing of the 16 bolts, apply adhesive to the 16 bolts and install them within 10 minutes of applying adhesive.
Install the transaxle oil (CVT) pan sub-assembly and a new transaxle oil pan (CVT) gasket to the transaxle case with the 16 bolts.
- Torque:
- 7.0 N*m (71 kgf*cm, 62 in.*lbf)
- NOTICE:
- ·
Make sure that there is no oil or foreign matter on the gasket seal surface or transaxle oil (CVT) pan sub-assembly contact surface.
·Make sure that the transmission wire is not pinched.
When using the Non-precoated bolt:
Install the transaxle oil (CVT) pan sub-assembly and a new transaxle oil pan (CVT) gasket to the transaxle case with the 16 bolts.
- Torque:
- 7.8 N*m (80 kgf*cm, 69 in.*lbf)
- NOTICE:
- ·
Make sure that there is no oil or foreign matter on the gasket seal surface or transaxle oil (CVT) pan sub-assembly contact surface.
·Make sure that the transmission wire is not pinched.
Using a 6 mm hexagon socket wrench, install the overflow (CVT) tube to the transaxle oil (CVT) pan sub-assembly.
- Torque:
- 1.7 N*m (17 kgf*cm, 15 in.*lbf)
Using a 6 mm hexagon socket wrench, temporarily install the overflow plug and gasket to the transaxle oil (CVT) pan sub-assembly.
- HINT:
-
Reuse the old gasket as the overflow plug will be removed again to adjust the fluid level.
4.ADD CONTINUOUSLY VARIABLE TRANSAXLE FLUID
5.INSPECT FOR OIL LEAK
51444A
6.INSTALL REAR ENGINE UNDER COVER LH
51410
7.INSTALL NO. 1 ENGINE UNDER COVER ASSEMBLY