EXTERIOR PANELS / TRIM FRONT DOOR BELT MOULDING INSTALLATION
CAUTION / NOTICE / HINT
- HINT:
- ·
Use the same procedure for the RH side and LH side.
·The following procedure is for the LH side.
PROCEDURE

 1. PRECAUTION
- NOTICE:
-
After turning the ignition switch (for Gasoline Model) or power switch (for HV Model) off, waiting time may be required before disconnecting the cable from the negative (-) auxiliary battery terminal. Therefore, make sure to read the disconnecting the cable from the negative (-) auxiliary battery terminal notices before proceeding with work.
75720
2.INSTALL FRONT DOOR BELT MOULDING
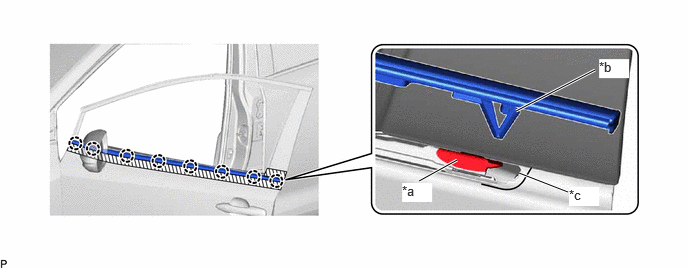
| *a | Protrusion | *b | Front Door Belt Moulding Claw Part |
| *c | Front Door Belt Moulding Claw Part Engagement Position | - | - |
Engage the 8 claws in the order shown in the illustration to install a new front door belt moulding LH.
- HINT:
-
When engaging the end portion of the front door belt moulding, engage the claw in such a way that the claw does not catch on the protrusion.
3.INSTALL FRONT DOOR FIX WINDOW WEATHERSTRIP WITH FRONT DOOR FIX WINDOW GLASS
67402F
4.INSTALL FRONT DOOR FRONT LOWER FRAME SUB-ASSEMBLY
67862
5.CONNECT FRONT DOOR WEATHERSTRIP
Connect the front door weatherstrip.
68151D
6.INSTALL FRONT DOOR GLASS RUN
68102
7.INSTALL FRONT DOOR GLASS SUB-ASSEMBLY
67832
8.INSTALL FRONT DOOR SERVICE HOLE COVER
67836C
9.INSTALL NO. 3 FRONT DOOR SERVICE HOLE COVER
67838D
10.INSTALL FRONT DOOR VENT SEAL
67664C
11.INSTALL DOOR UPPER FRAME GARNISH
67602
12.INSTALL FRONT DOOR TRIM BOARD SUB-ASSEMBLY
13.INSTALL MULTIPLEX NETWORK MASTER SWITCH ASSEMBLY WITH FRONT DOOR UPPER ARMREST BASE PANEL (for Driver Side)
14.INSTALL POWER WINDOW REGULATOR SWITCH ASSEMBLY WITH FRONT DOOR UPPER ARMREST BASE PANEL (for Front Passenger Side)
74640E
15.INSTALL FRONT DOOR ASSIST GRIP ASSEMBLY
69284F
16.INSTALL FRONT DOOR INSIDE HANDLE BEZEL PLUG
17.CONNECT CABLE TO NEGATIVE AUXILIARY BATTERY TERMINAL
for NR Series: Click hereGeneral>MAINTENANCE>NR Series BATTERY>INSTALLATION202304,999999,_V1,_080956,_0392375,RM100000002BCCN_03_0002,
for 8ZR-FXE: Click hereGeneral>MAINTENANCE>8ZR-FXE AUXILIARY BATTERY>INSTALLATION202304,999999,_V1,_080956,_0392376,RM100000002ACL8_01_0029,
for M15B-FKS: Click hereGeneral>MAINTENANCE>M15B-FKS BATTERY>INSTALLATION202304,999999,_V1,_080956,_0453685,RM100000002BCCF_03_0002,
for M15C-FKS: Click hereGeneral>MAINTENANCE>M15C-FKS BATTERY>INSTALLATION202304,999999,_V1,_080956,_0453686,RM100000002BCCG_03_0002,
for M20A-FKS: Click hereGeneral>MAINTENANCE>M20A-FKS BATTERY>INSTALLATION202304,999999,_V1,_080956,_0470107,RM100000002BCCI_03_0002,
for M20E-FKS: Click hereGeneral>MAINTENANCE>M20E-FKS BATTERY>INSTALLATION202304,999999,_V1,_080956,_0474497,RM100000002BCCK_03_0002,
for M20C-FKS: Click hereGeneral>MAINTENANCE>M20C-FKS BATTERY>INSTALLATION202304,999999,_V1,_080956,_0484846,RM100000002BCCJ_03_0002,
for M20F-FXS, M20G-FXS: Click hereGeneral>MAINTENANCE>M20F-FXS, M20G-FXS AUXILIARY BATTERY>INSTALLATION202307,999999,_V1,_080956,_0611807,RM100000002CK9L_01_0015,
64490
18.INSTALL LUGGAGE COMPARTMENT SIDE TRAY ASSEMBLY (for M20F-FXS, M20G-FXS)
19.INITIALIZE POWER WINDOW CONTROL SYSTEM
20.INSPECT POWER WINDOW OPERATION
for NR Series Engine:
except NR Series Engine: