LIGHTING (EXT) LIGHTING SYSTEM(except NR Series Engine) Taillight Relay Circuit
DESCRIPTION
The main body ECU (multiplex network body ECU) controls the taillight and license plate light.
WIRING DIAGRAM
for TFTM Made
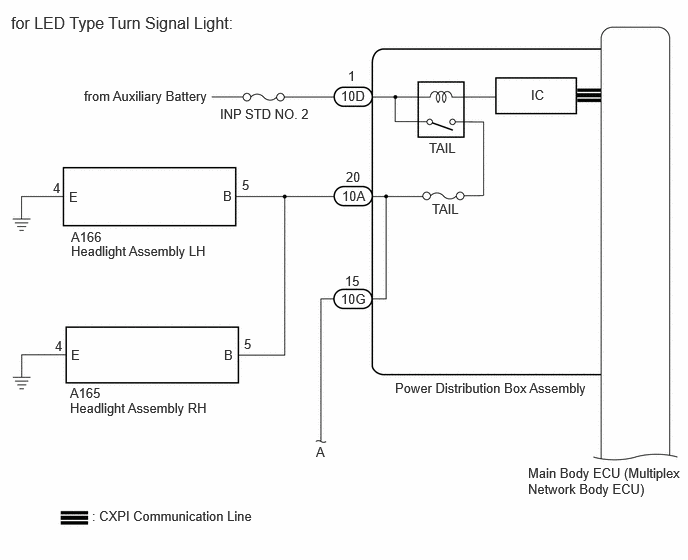
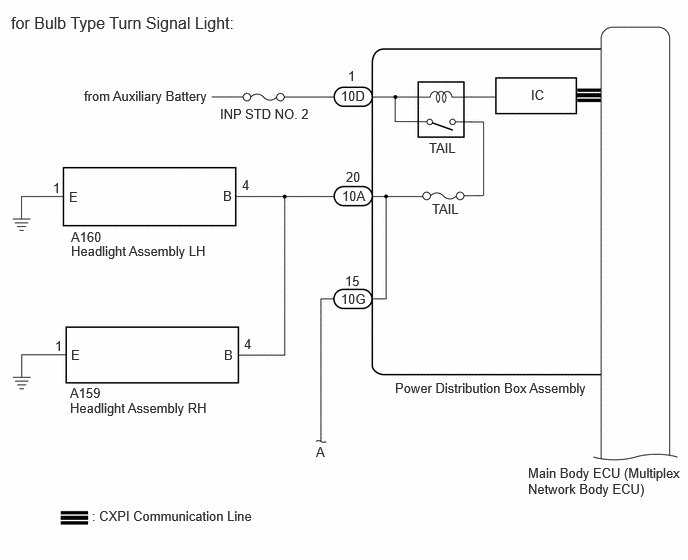
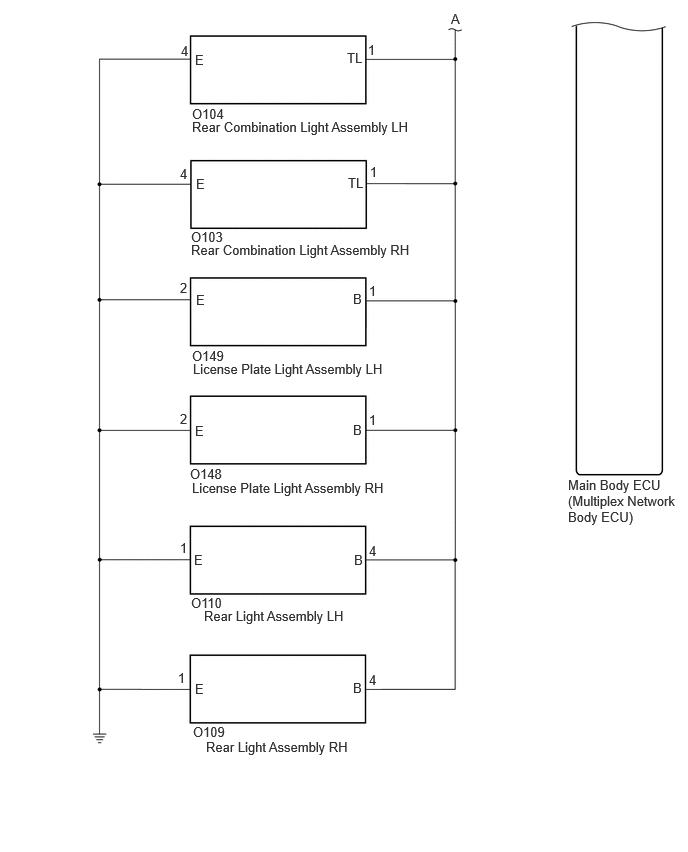
for GTMC Made
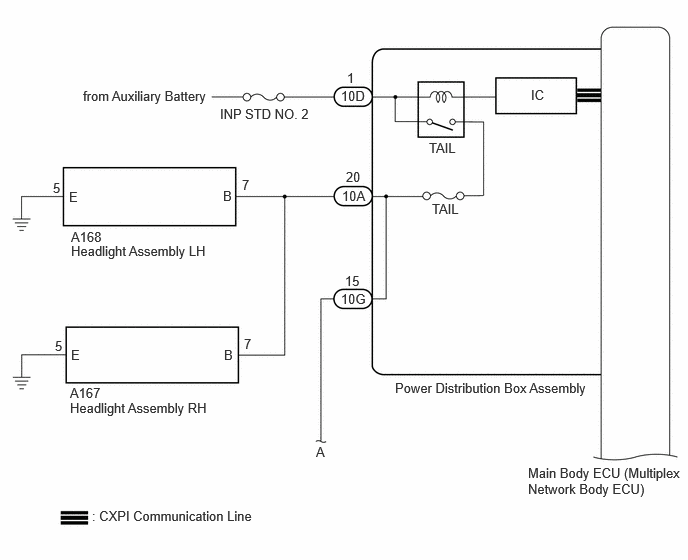
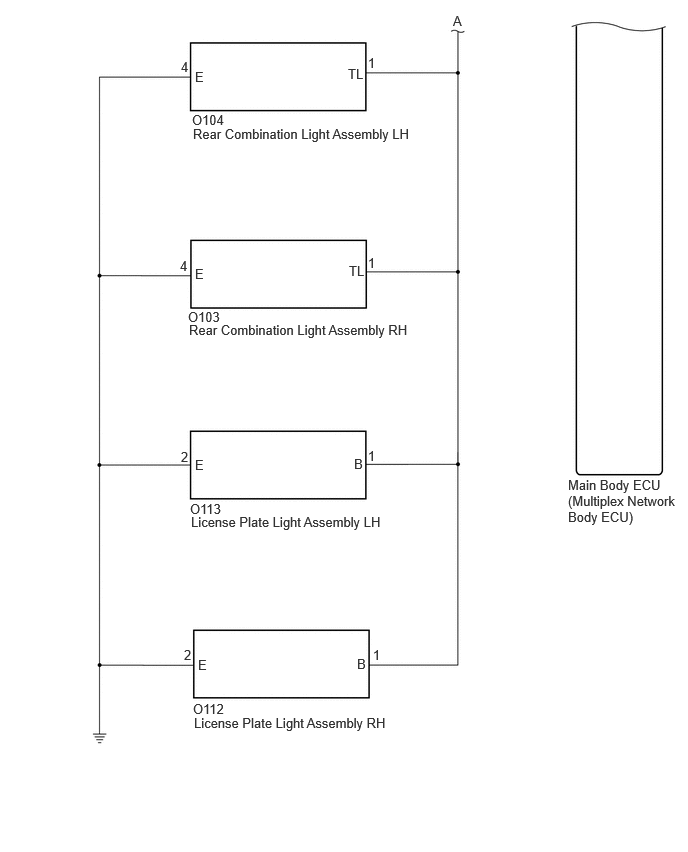
CAUTION / NOTICE / HINT
- NOTICE:
- ·
First perform the communication function inspections in How to Proceed with Troubleshooting to confirm that there are no CAN communication malfunctions before troubleshooting this symptom.
·First perform the communication function inspections in How to Proceed with Troubleshooting to confirm that there are no CXPI communication malfunctions before troubleshooting this symptom.
PROCEDURE
Using the GTS, read the Data List.
- Body Electrical > Power Distribution Box > Data List
-
Tester Display Measurement Item Range Normal Condition Diagnostic Note Tail Light Input Signal Tail light input OFF or ON OFF: Taillight is not input
ON: Tail light is input-
- Body Electrical > Power Distribution Box > Data List
-
Tester Display Tail Light Input Signal - 50003 475 1290
- OK:
Display changes according to the taillight illumination condition.
- Result:
Proceed to OK NG
OK
NG
Turn the light control switch to the TAIL position.
Using the GTS, read the Data List.
- Body Electrical > Power Distribution Box > Data List
-
Tester Display Measurement Item Range Normal Condition Diagnostic Note Tail Light Fuse Shut Off Status Tail light fuse condition OFF or ON OFF: Taillight fuse not shut off
ON: Taillight fuse shut off-
- Body Electrical > Power Distribution Box > Data List
-
Tester Display Tail Light Fuse Shut Off Status - 50003 475 1293
- OK:
The Data List value displays "OFF".
- Result:
Proceed to OK NG
OK
NG
Using the GTS, read the Data List.
- Body Electrical > Power Distribution Box > Data List
-
Tester Display Measurement Item Range Normal Condition Diagnostic Note Tail Light Output Signal Tail light output OFF or ON OFF: Taillight is not output
ON: Tail light is output-
- Body Electrical > Power Distribution Box > Data List
-
Tester Display Tail Light Output Signal - 50003 475 1291
- OK:
Display changes according to the taillight illumination condition.
- Result:
Proceed to OK NG
OK
NG
Check vehicle type.
- Result:
Result Proceed to for TFTM Model A for GTMC Model B
A
B
Check vehicle type.
- Result:
Result Proceed to for LED Headlight A for Halogen Headlight B
A
B
Disconnect the A166 headlight assembly LH connector.
Turn the light control switch to the AUTO (OFF) position.
- NOTICE:
-
If the low beam headlights or clearance lights illuminate when the ignition switch is turned ON, shine a light on the automatic light control sensor to turn the low beam headlights off before operating the headlight dimmer switch.
Turn the light control switch to the TAIL position.
Using the GTS, read the Data List.
- Body Electrical > Power Distribution Box > Data List
-
Tester Display Measurement Item Range Normal Condition Diagnostic Note Tail Light Fuse Shut Off Status Tail light fuse condition OFF or ON OFF: Taillight fuse not shut off
ON: Taillight fuse shut off-
- Body Electrical > Power Distribution Box > Data List
-
Tester Display Tail Light Fuse Shut Off Status - 50003 475 1293
- OK:
The Data List value displays "OFF".
- Result:
Proceed to OK NG
OK
NG
Disconnect the A165 headlight assembly RH connector.
Turn the light control switch to the AUTO (OFF) position.
- NOTICE:
-
If the low beam headlights or clearance lights illuminate when the ignition switch is turned ON, shine a light on the automatic light control sensor to turn the low beam headlights off before operating the headlight dimmer switch.
Turn the light control switch to the TAIL position.
Using the GTS, read the Data List.
- Body Electrical > Power Distribution Box > Data List
-
Tester Display Measurement Item Range Normal Condition Diagnostic Note Tail Light Fuse Shut Off Status Tail light fuse condition OFF or ON OFF: Taillight fuse not shut off
ON: Taillight fuse shut off-
- Body Electrical > Power Distribution Box > Data List
-
Tester Display Tail Light Fuse Shut Off Status - 50003 475 1293
- OK:
The Data List value displays "OFF".
- Result:
Proceed to OK NG
OK
NG
Disconnect the O104 rear combination light assembly LH connector.
Turn the light control switch to the AUTO (OFF) position.
- NOTICE:
-
If the low beam headlights or clearance lights illuminate when the ignition switch is turned ON, shine a light on the automatic light control sensor to turn the low beam headlights off before operating the headlight dimmer switch.
Turn the light control switch to the TAIL position.
Using the GTS, read the Data List.
- Body Electrical > Power Distribution Box > Data List
-
Tester Display Measurement Item Range Normal Condition Diagnostic Note Tail Light Fuse Shut Off Status Tail light fuse condition OFF or ON OFF: Taillight fuse not shut off
ON: Taillight fuse shut off-
- Body Electrical > Power Distribution Box > Data List
-
Tester Display Tail Light Fuse Shut Off Status - 50003 475 1293
- OK:
The Data List value displays "OFF".
- Result:
Proceed to OK NG
OK
NG
Disconnect the O103 rear combination light assembly RH connector.
Turn the light control switch to the AUTO (OFF) position.
- NOTICE:
-
If the low beam headlights or clearance lights illuminate when the ignition switch is turned ON, shine a light on the automatic light control sensor to turn the low beam headlights off before operating the headlight dimmer switch.
Turn the light control switch to the TAIL position.
Using the GTS, read the Data List.
- Body Electrical > Power Distribution Box > Data List
-
Tester Display Measurement Item Range Normal Condition Diagnostic Note Tail Light Fuse Shut Off Status Tail light fuse condition OFF or ON OFF: Taillight fuse not shut off
ON: Taillight fuse shut off-
- Body Electrical > Power Distribution Box > Data List
-
Tester Display Tail Light Fuse Shut Off Status - 50003 475 1293
- OK:
The Data List value displays "OFF".
- Result:
Proceed to OK NG
OK
NG
Disconnect the O110 rear light assembly LH connector.
Turn the light control switch to the AUTO (OFF) position.
- NOTICE:
-
If the low beam headlights or clearance lights illuminate when the ignition switch is turned ON, shine a light on the automatic light control sensor to turn the low beam headlights off before operating the headlight dimmer switch.
Turn the light control switch to the TAIL position.
Using the GTS, read the Data List.
- Body Electrical > Power Distribution Box > Data List
-
Tester Display Measurement Item Range Normal Condition Diagnostic Note Tail Light Fuse Shut Off Status Tail light fuse condition OFF or ON OFF: Taillight fuse not shut off
ON: Taillight fuse shut off-
- Body Electrical > Power Distribution Box > Data List
-
Tester Display Tail Light Fuse Shut Off Status - 50003 475 1293
- OK:
The Data List value displays "OFF".
- Result:
Proceed to OK NG
OK
NG
Disconnect the O109 rear light assembly RH connector.
Turn the light control switch to the AUTO (OFF) position.
- NOTICE:
-
If the low beam headlights or clearance lights illuminate when the ignition switch is turned ON, shine a light on the automatic light control sensor to turn the low beam headlights off before operating the headlight dimmer switch.
Turn the light control switch to the TAIL position.
Using the GTS, read the Data List.
- Body Electrical > Power Distribution Box > Data List
-
Tester Display Measurement Item Range Normal Condition Diagnostic Note Tail Light Fuse Shut Off Status Tail light fuse condition OFF or ON OFF: Taillight fuse not shut off
ON: Taillight fuse shut off-
- Body Electrical > Power Distribution Box > Data List
-
Tester Display Tail Light Fuse Shut Off Status - 50003 475 1293
- OK:
The Data List value displays "OFF".
- Result:
Proceed to OK NG
OK
NG
Disconnect the O149 license plate light assembly LH connector.
Turn the light control switch to the AUTO (OFF) position.
- NOTICE:
-
If the low beam headlights or clearance lights illuminate when the ignition switch is turned ON, shine a light on the automatic light control sensor to turn the low beam headlights off before operating the headlight dimmer switch.
Turn the light control switch to the TAIL position.
Using the GTS, read the Data List.
- Body Electrical > Power Distribution Box > Data List
-
Tester Display Measurement Item Range Normal Condition Diagnostic Note Tail Light Fuse Shut Off Status Tail light fuse condition OFF or ON OFF: Taillight fuse not shut off
ON: Taillight fuse shut off-
- Body Electrical > Power Distribution Box > Data List
-
Tester Display Tail Light Fuse Shut Off Status - 50003 475 1293
- OK:
The Data List value displays "OFF".
- Result:
Proceed to OK NG
OK
NG
Disconnect the O148 license plate light assembly RH connector.
Turn the light control switch to the AUTO (OFF) position.
- NOTICE:
-
If the low beam headlights or clearance lights illuminate when the ignition switch is turned ON, shine a light on the automatic light control sensor to turn the low beam headlights off before operating the headlight dimmer switch.
Turn the light control switch to the TAIL position.
Using the GTS, read the Data List.
- Body Electrical > Power Distribution Box > Data List
-
Tester Display Measurement Item Range Normal Condition Diagnostic Note Tail Light Fuse Shut Off Status Tail light fuse condition OFF or ON OFF: Taillight fuse not shut off
ON: Taillight fuse shut off-
- Body Electrical > Power Distribution Box > Data List
-
Tester Display Tail Light Fuse Shut Off Status - 50003 475 1293
- OK:
The Data List value displays "OFF".
- Result:
Proceed to OK NG
OK
NG
Disconnect the cable from the negative (-) auxiliary battery terminal.
Disconnect the 10A and 10G power distribution box assembly connector.
Measure the resistance according to the value(s) in the table below.
- Standard Resistance:
Tester Connection Condition Specified Condition A166-5 (B) - Body ground Always 10 kΩ or higher A165-5 (B) - Body ground Always 10 kΩ or higher O104-1 (TL) - Body ground Always 10 kΩ or higher O103-1 (TL) - Body ground Always 10 kΩ or higher O149-1 (B) - Body ground Always 10 kΩ or higher O148-1 (B) - Body ground Always 10 kΩ or higher O110-4 (B) - Body ground Always 10 kΩ or higher O109-4 (B) - Body ground Always 10 kΩ or higher 10A-20 - Body ground Always 10 kΩ or higher 10G-15 - Body ground Always 10 kΩ or higher
- Result:
Proceed to OK NG
OK
NG
Disconnect the A160 headlight assembly LH connector.
Turn the light control switch to the AUTO (OFF) position.
- NOTICE:
-
If the low beam headlights or clearance lights illuminate when the ignition switch is turned ON, shine a light on the automatic light control sensor to turn the low beam headlights off before operating the headlight dimmer switch.
Turn the light control switch to the TAIL position.
Using the GTS, read the Data List.
- Body Electrical > Power Distribution Box > Data List
-
Tester Display Measurement Item Range Normal Condition Diagnostic Note Tail Light Fuse Shut Off Status Tail light fuse condition OFF or ON OFF: Taillight fuse not shut off
ON: Taillight fuse shut off-
- Body Electrical > Power Distribution Box > Data List
-
Tester Display Tail Light Fuse Shut Off Status - 50003 475 1293
- OK:
The Data List value displays "OFF".
- Result:
Proceed to OK NG
OK
NG
Disconnect the A159 headlight assembly RH connector.
Turn the light control switch to the AUTO (OFF) position.
- NOTICE:
-
If the low beam headlights or clearance lights illuminate when the ignition switch is turned ON, shine a light on the automatic light control sensor to turn the low beam headlights off before operating the headlight dimmer switch.
Turn the light control switch to the TAIL position.
Using the GTS, read the Data List.
- Body Electrical > Power Distribution Box > Data List
-
Tester Display Measurement Item Range Normal Condition Diagnostic Note Tail Light Fuse Shut Off Status Tail light fuse condition OFF or ON OFF: Taillight fuse not shut off
ON: Taillight fuse shut off-
- Body Electrical > Power Distribution Box > Data List
-
Tester Display Tail Light Fuse Shut Off Status - 50003 475 1293
- OK:
The Data List value displays "OFF".
- Result:
Proceed to OK NG
OK
NG
Disconnect the O104 rear combination light assembly LH connector.
Turn the light control switch to the AUTO (OFF) position.
- NOTICE:
-
If the low beam headlights or clearance lights illuminate when the ignition switch is turned ON, shine a light on the automatic light control sensor to turn the low beam headlights off before operating the headlight dimmer switch.
Turn the light control switch to the TAIL position.
Using the GTS, read the Data List.
- Body Electrical > Power Distribution Box > Data List
-
Tester Display Measurement Item Range Normal Condition Diagnostic Note Tail Light Fuse Shut Off Status Tail light fuse condition OFF or ON OFF: Taillight fuse not shut off
ON: Taillight fuse shut off-
- Body Electrical > Power Distribution Box > Data List
-
Tester Display Tail Light Fuse Shut Off Status - 50003 475 1293
- OK:
The Data List value displays "OFF".
- Result:
Proceed to OK NG
OK
NG
Disconnect the O103 rear combination light assembly RH connector.
Turn the light control switch to the AUTO (OFF) position.
- NOTICE:
-
If the low beam headlights or clearance lights illuminate when the ignition switch is turned ON, shine a light on the automatic light control sensor to turn the low beam headlights off before operating the headlight dimmer switch.
Turn the light control switch to the TAIL position.
Using the GTS, read the Data List.
- Body Electrical > Power Distribution Box > Data List
-
Tester Display Measurement Item Range Normal Condition Diagnostic Note Tail Light Fuse Shut Off Status Tail light fuse condition OFF or ON OFF: Taillight fuse not shut off
ON: Taillight fuse shut off-
- Body Electrical > Power Distribution Box > Data List
-
Tester Display Tail Light Fuse Shut Off Status - 50003 475 1293
- OK:
The Data List value displays "OFF".
- Result:
Proceed to OK NG
OK
NG
Disconnect the O110 rear light assembly LH connector.
Turn the light control switch to the AUTO (OFF) position.
- NOTICE:
-
If the low beam headlights or clearance lights illuminate when the ignition switch is turned ON, shine a light on the automatic light control sensor to turn the low beam headlights off before operating the headlight dimmer switch.
Turn the light control switch to the TAIL position.
Using the GTS, read the Data List.
- Body Electrical > Power Distribution Box > Data List
-
Tester Display Measurement Item Range Normal Condition Diagnostic Note Tail Light Fuse Shut Off Status Tail light fuse condition OFF or ON OFF: Taillight fuse not shut off
ON: Taillight fuse shut off-
- Body Electrical > Power Distribution Box > Data List
-
Tester Display Tail Light Fuse Shut Off Status - 50003 475 1293
- OK:
The Data List value displays "OFF".
- Result:
Proceed to OK NG
OK
NG
Disconnect the O109 rear light assembly RH connector.
Turn the light control switch to the AUTO (OFF) position.
- NOTICE:
-
If the low beam headlights or clearance lights illuminate when the ignition switch is turned ON, shine a light on the automatic light control sensor to turn the low beam headlights off before operating the headlight dimmer switch.
Turn the light control switch to the TAIL position.
Using the GTS, read the Data List.
- Body Electrical > Power Distribution Box > Data List
-
Tester Display Measurement Item Range Normal Condition Diagnostic Note Tail Light Fuse Shut Off Status Tail light fuse condition OFF or ON OFF: Taillight fuse not shut off
ON: Taillight fuse shut off-
- Body Electrical > Power Distribution Box > Data List
-
Tester Display Tail Light Fuse Shut Off Status - 50003 475 1293
- OK:
The Data List value displays "OFF".
- Result:
Proceed to OK NG
OK
NG
Disconnect the O149 license plate light assembly LH connector.
Turn the light control switch to the AUTO (OFF) position.
- NOTICE:
-
If the low beam headlights or clearance lights illuminate when the ignition switch is turned ON, shine a light on the automatic light control sensor to turn the low beam headlights off before operating the headlight dimmer switch.
Turn the light control switch to the TAIL position.
Using the GTS, read the Data List.
- Body Electrical > Power Distribution Box > Data List
-
Tester Display Measurement Item Range Normal Condition Diagnostic Note Tail Light Fuse Shut Off Status Tail light fuse condition OFF or ON OFF: Taillight fuse not shut off
ON: Taillight fuse shut off-
- Body Electrical > Power Distribution Box > Data List
-
Tester Display Tail Light Fuse Shut Off Status - 50003 475 1293
- OK:
The Data List value displays "OFF".
- Result:
Proceed to OK NG
OK
NG
Disconnect the O148 license plate light assembly RH connector.
Turn the light control switch to the AUTO (OFF) position.
- NOTICE:
-
If the low beam headlights or clearance lights illuminate when the ignition switch is turned ON, shine a light on the automatic light control sensor to turn the low beam headlights off before operating the headlight dimmer switch.
Turn the light control switch to the TAIL position.
Using the GTS, read the Data List.
- Body Electrical > Power Distribution Box > Data List
-
Tester Display Measurement Item Range Normal Condition Diagnostic Note Tail Light Fuse Shut Off Status Tail light fuse condition OFF or ON OFF: Taillight fuse not shut off
ON: Taillight fuse shut off-
- Body Electrical > Power Distribution Box > Data List
-
Tester Display Tail Light Fuse Shut Off Status - 50003 475 1293
- OK:
The Data List value displays "OFF".
- Result:
Proceed to OK NG
OK
NG
Disconnect the cable from the negative (-) auxiliary battery terminal.
Disconnect the 10A and 10G power distribution box assembly connector.
Measure the resistance according to the value(s) in the table below.
- Standard Resistance:
Tester Connection Condition Specified Condition A160-4 (B) - Body ground Always 10 kΩ or higher A159-4 (B) - Body ground Always 10 kΩ or higher O104-1 (TL) - Body ground Always 10 kΩ or higher O103-1 (TL) - Body ground Always 10 kΩ or higher O149-1 (B) - Body ground Always 10 kΩ or higher O148-1 (B) - Body ground Always 10 kΩ or higher O110-4 (B) - Body ground Always 10 kΩ or higher O109-4 (B) - Body ground Always 10 kΩ or higher 10A-20 - Body ground Always 10 kΩ or higher 10G-15 - Body ground Always 10 kΩ or higher
- Result:
Proceed to OK NG
OK
NG
Disconnect the A168 headlight assembly LH connector.
Turn the light control switch to the AUTO (OFF) position.
- NOTICE:
-
If the low beam headlights or clearance lights illuminate when the ignition switch is turned ON, shine a light on the automatic light control sensor to turn the low beam headlights off before operating the headlight dimmer switch.
Turn the light control switch to the TAIL position.
Using the GTS, read the Data List.
- Body Electrical > Power Distribution Box > Data List
-
Tester Display Measurement Item Range Normal Condition Diagnostic Note Tail Light Fuse Shut Off Status Tail light fuse condition OFF or ON OFF: Taillight fuse not shut off
ON: Taillight fuse shut off-
- Body Electrical > Power Distribution Box > Data List
-
Tester Display Tail Light Fuse Shut Off Status - 50003 475 1293
- OK:
The Data List value displays "OFF".
- Result:
Proceed to OK NG
OK
NG
Disconnect the A167 headlight assembly RH connector.
Turn the light control switch to the AUTO (OFF) position.
- NOTICE:
-
If the low beam headlights or clearance lights illuminate when the ignition switch is turned ON, shine a light on the automatic light control sensor to turn the low beam headlights off before operating the headlight dimmer switch.
Turn the light control switch to the TAIL position.
Using the GTS, read the Data List.
- Body Electrical > Power Distribution Box > Data List
-
Tester Display Measurement Item Range Normal Condition Diagnostic Note Tail Light Fuse Shut Off Status Tail light fuse condition OFF or ON OFF: Taillight fuse not shut off
ON: Taillight fuse shut off-
- Body Electrical > Power Distribution Box > Data List
-
Tester Display Tail Light Fuse Shut Off Status - 50003 475 1293
- OK:
The Data List value displays "OFF".
- Result:
Proceed to OK NG
OK
NG
Disconnect the O104 rear combination light assembly LH connector.
Turn the light control switch to the AUTO (OFF) position.
- NOTICE:
-
If the low beam headlights or clearance lights illuminate when the ignition switch is turned ON, shine a light on the automatic light control sensor to turn the low beam headlights off before operating the headlight dimmer switch.
Turn the light control switch to the TAIL position.
Using the GTS, read the Data List.
- Body Electrical > Power Distribution Box > Data List
-
Tester Display Measurement Item Range Normal Condition Diagnostic Note Tail Light Fuse Shut Off Status Tail light fuse condition OFF or ON OFF: Taillight fuse not shut off
ON: Taillight fuse shut off-
- Body Electrical > Power Distribution Box > Data List
-
Tester Display Tail Light Fuse Shut Off Status - 50003 475 1293
- OK:
The Data List value displays "OFF".
- Result:
Proceed to OK NG
OK
NG
Disconnect the O103 rear combination light assembly RH connector.
Turn the light control switch to the AUTO (OFF) position.
- NOTICE:
-
If the low beam headlights or clearance lights illuminate when the ignition switch is turned ON, shine a light on the automatic light control sensor to turn the low beam headlights off before operating the headlight dimmer switch.
Turn the light control switch to the TAIL position.
Using the GTS, read the Data List.
- Body Electrical > Power Distribution Box > Data List
-
Tester Display Measurement Item Range Normal Condition Diagnostic Note Tail Light Fuse Shut Off Status Tail light fuse condition OFF or ON OFF: Taillight fuse not shut off
ON: Taillight fuse shut off-
- Body Electrical > Power Distribution Box > Data List
-
Tester Display Tail Light Fuse Shut Off Status - 50003 475 1293
- OK:
The Data List value displays "OFF".
- Result:
Proceed to OK NG
OK
NG
Disconnect the O113 license plate light assembly LH connector.
Turn the light control switch to the AUTO (OFF) position.
- NOTICE:
-
If the low beam headlights or clearance lights illuminate when the ignition switch is turned ON, shine a light on the automatic light control sensor to turn the low beam headlights off before operating the headlight dimmer switch.
Turn the light control switch to the TAIL position.
Using the GTS, read the Data List.
- Body Electrical > Power Distribution Box > Data List
-
Tester Display Measurement Item Range Normal Condition Diagnostic Note Tail Light Fuse Shut Off Status Tail light fuse condition OFF or ON OFF: Taillight fuse not shut off
ON: Taillight fuse shut off-
- Body Electrical > Power Distribution Box > Data List
-
Tester Display Tail Light Fuse Shut Off Status - 50003 475 1293
- OK:
The Data List value displays "OFF".
- Result:
Proceed to OK NG
OK
NG
Disconnect the O112 license plate light assembly RH connector.
Turn the light control switch to the AUTO (OFF) position.
- NOTICE:
-
If the low beam headlights or clearance lights illuminate when the ignition switch is turned ON, shine a light on the automatic light control sensor to turn the low beam headlights off before operating the headlight dimmer switch.
Turn the light control switch to the TAIL position.
Using the GTS, read the Data List.
- Body Electrical > Power Distribution Box > Data List
-
Tester Display Measurement Item Range Normal Condition Diagnostic Note Tail Light Fuse Shut Off Status Tail light fuse condition OFF or ON OFF: Taillight fuse not shut off
ON: Taillight fuse shut off-
- Body Electrical > Power Distribution Box > Data List
-
Tester Display Tail Light Fuse Shut Off Status - 50003 475 1293
- OK:
The Data List value displays "OFF".
- Result:
Proceed to OK NG
OK
NG
Disconnect the cable from the negative (-) auxiliary battery terminal.
Disconnect the 10A and 10G power distribution box assembly connector.
Measure the resistance according to the value(s) in the table below.
- Standard Resistance:
Tester Connection Condition Specified Condition A168-7(B) - Body ground Always 10 kΩ or higher A167-7(B) - Body ground Always 10 kΩ or higher O104-1 (TL) - Body ground Always 10 kΩ or higher O103-1 (TL) - Body ground Always 10 kΩ or higher O113-1 (B) - Body ground Always 10 kΩ or higher O112-1 (B) - Body ground Always 10 kΩ or higher 10A-20 - Body ground Always 10 kΩ or higher 10G-15 - Body ground Always 10 kΩ or higher
- Result:
Proceed to OK NG
OK
NG