8ZR-FXE EMISSION CONTROL EXHAUST GAS TEMPERATURE SENSOR INSTALLATION
PROCEDURE

 89425A
1.INSTALL NO. 2 EXHAUST GAS TEMPERATURE SENSOR
89425A
1.INSTALL NO. 2 EXHAUST GAS TEMPERATURE SENSOR
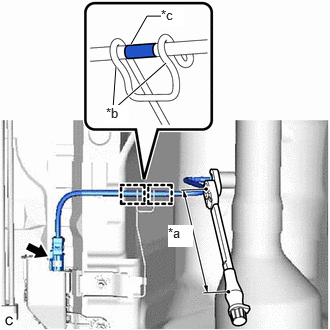
| *a | Torque Wrench Fulcrum Length |
| *b | Wire Harness Clamp |
| *c | Tube |
Using a 14 mm union nut wrench, install the No. 2 exhaust gas temperature sensor.
- NOTICE:
-
If the exhaust gas temperature sensor is dropped, replace it with a new one.
- Torque:
- 30 N*m (306 kgf*cm, 22 ft.*lbf)
- HINT:
-
Calculate the torque wrench reading when changing the fulcrum length of the torque wrench.
-
When using a union nut wrench (fulcrum length of 25 mm (0.984 in.)) + torque wrench (fulcrum length of 180 mm (7.09 in.)): 26.3 N*m (268 kgf*cm, 19 ft.*lbf)
Engage the wire harness clamp so that the tube is positioned as shown in the illustration.
Connect the connector.
2.INSTALL WIRE HARNESS CLAMP BRACKET
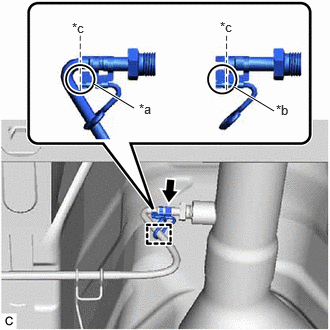
| *a | Correct |
| *b | Incorrect |
| *c | Standard Position |
Install the wire harness clamp bracket to the No. 2 exhaust gas temperature sensor.
- NOTICE:
-
Align the edge of the wire harness clamp bracket and No. 2 exhaust gas tenperature sensor as shown in the illustration.
89425
3.INSTALL NO. 1 EXHAUST GAS TEMPERATURE SENSOR
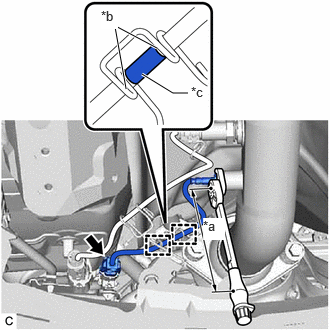
| *a | Torque Wrench Fulcrum Length |
| *b | Wire Harness Clamp |
| *c | Tube |
Using a 14 mm union nut wrench, install the No. 1 exhaust gas temperature sensor.
- NOTICE:
-
If the No. 1 exhaust gas temperature sensor is dropped, replace the new one.
- Torque:
- 30 N*m (306 kgf*cm, 22 ft.*lbf)
- HINT:
-
Calculate the torque wrench reading when changing the fulcrum length of the torque wrench.
-
When using a union nut wrench (fulcrum length of 25 mm (0.984 in.)) + torque wrench (fulcrum length of 180 mm (7.09 in.)): 26.3 N*m (268 kgf*cm, 19 ft.*lbf)
Engage the wire harness clamp so that the tube is positioned as shown in the illustration.
Connect the connector.
4.INSTALL WIRE HARNESS CLAMP BRACKET

| *a | Correct |
| *b | Incorrect |
| *c | Standard Position |
Install the wire harness clamp bracket to the No. 1 exhaust gas temperature sensor.
- NOTICE:
-
Align the edge of the wire harness clamp bracket and No. 1 exhaust gas tenperature sensor as shown in the illustration.
58166A
5.INSTALL FRONT FLOOR COVER LH
6.INSPECT FOR EXHAUST GAS LEAK