ADVANCED DRIVER ASSISTANCE SYSTEM FRONT CAMERA(except NR Series Engine) REMOVAL
CAUTION / NOTICE / HINT
The necessary procedures (adjustment, calibration, initialization, or registration) that must be performed after parts are replaced during forward recognition camera removal/installation are shown below.
| Replaced Part or Performed Procedure | Necessary Procedure | Effect/Inoperative Function when Necessary Procedures are not Performed | Link |
|---|---|---|---|
| Forward recognition camera | Update ECU security key | Vehicle Control History (RoB) are stored | ( 202304,999999,_V1,_143216,_0598316,RM100000002B3ML,) 202304,999999,_V1,_143216,_0598316,RM100000002B3ML,)
|
| Software version confirmation | ·
Front Camera System ·
Automatic High Beam System |
(202304,999999,_95,_139716,_0584199,RM1000000029F61,)
|
|
| Adjust forward recognition camera | ·
Front Camera System ·
Automatic High Beam System |
One Time Recognition:(202304,999999,_95,_139716,_0584196,RM1000000029F5M,)
Driving Adjustment:( 202304,999999,_95,_139716,_0584196,RM1000000029F5O,)
Camera Axis Adjustment Value Write:( 202304,999999,_95,_139716,_0584196,RM1000000029F5P,)
|
- NOTICE:
- ·
When replacing the forward recognition camera, replace it with a new one.
·Do not touch the camera lens or the front windshield glass in front of the camera.
·If the forward recognition camera has been struck or dropped, replace it with a new one.
·When replacing the windshield glass of a vehicle equipped with a forward recognition camera, make sure to use a Toyota genuine part. If a non-Toyota genuine part is used, the forward recognition camera may not be able to be installed due to a missing bracket. Also, the front camera system or automatic high beam system may not operate properly due to a difference in the transmissivity or black ceramic border.
PROCEDURE

 86466E
1.REMOVE NO. 2 FORWARD RECOGNITION COVER
86466E
1.REMOVE NO. 2 FORWARD RECOGNITION COVER
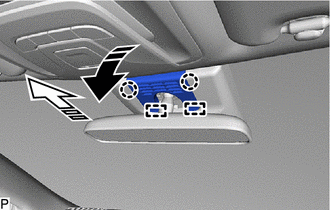

|
Remove in this Direction (1) |

|
Remove in this Direction (2) |
Pull the No. 2 forward recognition cover in the direction indicated by the arrow (1) shown in the illustration to disengage the 2 claws.
- NOTICE:
-
If these claws are disengaged separately, they may break. Insert a molding remover between them and pull it down to disengage the claws simultaneously.
Pull the No. 2 forward recognition cover in the direction indicated by the arrow (2) shown in the illustration to disengage the 2 guides and remove the No. 2 forward recognition cover.
86466D
2.REMOVE NO. 1 FORWARD RECOGNITION COVER
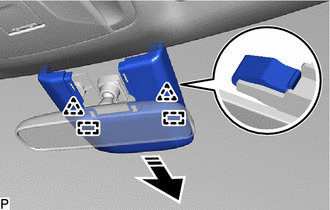
|
|
Remove in this Direction |
Disengage the 2 clips and 2 guides to remove the No. 1 forward recognition cover as shown in the illustration.
- NOTICE:
-
To avoid damaging the guides, always slide the No. 1 forward recognition cover parallel to the windshield glass.
8646C
3.REMOVE FORWARD RECOGNITION CAMERA
- NOTICE:
-
If the forward recognition camera has been struck or dropped, replace it with a new one.
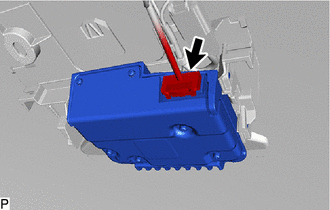
Disconnect the connector.
- NOTICE:
-
Do not pull the harness forcibly when disconnecting the connector.
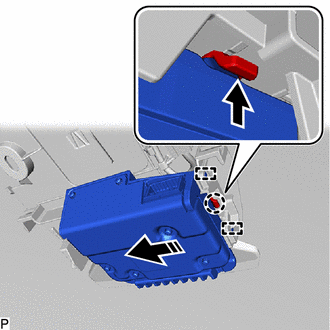

|
Push |
|
|
Remove in this Direction |
Disengage the claw and 2 guides as shown in the illustration.
- NOTICE:
- ·
Do not touch the camera lens.
·If the forward recognition camera bracket is deformed or damaged, replace it together with the windshield glass.

|
|
Remove in this Direction (1) |
|
|
Remove in this Direction (2) |
Disengage the guide to remove the forward recognition camera as shown in the illustration.
- NOTICE:
- ·
Do not touch the camera lens.
·If the forward recognition camera bracket is deformed or damaged, replace it together with the windshield glass.
86461
4.REMOVE FORWARD RECOGNITION HOOD
- HINT:
-
Perform this procedure only when replacement of the forward recognition hood is necessary.
- NOTICE:
-
If the inner surface of the windshield glass in the area in front of the forward recognition camera is dirty, remove the forward recognition hood, clean the glass, then reinstall the forward recognition hood and forward recognition camera.
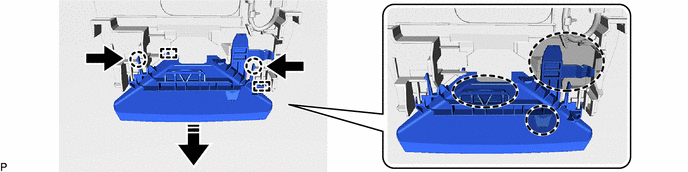
Disengage the 2 claws as shown in the illustration.
|
|
Push |
|
Remove in this Direction |

|
Do not touch | - | - |
As shown in the illustration, slide the 2 claws of the 2 guides parallel to the surface of the glass to remove the forward recognition hood.
- NOTICE:
-
Do not touch the areas shown in the illustration as application of load may cause bending.