AUDIO / VIDEO AUDIO AND VISUAL SYSTEM(for Radio and Display Type) DTC CHECK / CLEAR
CHECK DTC (CHECK USING GTS)
Connect the GTS to the DLC3.
Turn the ignition switch to ON and wait for 90 seconds.
Turn the GTS on.
Enter the following menus: Body Electrical / Navigation System / Trouble Codes.
- Body Electrical > Navigation System > Trouble Codes
- 50001 212
Check for DTCs, and then write them down.
CLEAR DTC (CLEAR USING GTS)
Connect the GTS to the DLC3.
Turn the ignition switch to ON and wait for 90 seconds.
Turn the GTS on.
Enter the following menus: Body Electrical / Navigation System / Trouble Codes.
- Body Electrical > Navigation System > Clear DTCs
- 50002 212
Clear the DTCs.
START DIAGNOSTIC MODE
- HINT:
- ·
Illustrations may differ from the actual vehicle screen depending on the device settings and options. Therefore, some detailed areas may not be shown exactly the same as on the actual vehicle screen.
·Start diagnostic mode at least 90 seconds after turning the ignition switch to ON. Otherwise, some items cannot be checked.
There are 4 methods to start diagnostic mode. Start diagnostic mode by using one of them.
Method 1
Turn the ignition switch to ON.
While pressing and holding the "AUDIO" switch, operate the light control switch: Off → Tail → Off → Tail → Off → Tail → Off.
Diagnostic mode will start and the "Service Menu" screen will be displayed.
Method 2
Connect the GTS to the DLC3.
Turn the ignition switch to ON.
Turn the GTS on.
Enter the following menus: Body Electrical / Navigation System / Utility / Diagnostic Mode.
- Body Electrical > Navigation System > Utility
-
Tester Display Diagnostic Mode - 50005 212 4501
Diagnostic mode will start and the "Service Menu" screen will be displayed.
Method 3
Turn the ignition switch to ON.
Press the seek/track up panel switch 5 times and then press the seek/track down panel switch 5 times with the screen and audio turned off.
- HINT:
- ·
Diagnostic mode can only be started if the above operation is completed within 15 seconds of the first press of the seek/track up panel switch.
·If the operation is not completed within 15 seconds of the first press of the seek/track panel switch or fails, turn the screen and audio on and then off again before attempting to start diagnostic mode.
Diagnostic mode will start and the "Service Menu" screen will be displayed.
Method 4
- NOTICE:
- ·
Do not touch the multi-display except when necessary.
·Since the multi-display may recognize a pinch in/out or flick operation if operated with 2 fingers, always use 1 finger to operate it in diagnostic mode.
Turn the ignition switch to ON.
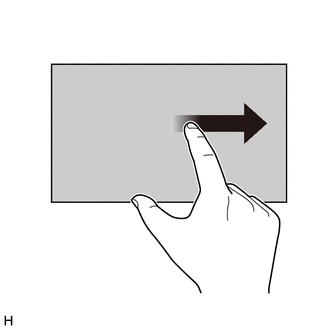
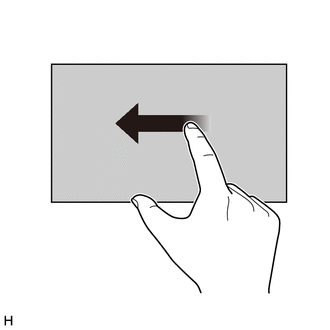
Perform a flick operation on the multi-display screen from the left to the right 5 times and then perform a flick operation from the right to left 5 times with the screen and audio turned off as shown in the illustration.
- HINT:
- ·
Diagnostic mode can only be started if the above operation is completed within 15 seconds of the first flick from the left to the right.
·If the operation is not completed within 15 seconds of the first flick from the left to the right or fails, turn the screen and audio on and then off before attempting to start diagnostic mode again.
·Flick operations can be recognized anywhere within the touch area of the multi-display screen.
Diagnostic mode will start and the "Service Menu" screen will be displayed.
FAILURE DIAGNOSIS
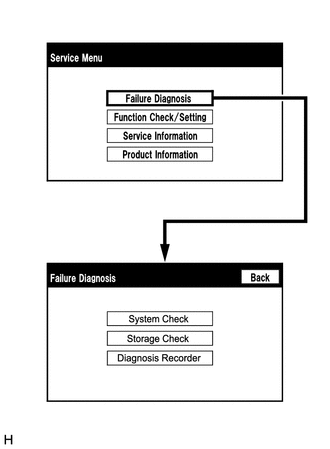
The "Failure Diagnosis" screen will be displayed by selecting "Failure Diagnosis" on the "Service Menu" screen.
SYSTEM CHECK
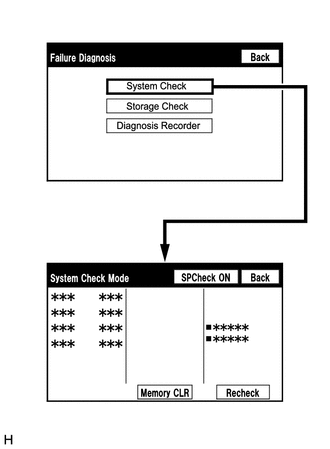
The "System Check Mode" screen will be displayed by selecting "System Check" on the "Failure Diagnosis" screen.
CHECK DTC (CHECK USING SYSTEM CHECK MODE SCREEN)
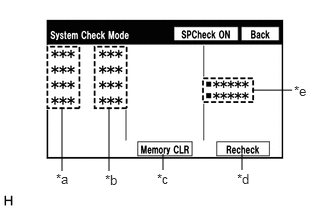
System check mode screen description
| Display | Content |
|---|---|
|
*: w/ AUX Function |
|
| *a: Device name list No. 1 | ·
Device Name List No. 1 displays some of the devices that make up the audio and visual system. ·
The names of the components from Device Name List No. 1 are shown in the following table. |
| *b: Check result | Result codes for all devices are displayed. |
| *c: Memory clear | ·
Present and history DTCs and registered connected device names are cleared. ·
Select "Memory CLR" for 3 seconds. |
| *d: Recheck | ·
A system check will be performed again after the memory is cleared. ·
"Recheck" will dim during a system check. |
| *e: Device name list No. 2* | ·
Device Name List No. 2 displays some of the devices that make up the audio and visual system. ·
The names of the components from Device Name List No. 2 are shown in the following table. |
| Name | Component | Connection Method |
|---|---|---|
| DCU | Radio and display receiver assembly | - |
| CAA | Television camera assembly*1 | CAN communication line |
| CAMERA-M | Parking assist ECU*2 | CAN communication line |
*1: w/ Parking Assist Monitor System
*2: w/ Panoramic View Monitor System
| Result | Meaning | Action |
|---|---|---|
| OK | The device does not respond with a DTC. | - |
| DETAIL | The device responds with a DTC. | Read the DTCs on the "Unit Check Mode" screen. |
| NCON | The device was previously present, but did not respond in diagnostic mode. | ·
Check the vehicle wire harness. ·
Check the power supply circuit of the device. |
| Name | Component | Connection Method |
|---|---|---|
| AUX/VTR* | No. 1 stereo jack adapter assembly | Vehicle wire harness |
*: w/ AUX Function
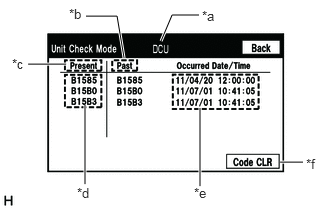
Unit check mode screen description
| Display | Content |
|---|---|
| *a: Device name | Target device |
| *b: History DTC | Diagnostic memory results and stored DTCs are displayed. |
| *c: Present DTC | DTCs output in the service check are displayed. |
| *d: DTC | DTC (Diagnostic Trouble Code) |
| *e: Timestamp | The time and date of history DTCs are displayed. (The year is displayed in 2-digit format.) |
| *f: Diagnosis clear | Selecting "Code CLR" for 3 seconds clears the diagnostic memory data of the target device (both diagnostic system check result and the displayed data are cleared). |
- HINT:
- ·
This screen is updated once per second.
·A maximum of 6 DTCs can be displayed for history and present DTCs.
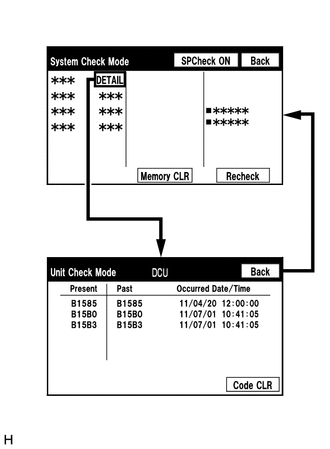
Read the system check result.
If the check result is "DETAIL", select the displayed check result to view the results on the "Unit Check Mode" screen and record them.
- NOTICE:
-
A maximum of 6 DTCs can be displayed for history and present DTCs on the "Unit Check Mode" screen. Therefore, when 6 DTCs are displayed, troubleshoot those DTCs first and then check the "Unit Check Mode" screen again to see if any other DTCs are displayed.
- HINT:
- ·
When all results are "OK", no DTCs are output.
·When proceeding to view the results of another device, select "Back" to return to the "System Check Mode" screen. Repeat the above step to view the results of other devices.
DTC CLEAR/RECHECK (CLEAR USING SYSTEM CHECK MODE SCREEN)
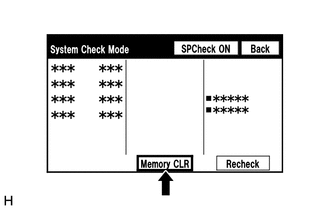
Clear the DTCs
Select "Memory CLR" for 3 seconds.
Check that the check results are cleared.
- HINT:
- ·
To clear the DTCs for a specific device, use the "Unit Check Mode" screen.
·When clearing the DTCs using the "Unit Check Mode" screen, select "Code CLR" for 3 seconds.
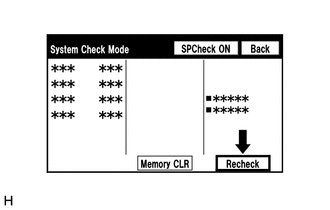
Recheck
Select "Recheck".
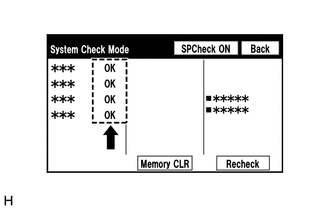
Check that all diagnostic codes are "OK" when the check results are displayed. If a result other than "OK" is displayed, perform troubleshooting again.
- HINT:
-
When the DTCs are cleared using the "Unit Check Mode" screen, select "Back" to return to the "System Check Mode" screen and perform this operation.
FINISH DIAGNOSTIC MODE
Turn the ignition switch off.