SEAT FRONT SEAT ASSEMBLY(for Sliding Bench Seat Type) REASSEMBLY
CAUTION / NOTICE / HINT
- CAUTION:
- ·
Wear protective gloves. Sharp areas on the parts may injure your hands.
·There is risk of injury.
- HINT:
- ·
Use the same procedure for RHD and LHD vehicles.
·The procedure listed below is for LHD vehicles.
PROCEDURE

 72211F
1.INSTALL SEAT TRACK ADJUSTING HANDLE RH
72211F
1.INSTALL SEAT TRACK ADJUSTING HANDLE RH
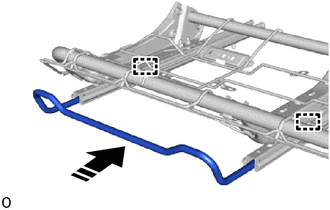

|
Install in this Direction |
Attach the guide and install the seat track adjusting handle RH as shown in the illustration.
2.INSTALL SCREW GROMMET (for Wagon)
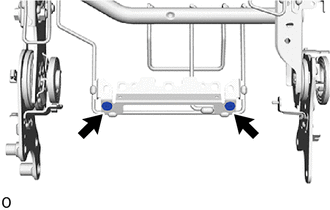
Install the 2 screw grommets.
3.INSTALL FRONT SEATBACK ASSEMBLY RH
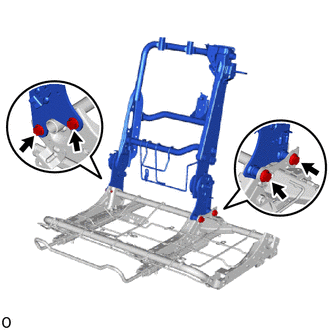
Install the front seatback assembly RH with the 4 bolts.
- Torque:
- 42 N*m (428 kgf*cm, 31 ft.*lbf)
72580C
4.INSTALL RH SEAT RECLINING ADJUSTING CABLE ASSEMBLY
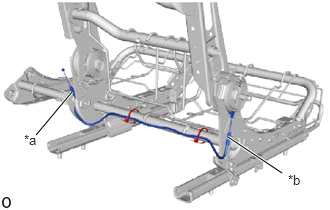
| *a | Pink Cable Color |
| *b | White Cable Color |
Install the RH seat reclining adjusting cable assembly with 2 new cable ties.
Cut off the end of the cable tie.
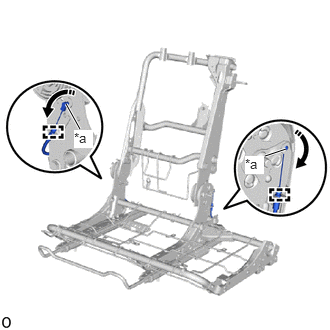
| *a | Cable End |
|
|
Move in this Direction |
Connect the 2 cable ends by moving them in the direction of the arrows in the illustration.
Attach the cable clamp.
71H76
5.INSTALL RH SEAT RECLINING ADJUSTER INSIDE COVER RH
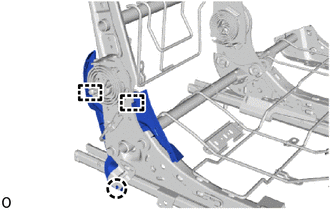
Attach the guide and claw and install the RH seat reclining adjuster inside cover RH.
71H75A
6.INSTALL RH SEAT RECLINING ADJUSTER INSIDE COVER
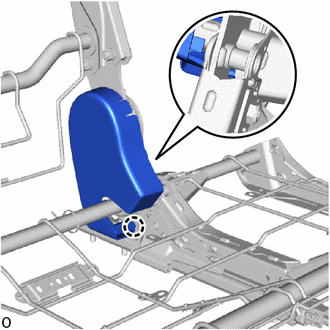
Attach the claw and install the RH seat reclining adjuster inside cover.
71862M
7.INSTALL FRONT SEAT INNER NO. 2 CUSHION SHIELD LH
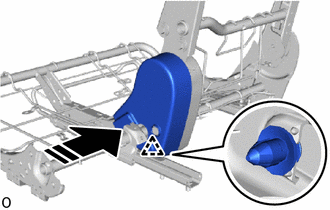
|
|
Install in this Direction |
Attach the clip as shown in the illustration.
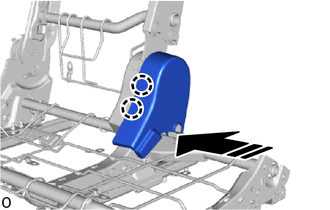
|
|
Install in this Direction |
Attach the claw as shown in the illustration.
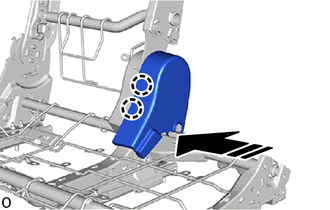
|
|
Install in this Direction |
Attach the claw and install the front seat inner No. 2 cushion shield LH as shown in the illustration.
73187
8.INSTALL FRONT SEAT SHOULDER BELT GUIDE
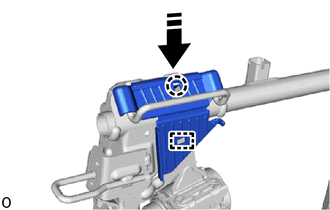
|
|
Install in this Direction |
Attach the guide and claw and install the front seat shoulder belt guide as shown in the illustration.
73120
9.INSTALL FRONT SEAT 3 POINT TYPE BELT ASSEMBLY LH
71H75B
10.INSTALL RH SEATBACK FRAME RECLINING ADJUSTER INSIDE COVER
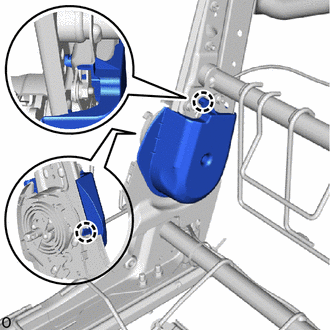
Attach the claw and install the RH seatback frame reclining adjuster inside cover.
89178C
11.INSTALL NO. 2 AIRBAG BRACKET (w/ Front Seat Side Airbag)
73910B
12.INSTALL FRONT SEAT AIRBAG ASSEMBLY RH (w/ Front Seat Side Airbag)
74810L
13.INSTALL FRONT PROTECTOR ASSEMBLY RH
for Van:
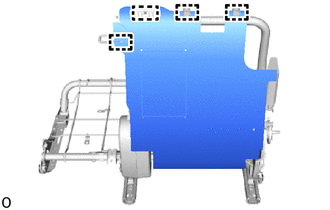
Attach the guide.
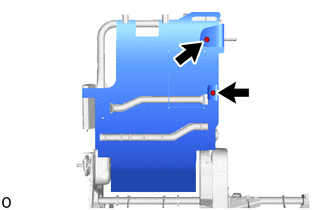
Install the front protector assembly RH with the 2 clips.
for Wagon:
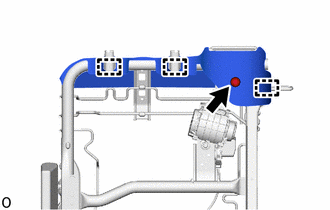
Attach the guide.
Install the front protector assembly RH with the clip.
71551A
14.INSTALL FRONT SEATBACK PAD RH
Install the front seatback pad RH.
for Wagon:
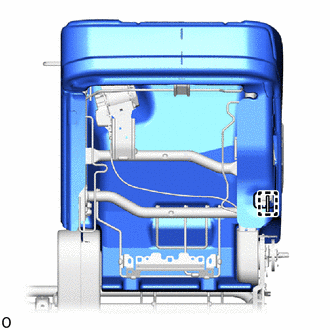
Attach the hook.
79158
15.INSTALL SEATBACK COVER PLATE RH
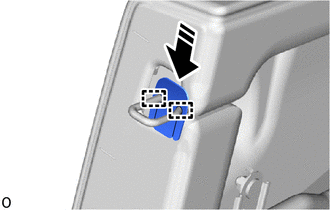
|
|
Install in this Direction |
Attach the guide and install the seatback cover plate RH as shown in the illustration.
16.INSTALL SEAT COVER WIRE
for Van:
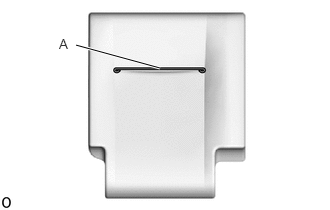
Install the seat cover wire.
- HINT:
- ·
Wire 1000 mm (3.28 ft.) or longer and shaped wire are available as supplied parts.
·For wire 1000 mm (3.28 ft.) or less in length, cut or shape 1000 mm (3.28 ft.) wire into the dimensions shown in the illustration.
·Make sure to read the Precaution section before preparing the wire.
- Dimensions:
A 250 mm (9.84 in.)
- HINT:
-
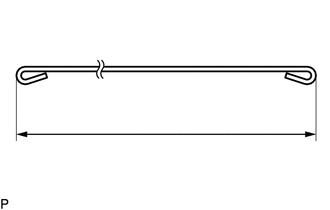
-
The dimensions shown in the illustration are the length.
for Wagon:
Install the seat cover wire.
- HINT:
- ·
Wire 1000 mm (3.28 ft.) or longer and shaped wire are available as supplied parts.
·For wire 1000 mm (3.28 ft.) or less in length, cut or shape 1000 mm (3.28 ft.) wire into the dimensions shown in the illustration.
·Make sure to read the Precaution section before preparing the wire.
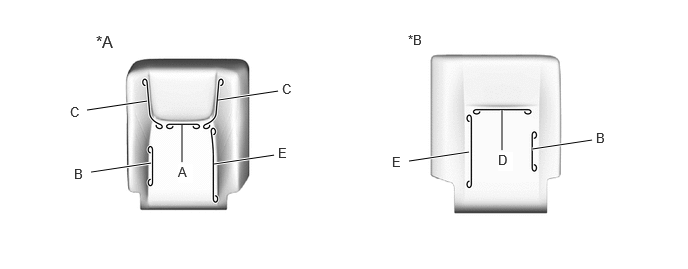
| *A | for Type A | *B | for Type B |
- Dimensions:
A 110 mm (4.33 in.) B 150 mm (5.91 in.) C 200 mm (7.87 in.) D 250 mm (9.84 in.) E 360 mm (1.18 ft.)
- HINT:
-
-
The dimensions shown in the illustration are the length.
71073A
17.INSTALL FRONT SEATBACK COVER SUB-ASSEMBLY RH
- HINT:
-
When installing a front seatback cover sub-assembly RH, refer to the Precaution section in order to prevent wrinkles from forming.
w/ Front Seat Side Airbag:
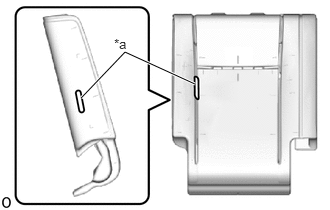
| *a | Hole |
Pass the bracket of the front seatback cover sub-assembly RH through the hole of the front seatback pad RH.
for Van:
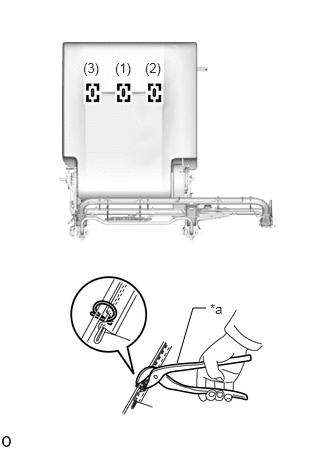
| *a | Hog Ring Pliers |
Using hog ring pliers, install the front seatback cover sub-assembly RH with 3 new hog rings in the order indicated in the illustration.
- NOTICE:
- ·
Be careful not to dirty or damage the front seatback cover sub-assembly RH.
- ·
Be sure to securely install the hog rings as shown in the illustration while preventing wrinkles from forming on the front seatback cover sub-assembly RH.
for Wagon:
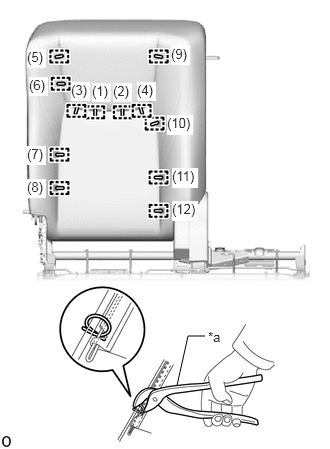
| *a | Hog Ring Pliers |
for Type A:
Using hog ring pliers, install the front seatback cover sub-assembly RH with 12 new hog rings in the order indicated in the illustration.
- NOTICE:
- ·
Be careful not to dirty or damage the front seatback cover sub-assembly RH.
- ·
Be sure to securely install the hog rings as shown in the illustration while preventing wrinkles from forming on the front seatback cover sub-assembly RH.
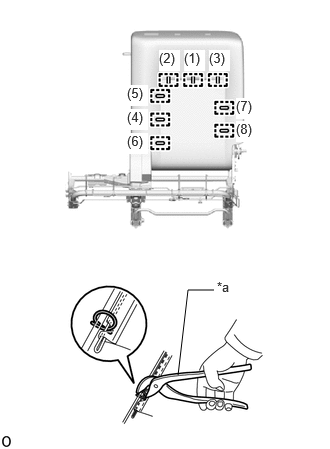
| *a | Hog Ring Pliers |
for Type B:
Using hog ring pliers, install the front seatback cover sub-assembly LH with 8 new hog rings in the order indicated in the illustration.
- NOTICE:
- ·
Be careful not to dirty or damage the front seatback cover sub-assembly LH.
- ·
Be sure to securely install the hog rings as shown in the illustration while preventing wrinkles from forming on the front seatback cover sub-assembly LH.

|
|
Install in this Direction |
Attach the claw and install the 2 front seat headrest support assemblies as shown in the illustration.
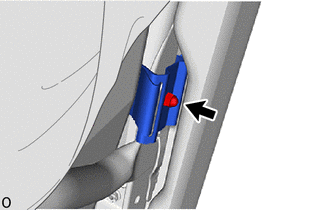
w/ Front Seat Side Airbag:
Install the bracket of the front seatback cover sub-assembly RH with a new nut.
- Torque:
- 12.5 N*m (127 kgf*cm, 9 ft.*lbf)
- CAUTION:
-
Do not reuse the nut.
for Van:
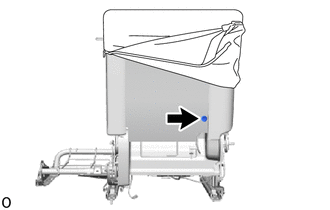
Install the clip.
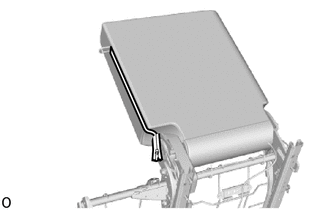
Close the fastener.
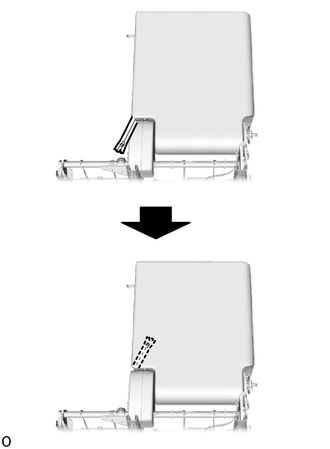
Insert the fastener.
Attach the hook.

|
Fastening Tape | - | - |
Attach the fastening tape.
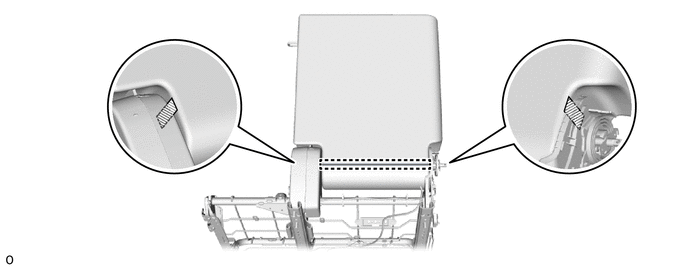
for Wagon:
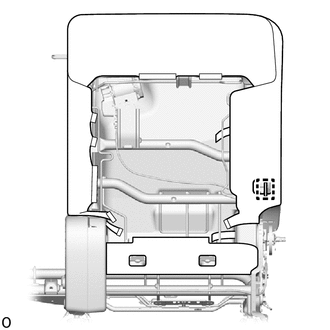
Attach the hook.
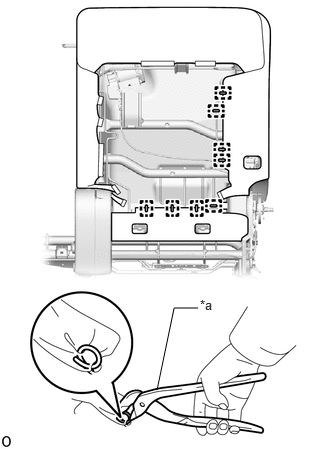
| *a | Hog Ring Pliers |
Using hog ring pliers, install 8 new hog rings.
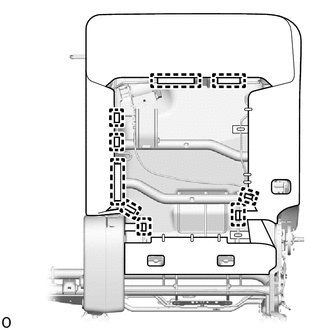
Attach the hook.
71705F
18.INSTALL FRONT SEATBACK BOARD SUB-ASSEMBLY RH (for Wagon)
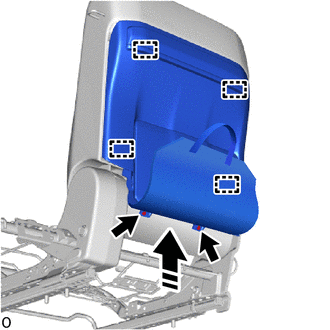
|
|
Install in this Direction |
Attach the hook as shown in the illustration.
Install the front seatback board sub-assembly RH with the 2 screws.
73178A
19.INSTALL SEAT BELT ANCHOR COVER CAP
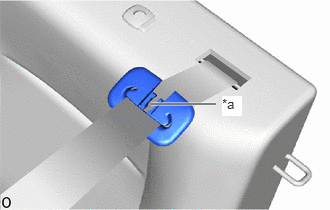
| *a | Slit |
Pass the front seat 3 point type belt assembly LH through the slit of rear seat shoulder belt cover.
for Van:
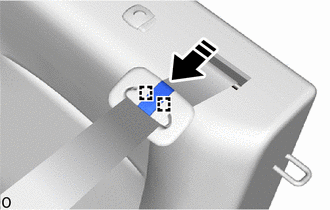
|
|
Install in this Direction |
Attach the guide and install the seat belt anchor cover cap as shown in the illustration.
for Wagon:
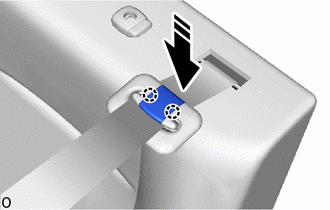
|
|
Install in this Direction |
Attach the claw and install the seat belt anchor cover cap as shown in the illustration.
73373
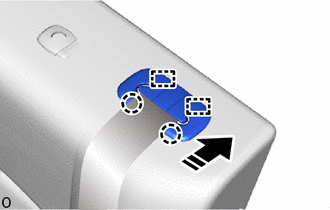
20.INSTALL REAR SEAT SHOULDER BELT COVER
|
|
Install in this Direction |
Attach the guide and claw and install the rear seat shoulder belt cover as shown in the illustration.
78970G
21.INSTALL FRONT SEATBACK LOCK BAND ASSEMBLY RH (w/ Center Seatback Board)
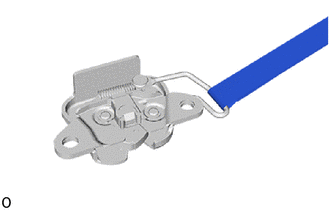
Install the front seatback lock band assembly RH.
72510H
22.INSTALL FRONT SEATBACK LOCK ASSEMBLY RH
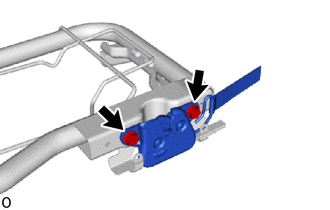
Install the front seatback lock assembly RH with the 2 bolts.
- Torque:
- 21 N*m (214 kgf*cm, 15 ft.*lbf)
71365A
23.INSTALL CENTER SEATBACK PAD
Install the center seatback pad.
74820L
24.INSTALL FRONT PROTECTOR ASSEMBLY LH (w/o Center Seatback Board)
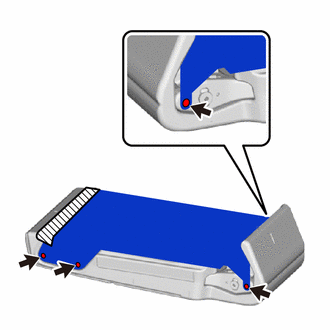
|
|
Tape |
Attach the the 4 clips and front protector assembly LH.
Attach the tape.
- NOTICE:
-
Do not reuse the front protector assembly LH and center seatback pad.
71095
25.INSTALL CENTER SEATBACK COVER SUB-ASSEMBLY
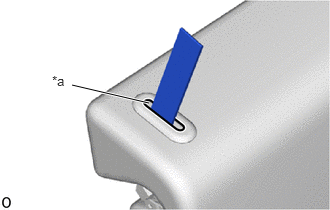
| *a | Hole |
w/ Center Seatback Board:
Pass the front seatback lock band assembly RH through the hole of the center seatback pad and center seatback cover sub-assembly.
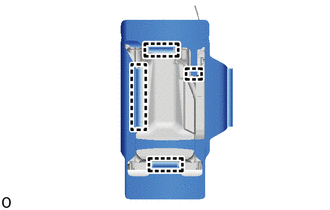
Attach the hook.
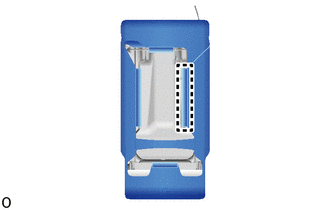
Attach the hook and install the center seatback cover sub-assembly.
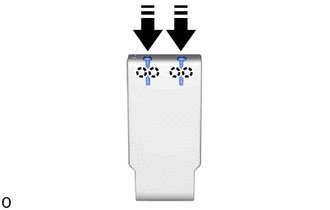
|
|
Install in this Direction |
Attach the claw and install the 2 front center seat headrest support assemblies as shown in the illustration.
for RHD, w/o Center Seatback Board:
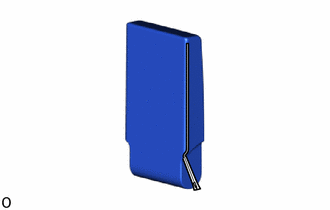
Close the fastener.
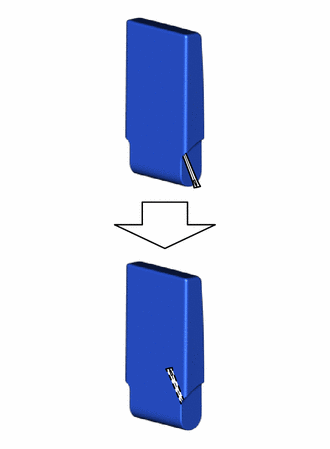
Insert the fastener.
Attach the hook, fastening tape and install the center seatback cover sub-assembly.

|
|
Fastening Tape | - | - |
|
|
Install in this Direction |
Attach the claw and install the 2 front center seat headrest support assemblies as shown in the illustration.
71705H
26.INSTALL FRONT CENTER SEATBACK BOARD SUB-ASSEMBLY RH (w/ Center Seatback Board)
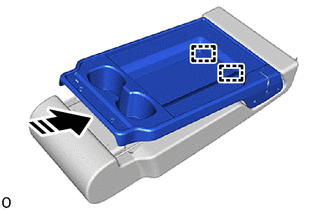
|
|
Install in this Direction |
Attach the guide as shown in the illustration.
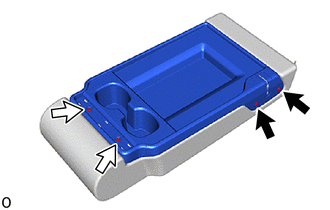

|
Clip |

|
Screw |
Install the 2 clips.
Install the front center seatback board sub-assembly RH with the 2 screws.
71784A
27.INSTALL FRONT SEATBACK BOARD CAP (w/ Center Seatback Board)
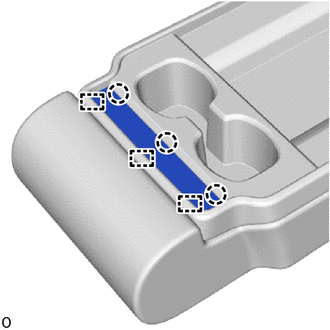
Attach the claw and guide and install the front seatback board cap.
72521
28.INSTALL LOWER RECLINING ADJUSTER ARM RH
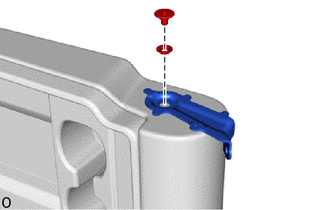
Using a T45 "TORX" socket wrench, install the lower reclining adjuster arm RH with the front seat reclining spacer RH and "TORX" screw.
- Torque:
- 21 N*m (214 kgf*cm, 15 ft.*lbf)
71397F
29.INSTALL CENTER SEAT UPPER HINGE COVER RH
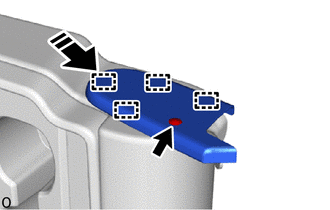
|
|
Install in this Direction |
Attach the guide as shown in the illustration.
Install the center seat upper hinge cover RH with the clip.
71811U
30.INSTALL BENCH TYPE FRONT SEAT CUSHION SHIELD
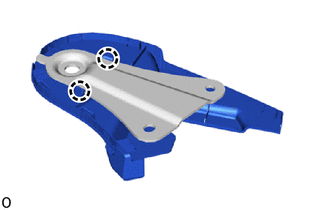
Attach the claw and install the bench type front seat cushion shield.
71387A
31.INSTALL CENTER SEAT LOWER HINGE ARM RH
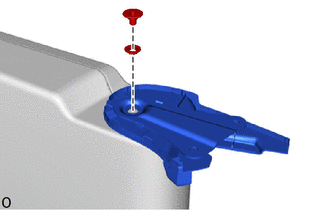
Using a T45 "TORX" socket wrench, install the center seat lower hinge arm RH with the front seat reclining spacer LH and "TORX" screw.
- Torque:
- 21 N*m (214 kgf*cm, 15 ft.*lbf)
32.INSTALL CENTER SEATBACK ASSEMBLY
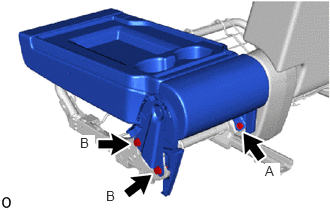
Temporalily install the center seatback assembly with the 3 bolts.
Tighten the 3 bolts.
- Torque:
- Bolt A : 21 N*m (214 kgf*cm, 15 ft.*lbf)
- Bolt B : 42 N*m (428 kgf*cm, 31 ft.*lbf)
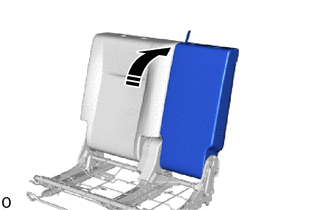
|
|
Move in this Direction |
w/ Center Seatback Board:
Move the center seatback assembly as shown in the illustration.
for RHD, w/ Center Seatback Board:
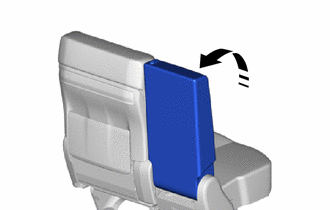
|
|
Move in this Direction |
Move the center seatback assembly as shown in the illustration.
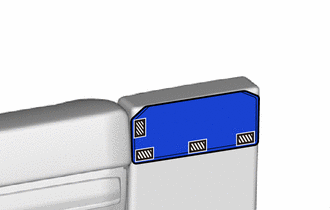
|
|
Fastening Tape |
Attach the fastening tape.
33.INSTALL SEAT COVER WIRE
for Van:
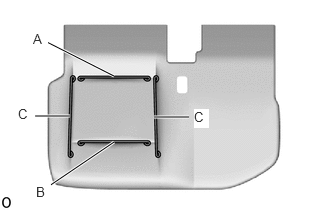
Install the seat cover wire.
- HINT:
- ·
Wire 1000 mm (3.28 ft.) or longer and shaped wire are available as supplied parts.
·For wire 1000 mm (3.28 ft.) or less in length, cut or shape 1000 mm (3.28 ft.) wire into the dimensions shown in the illustration.
·Make sure to read the Precaution section before preparing the wire.
- Dimensions:
A 280 mm (11.02 in.) B 300 mm (11.8 in.) C 350 mm (1.15 ft.)
- HINT:
-
-
The dimensions shown in the illustration are the length.
for Wagon:
Install the seat cover wire.
- HINT:
- ·
Wire 1000 mm (3.28 ft.) or longer and shaped wire are available as supplied parts.
·For wire 1000 mm (3.28 ft.) or less in length, cut or shape 1000 mm (3.28 ft.) wire into the dimensions shown in the illustration.
·Make sure to read the Precaution section before preparing the wire.
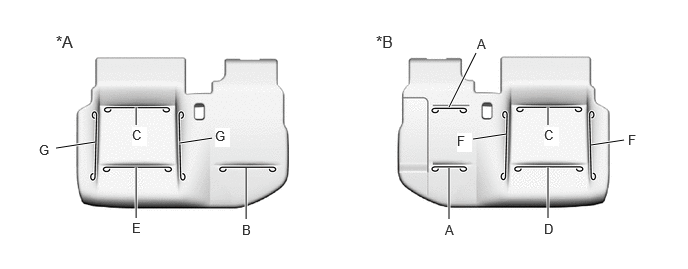
| *A | for Type A | *B | for Type B |
- Dimensions:
A 150 mm (5.91 in.) B 240 mm (9.45 in.) C 280 mm (11.02 in.) D 290 mm (11.42 in.) E 300 mm (11.8 in.) F 340 mm (1.12 ft.) G 350 mm (1.15 ft.)
- HINT:
-
-
The dimensions shown in the illustration are the length.
71071
34.INSTALL FRONT SEAT CUSHION COVER SUB-ASSEMBLY RH
- HINT:
-
When installing a front seat cushion cover sub-assembly RH, refer to the Precaution section in order to prevent wrinkles from forming.
for Van:
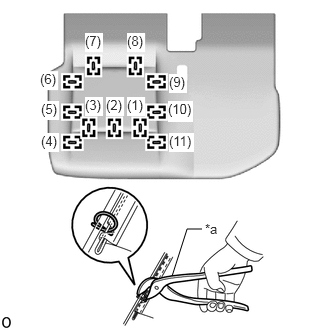
| *a | Hog Ring Pliers |
Using hog ring pliers, install the front seat cushion cover sub-assembly RH with 11 new hog rings in the order indicated in the illustration.
- NOTICE:
- ·
Be careful not to dirty or damage the front seat cushion cover sub-assembly RH.
- ·
Be sure to securely install the hog rings as shown in the illustration while preventing wrinkles from forming on the front seat cushion cover sub-assembly RH.
for Wagon:
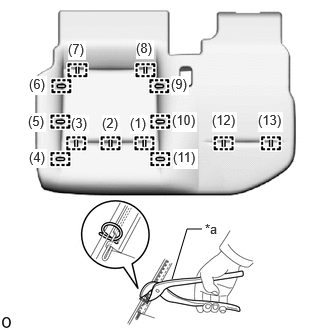
| *a | Hog Ring Pliers |
for Type A:
Using hog ring pliers, install the front seat cushion cover sub-assembly RH with 13 new hog rings in the order indicated in the illustration.
- NOTICE:
- ·
Be careful not to dirty or damage the front seat cushion cover sub-assembly RH.
- ·
Be sure to securely install the hog rings as shown in the illustration while preventing wrinkles from forming on the front seat cushion cover sub-assembly RH.
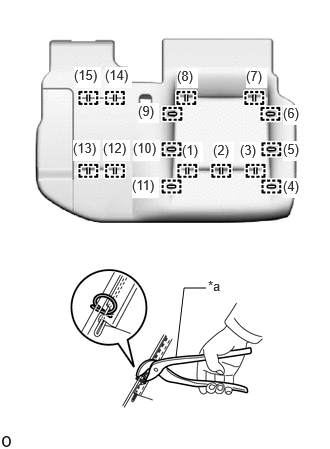
| *a | Hog Ring Pliers |
for Type B:
Using hog ring pliers, install the front seat cushion cover sub-assembly LH with 15 new hog rings in the order indicated in the illustration.
- NOTICE:
- ·
Be careful not to dirty or damage the front seat cushion cover sub-assembly LH.
- ·
Be sure to securely install the hog rings as shown in the illustration while preventing wrinkles from forming on the front seat cushion cover sub-assembly LH.
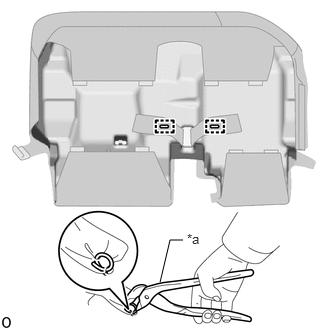
| *a | Hog Ring Pliers |
Using hog ring pliers, install the 2 new hog rings.
- NOTICE:
- ·
Be careful not to dirty or damage the front seat cushion cover sub-assembly RH.
- ·
Be sure to securely install the hog rings as shown in the illustration while preventing wrinkles from forming on the front seat cushion cover sub-assembly RH.
35.INSTALL FRONT SEAT CUSHION COVER WITH PAD
Set the front seat cushion cover with pad.
w/ Seat Belt Warning System:
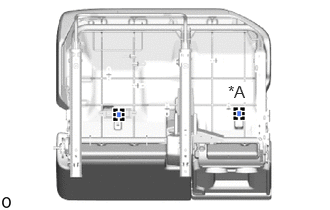
| *A | w/ Center Seat Occupant Detection Sensor |
Attach the clamp.
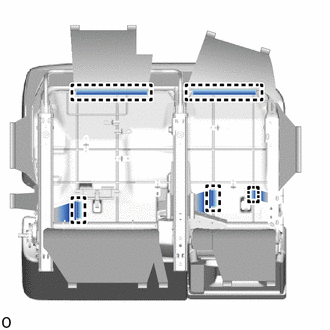
Attach the hook and install the front seat cushion cover with pad.
73240
36.INSTALL FRONT SEAT INNER BELT ASSEMBLY RH
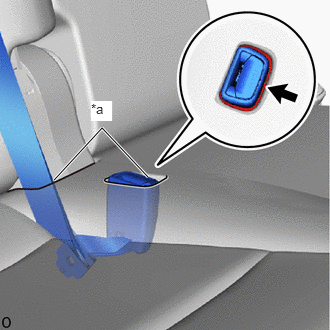
| *a | Hole |
|
|
Band |
Pass the front seat inner belt assembly RH and seat anchor of the front seat 3 point type belt assembly LH through the hole of the front seat cushion assembly.
Attach the band.
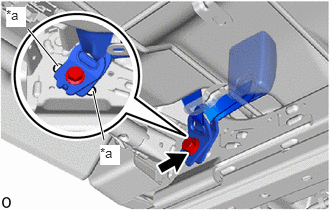
| *a | Protruding Part |
Install the front seat inner belt assembly RH and seat anchor of the front seat 3 point type belt assembly LH with the bolt.
- Torque:
- 42 N*m (428 kgf*cm, 31 ft.*lbf)
- NOTICE:
-
Do not allow the anchor part of the front seat inner belt assembly RH to overlap the protruding part.
for Van, w/ Seat Belt Warning System:
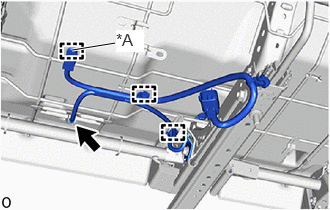
| *A | w/ Center Seat Occupant Detection Sensor |
Attach the clamp.
Connect the connector.
for Wagon:
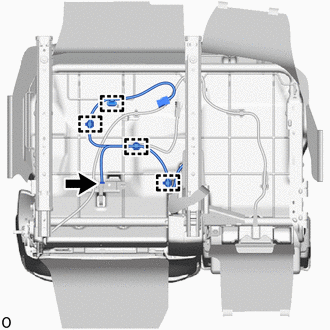
Attach the clamp.
Connect the connector.
Attach the hook.
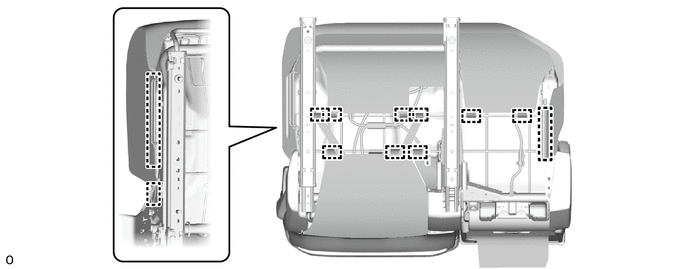
73250
37.INSTALL FRONT CENTER SEAT BELT ASSEMBLY
for Wagon:
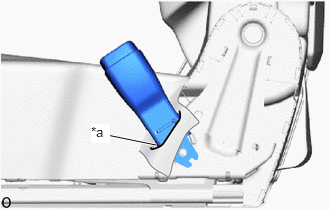
| *a | Slit |
Pass the front center seat belt assembly through the slit of front seat cushion cover sub-assembly RH.
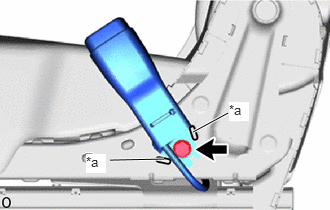
| *a | Protruding Part |
Install the front center seat belt assembly with the bolt.
- Torque:
- 42 N*m (428 kgf*cm, 31 ft.*lbf)
- NOTICE:
-
Do not allow the anchor part of the front seat inner belt assembly RH to overlap the protruding part.
w/ Center Seat Occupant Detection Sensor:
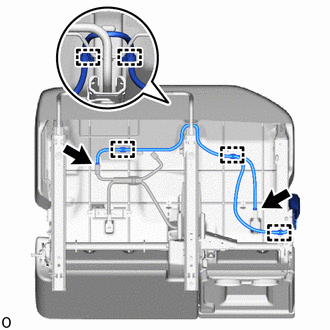
Attach the clamp.
Connect the 2 connectors.
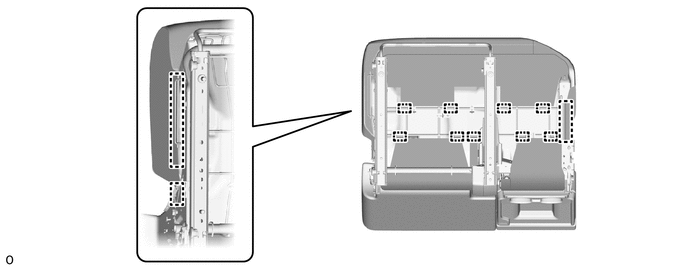
for Van:
Attach the hook.
71811T
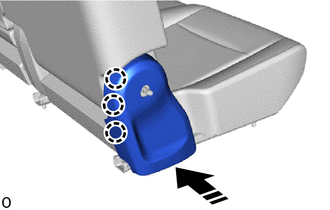
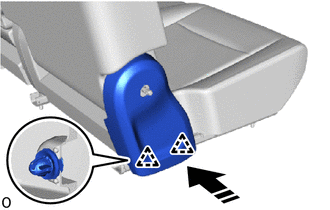
38.INSTALL FRONT SEAT CUSHION SHIELD RH
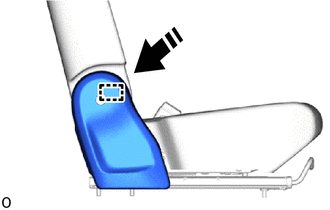
|
|
Install in this Direction |
Attach the guide as shown in the illustration.
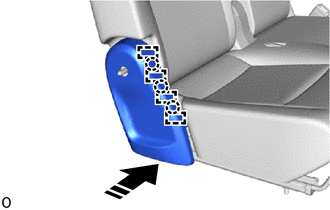
|
|
Install in this Direction |
Attach the claw and guide as shown in the illustration.
|
|
Install in this Direction |
Attach the claw as shown in the illustration.
|
|
Install in this Direction |
Attach the clip and install the front seat cushion shield RH as shown in the illustration.
71396K
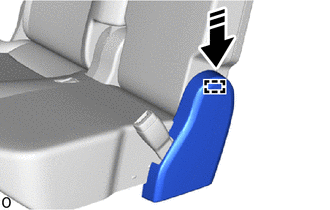
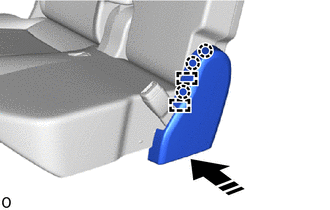
39.INSTALL CENTER SEAT HINGE COVER LH
|
|
Install in this Direction |
Attach the guide as shown in the illustration.
|
|
Install in this Direction |
Attach the guide and claw as shown in the illustration.
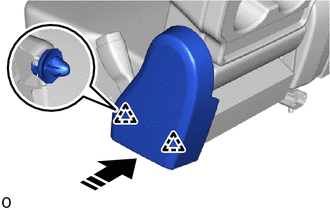
|
|
Install in this Direction |
Attach the clip as shown in the illustration.
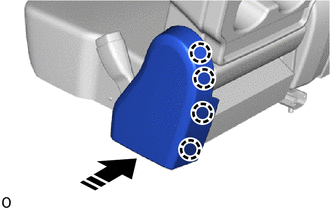
|
|
Install in this Direction |
Attach the claw and install the center seat hinge cover LH as shown in the illustration.
72525M
40.INSTALL RECLINING ADJUSTER RELEASE HANDLE RH
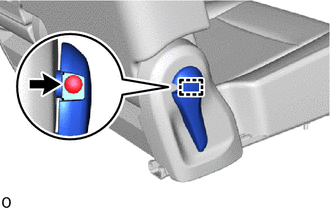
Attach the guide.
Install the reclining adjuster release handle RH with the screw.
72329D
41.INSTALL SEAT ADJUSTER BOLT COVER RH
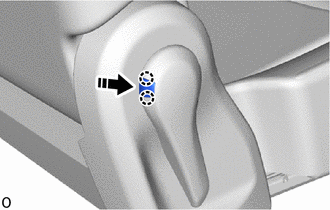
|
|
Install in this Direction |
Attach the claw and install the seat adjuster bolt cover RH as shown in the illustration.
71130B
42.INSTALL FRONT SEAT LEG ASSEMBLY RH
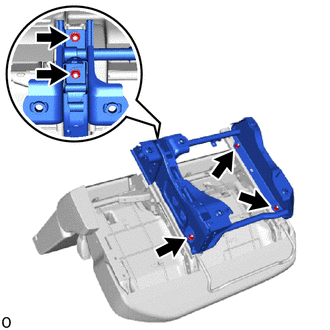
Install the front seat leg assembly RH with the 5 nuts.
- Torque:
- 21 N*m (214 kgf*cm, 15 ft.*lbf)
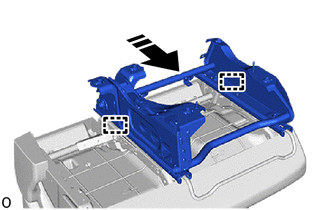
|
|
Slide in this Direction |
Operate the seat track adjusting handle RH and move the front seat assembly RH to the rearmost position and attach the guide.
w/ Front Seat Side Airbag:
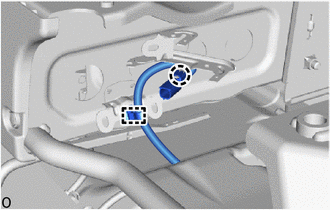
Attach the clamp and claw.
for Van, w/ Seat Belt Warning System:
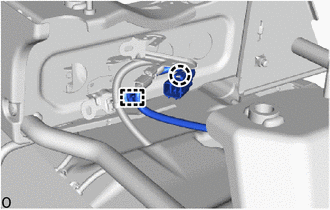
Attach the clamp and claw.
for Wagon:
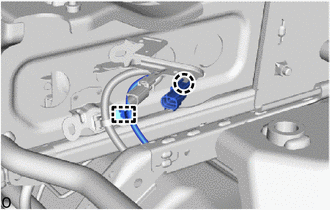
Detach the claw and clamp.
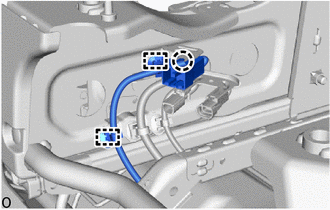
Detach the claw and clamp.
71139N
43.INSTALL FRONT SEAT INNER LEG COVER RH
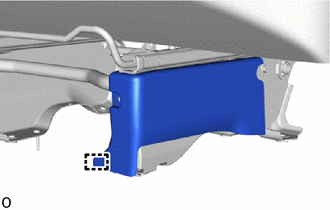
Attach the guide.
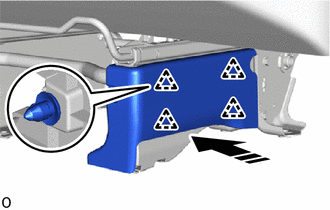
|
|
Install in this Direction |
Attach the clip as shown in the illustration.
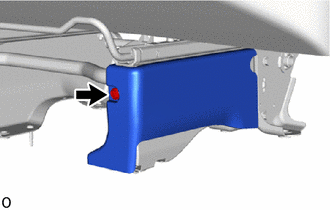
Install the front seat inner leg cover RH with the clip.
85532
44.INSTALL USB CHARGER SOCKET (for Wagon)
71739A
45.INSTALL FRONT SEATBACK BEZEL (for Wagon)
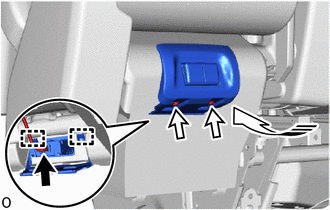
|
|
Connector |
|
|
Screw |
|
|
Install in this Direction |
Attach the guide as shown in the illustration.
Install the front seatback bezel with the 2 screws.
Connect the connector.
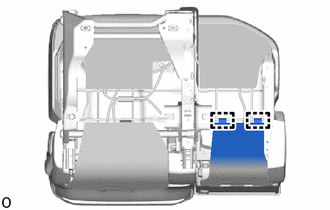
Attach the hook.
72345L
46.INSTALL RECLINING CONNECTING PIPE RH
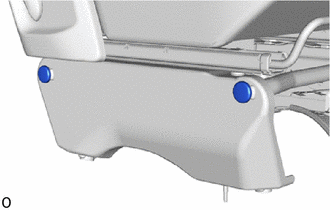
Install the 2 reclining connecting pipes RH.
71848N
47.INSTALL FRONT SEAT NO. 1 ADJUSTER COVER CAP RH
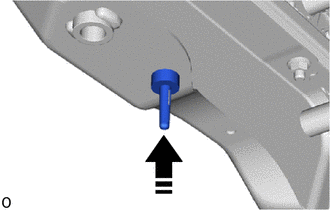
|
|
Install in this Direction |
Install the front seat No. 1 adjuster cover cap RH as shown in the illustration.
71848P
48.INSTALL FRONT SEAT NO. 2 ADJUSTER COVER CAP RH
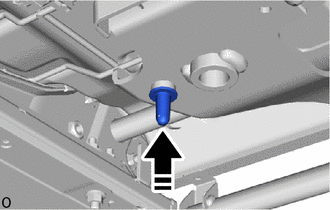
|
|
Install in this Direction |
Install the front seat No. 2 adjuster cover cap RH as shown in the illustration.