SEAT FRONT SEAT ASSEMBLY(for Sliding Bench Seat Type) DISASSEMBLY
CAUTION / NOTICE / HINT
- CAUTION:
- ·
Wear protective gloves. Sharp areas on the parts may injure your hands.
·There is risk of injury.
- HINT:
- ·
Use the same procedure for RHD and LHD vehicles.
·The procedure listed below is for LHD vehicles.
PROCEDURE

 71848P
1.REMOVE FRONT SEAT NO. 2 ADJUSTER COVER CAP RH
71848P
1.REMOVE FRONT SEAT NO. 2 ADJUSTER COVER CAP RH
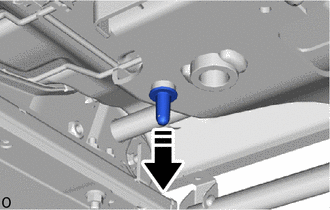

|
Remove in this Direction |
Remove the front seat No. 2 adjuster cover cap RH as shown in the illustration.
71848N
2.REMOVE FRONT SEAT NO. 1 ADJUSTER COVER CAP RH
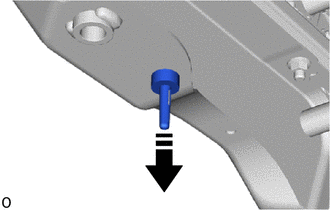
|
|
Remove in this Direction |
Remove the front seat No. 1 adjuster cover cap RH as shown in the illustration.
72345L
3.REMOVE RECLINING CONNECTING PIPE RH
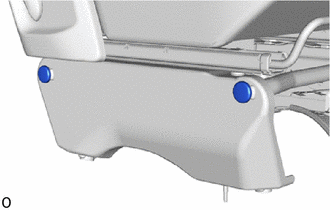
Remove the 2 reclining connecting pipes RH.
71739A
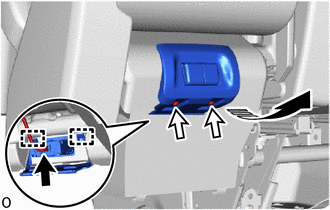
4.REMOVE FRONT SEATBACK BEZEL (for Wagon)
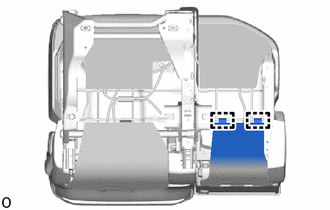
Detach the hook.

|
Connector |

|
Screw |
|
|
Remove in this Direction |
Disconnect the connector.
Remove the 2 screws.
Detach the guide and remove the front seatback bezel as shown in the illustration.
85532C
5.REMOVE NO. 2 USB CHARGER SOCKET (for Wagon)
71139N
6.REMOVE FRONT SEAT INNER LEG COVER RH
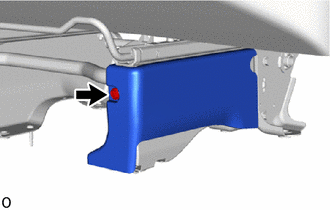
Remove the clip.
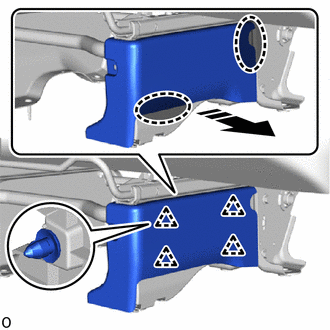

|
Place Hands Here |
|
|
Remove in this Direction |
Place your hands at the position shown in the illustration and pull in the removal direction and detach the clip.
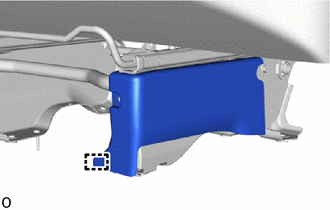
Detach the guide and remove the front seat inner leg cover RH.
71130B
7.REMOVE FRONT SEAT LEG ASSEMBLY RH
for Van, w/ Seat Belt Warning System:
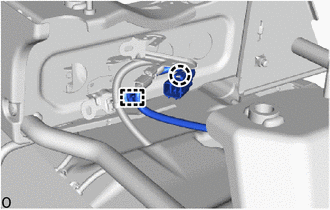
Detach the claw and clamp.
for Wagon:
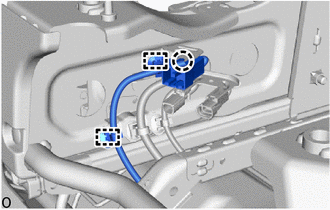
Detach the claw and clamp.
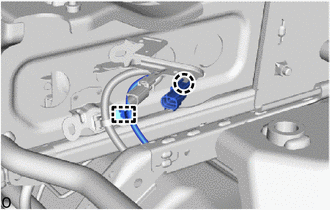
Detach the claw and clamp.
w/ Front Seat Side Airbag:
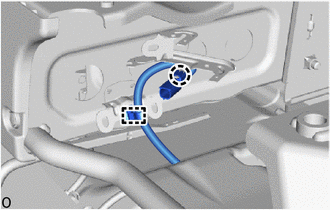
Detach the claw and clamp.
|
|
Slide in this Direction |
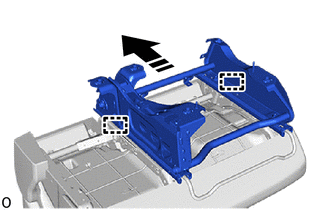
Operate the seat track adjusting handle RH and move the front seat assembly RH to the frontmost position and detach the guide.
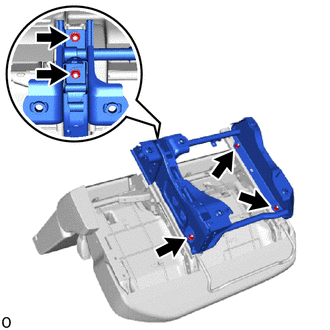
Remove the 5 nuts and front seat leg assembly RH.
72329D
8.REMOVE SEAT ADJUSTER BOLT COVER RH
|
|
Remove in this Direction |

|
Protective Tape |
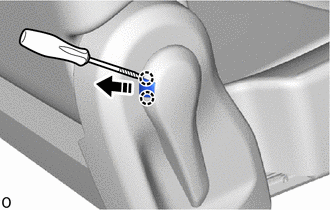
Using a thin-bladed screwdriver, detach the claw and remove the seat adjuster bolt cover RH as shown in the illustration.
- HINT:
-
Tape the thin-bladed screwdriver tip before use.
72525M
9.REMOVE RECLINING ADJUSTER RELEASE HANDLE RH
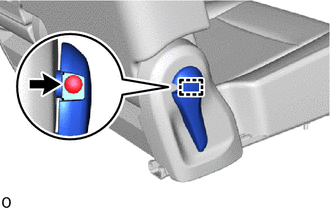
Remove the screw.
Detach the guide and remove the reclining adjuster release handle RH.
71396K
10.REMOVE CENTER SEAT HINGE COVER LH
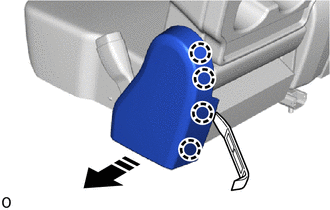
|
|
Remove in this Direction |
Using moulding remover A, detach the claw as shown in the illustration.
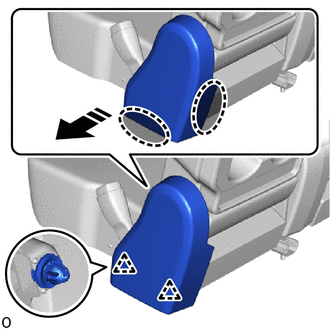
|
|
Place Hands Here |
|
|
Remove in this Direction |
Place your hands at the position shown in the illustration and pull in the removal direction and detach the clip.
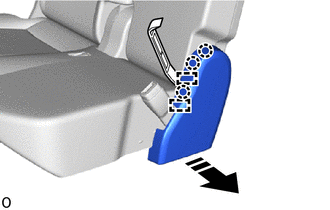
|
|
Remove in this Direction |
Using moulding remover A, detach the claw and guide as shown in the illustration.
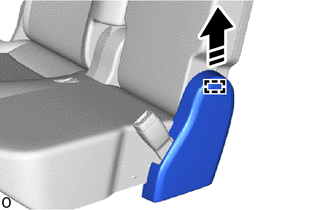
|
|
Remove in this Direction |
Detach the guide and remove the center seat hinge cover LH as shown in the illustration.
71811T
11.REMOVE FRONT SEAT CUSHION SHIELD RH
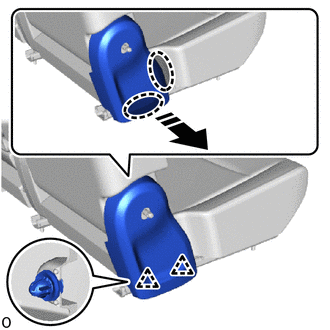
|
|
Place Hands Here |
|
|
Remove in this Direction |
Place your hands at the position shown in the illustration and pull in the removal direction and detach the clip.
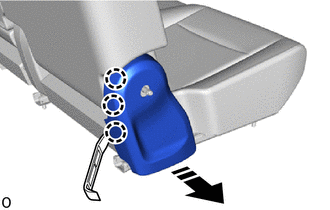
|
|
Remove in this Direction |
Using moulding remover A, detach the claw as shown in the illustration.
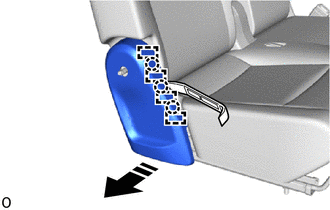
|
|
Remove in this Direction |
Using moulding remover A, detach the claw and guide as shown in the illustration.
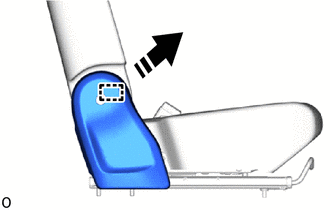
|
|
Remove in this Direction |
Detach the guide and remove the front seat cushion shield RH as shown in the illustration.
73250
12.REMOVE FRONT CENTER SEAT BELT ASSEMBLY
for Van:
Detach the hook.
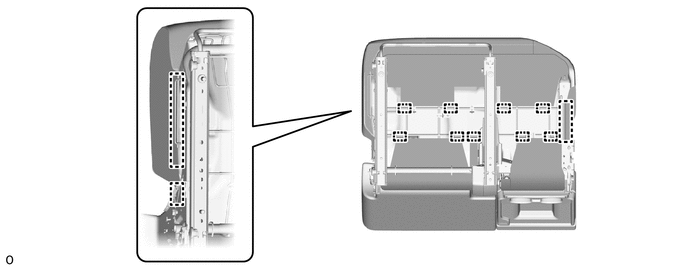
w/ Center Seat Occupant Detection Sensor:
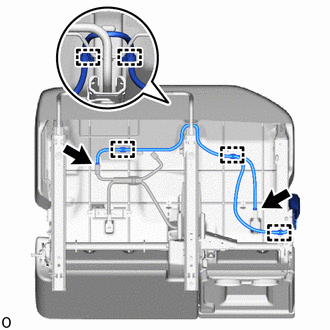
Disconnect the 2 connectors.
Detach the clamp.
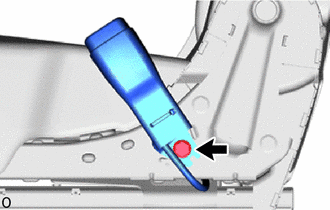
Remove the bolt and front center seat belt assembly.
73240
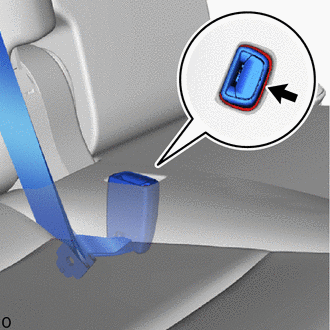
13.REMOVE FRONT SEAT INNER BELT ASSEMBLY RH
for Van, w/ Seat Belt Warning System:
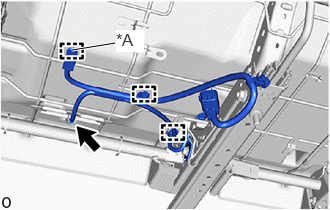
| *A | w/ Center Seat Occupant Detection Sensor |
Detach the clamp.
Disconnect the connector.
for Wagon:
Detach the hook.
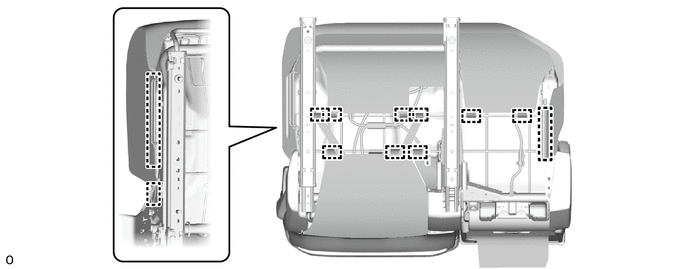
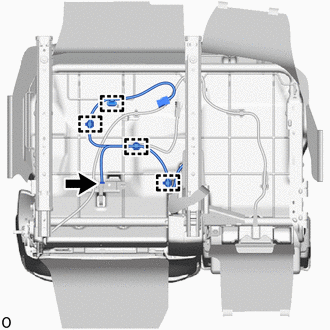
Disconnect the connector.
Detach the clamp.
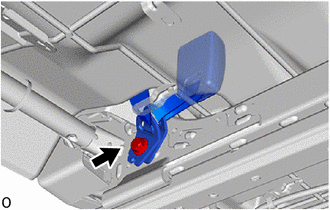
Remove the bolt.
|
|
Band |
Detach the band and remove the front seat inner belt assembly RH and seat anchor of the front seat 3 point type belt assembly LH.
82192
14.REMOVE FRONT SEAT WIRE LH (for Wagon)
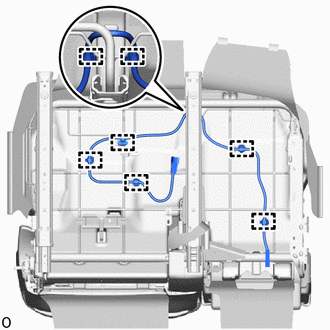
Detach the clamp and remove the front seat wire LH.
15.REMOVE FRONT SEAT CUSHION COVER WITH PAD
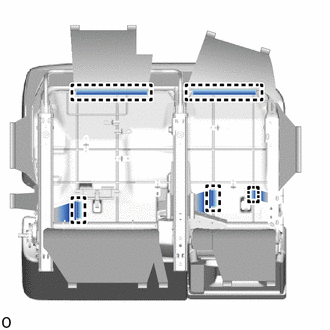
Detach the hook.
w/ Seat Belt Warning System:
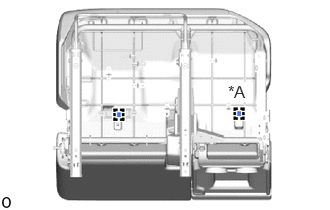
| *A | w/ Center Seat Occupant Detection Sensor |
Detach the clamp.
Remove the front seat cushion cover with pad.
71071
16.REMOVE FRONT SEAT CUSHION COVER SUB-ASSEMBLY RH
for Van:
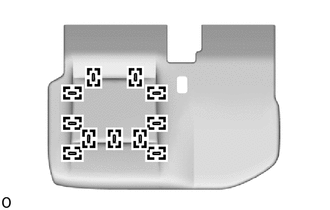
Remove the 11 hog rings and front seat cushion cover sub-assembly RH.
for Wagon:
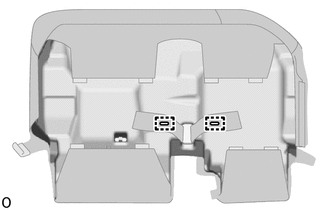
Remove the 2 hog rings.
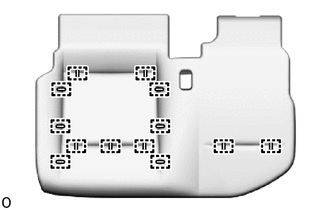
for Type A:
Remove the 13 hog rings and front seat cushion cover sub-assembly RH.
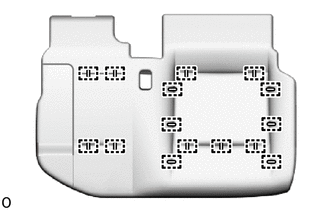
for Type B:
Remove the 15 hog rings and front seat cushion cover sub-assembly LH.
17.REMOVE SEAT COVER WIRE
for Van:
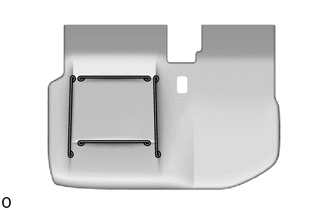
Remove the seat cover wire.
for Wagon:
Remove the seat cover wire.
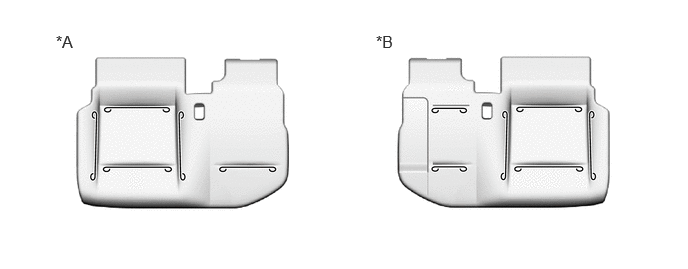
| *A | for Type A | *B | for Type B |
18.REMOVE CENTER SEATBACK ASSEMBLY
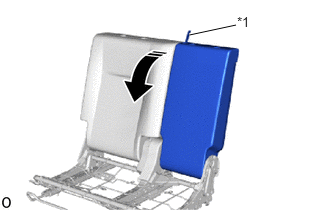
| *1 | Seat Lock Band Assembly |
|
|
Fold in this Direction |
w/ Center Seatback Board:
Pull the seat lock band assembly and move the center seatback assembly as shown in the illustration.
for RHD, w/o Center Seatback Board:
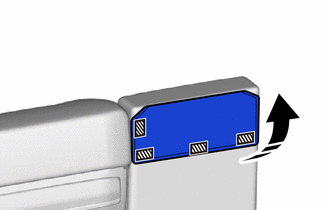
|
|
Pull up in this Direction |
|
|
Fastening Tape |
Detach the fastening tape and pull up the seatback cover as shown in the illustration.
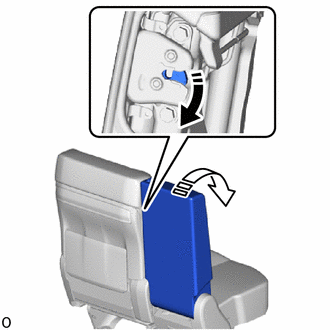
|
|
Release in the this Direction |

|
Fold in the this Direction |
Release the front seatback lock assembly and fold the center seatback assembly as shown in the illustration.
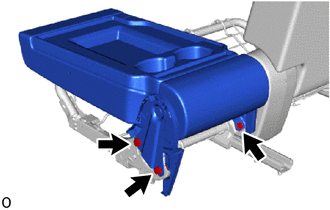
Remove the 3 bolts and center seatback assembly.
71387A
19.REMOVE CENTER SEAT LOWER HINGE ARM RH
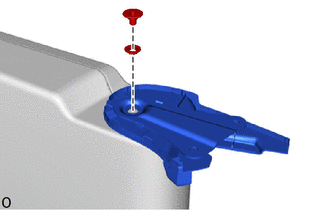
Using a T45 "TORX" socket wrench, remove the "TORX" screw, front seat reclining spacer LH and center seat lower hinge arm RH.
- HINT:
-
Remove the bench type front seat cushion shield together with the center seat lower hinge arm RH.
71811U
20.REMOVE BENCH TYPE FRONT SEAT CUSHION SHIELD
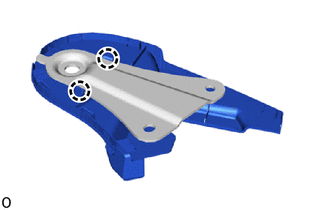
Detach the claw and remove the bench type front seat cushion shield.
71397F
21.REMOVE CENTER SEAT UPPER HINGE COVER RH
|
|
Remove in this Direction |
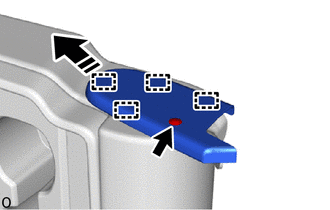
Remove the clip.
Detach the guide and remove the center seat upper hinge cover RH as shown in the illustration.
72521
22.REMOVE LOWER RECLINING ADJUSTER ARM RH
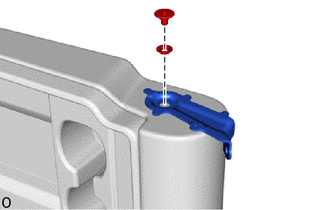
Using a T45 "TORX" socket wrench, remove the "TORX" screw, front seat reclining spacer RH and lower reclining adjuster arm RH.
71784A
23.REMOVE FRONT SEATBACK BOARD CAP (w/ Center Seatback Board)
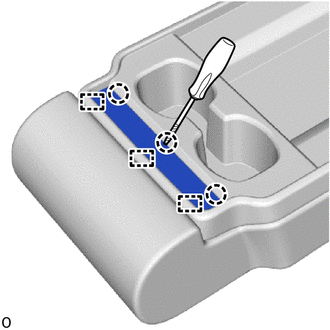
|
|
Protective Tape |
Using a thin-bladed screwdriver, detach the claw and guide and remove the front seatback board cap.
- HINT:
-
Tape the thin-bladed screwdriver tip before use.
71705H
24.REMOVE FRONT CENTER SEATBACK BOARD SUB-ASSEMBLY RH (w/ Center Seatback Board)
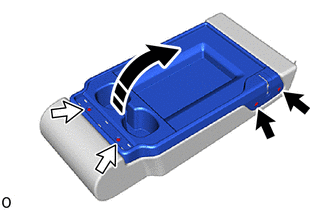
|
|
Clip |
|
|
Screw |
|
|
Lift up in this Direction |
Using a clip remover, remove the 2 clips.
Remove the 2 screws.
Lift up the front center seatback board sub-assembly RH as shown in the illustration.
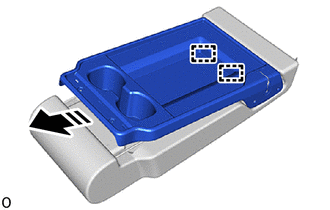
|
|
Remove in this Direction |
Pull in the removal direction shown in the illustration and detach the hook and remove the front center seatback board sub-assembly RH.
71095
25.REMOVE CENTER SEATBACK COVER SUB-ASSEMBLY
w/ Center Seatback Board:
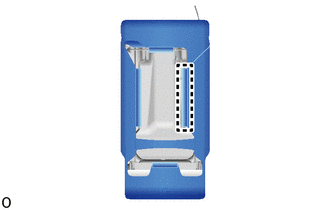
Detach the hook.
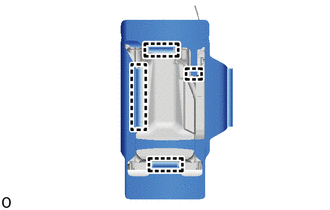
Detach the hook and remove the center seatback cover sub-assembly.

|
|
Remove in this Direction |
Detach the claw and remove the 2 front center seat headrest support assemblies as shown in the illustration.
Remove the center seatback cover sub-assembly.
for RHD, w/o Center Seatback Board:
Detach the hook and fastening tape.

|
|
Fastening Tape | - | - |
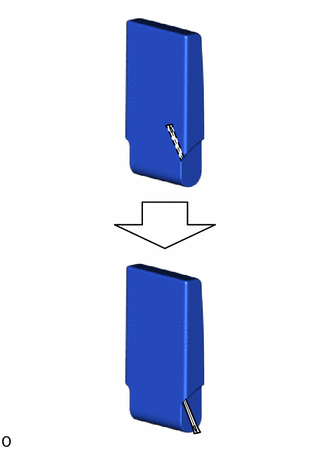
Pull out the fastener.
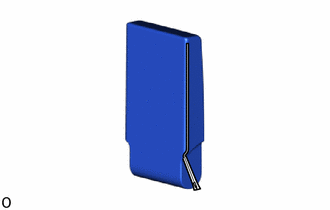
Open the fastener.
|
|
Remove in this Direction |
Detach the claw and remove the 2 front center seat headrest support assemblies as shown in the illustration.
Remove the center seatback cover sub-assembly.
74820L
26.REMOVE FRONT PROTECTOR ASSEMBLY LH (w/o Center Seatback Board)
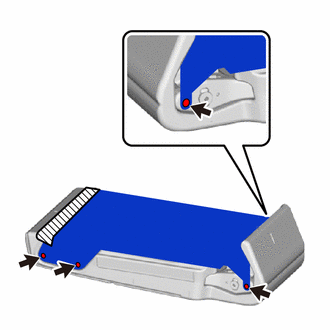
|
|
Tape |
Detach the tape.
- NOTICE:
-
Do not reuse the front protector assembly LH and center seatback pad.
Remove the 4 clips and front protector assembly LH.
71365A
27.REMOVE CENTER SEATBACK PAD
Remove the center seatback pad.
72510H
28.REMOVE FRONT SEATBACK LOCK ASSEMBLY RH
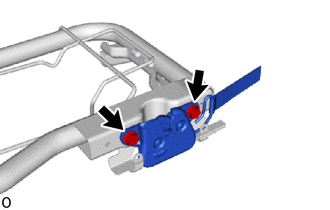
Remove the 2 bolts and front seatback lock assembly RH.
78970G
29.REMOVE FRONT SEATBACK LOCK BAND ASSEMBLY RH (w/ Center Seatback Board)
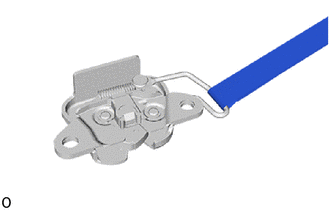
Remove the front seatback lock band assembly RH.
73178A
30.REMOVE SEAT BELT ANCHOR COVER CAP
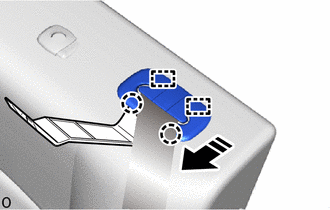
|
|
Remove in this Direction |
Using a moulding remover B, detach the claw.
Detach the guide as shown in the illustration.
for Van:
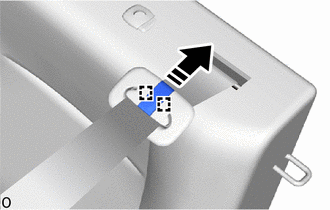
|
|
Remove in this Direction |
Detach the guide and remove the seat belt anchor cover cap as shown in the illustration.
for Wagon:
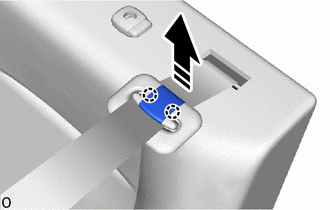
|
|
Remove in this Direction |
Detach the claw and remove the seat belt anchor cover cap as shown in the illustration.
73373
31.REMOVE REAR SEAT SHOULDER BELT COVER
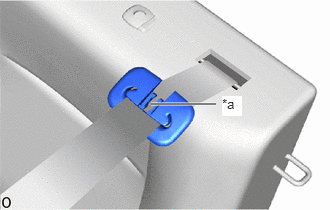
| *a | Slit |
Pass the front seat 3 point type belt assembly LH through the slit of the rear seat shoulder belt cover and remove the rear seat shoulder belt cover.
71705F
32.REMOVE FRONT SEATBACK BOARD SUB-ASSEMBLY RH (for Wagon)
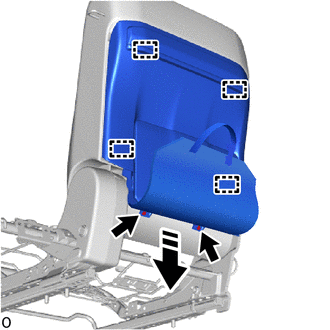
|
|
Remove in this Direction |
Remove the 2 screws.
Detach the hook and remove the front seatback board sub-assembly RH as shown in the illustration.
71073A
33.REMOVE FRONT SEATBACK COVER SUB-ASSEMBLY RH
for Van:
Detach the fastening tape.
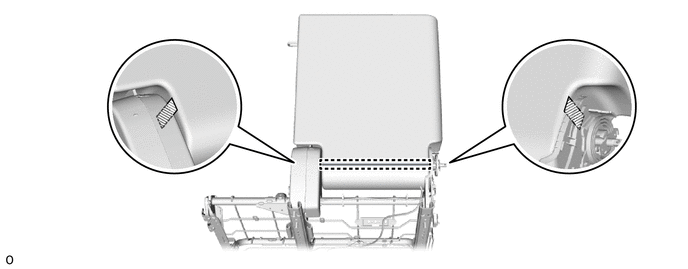
|
|
Fastening Tape | - | - |
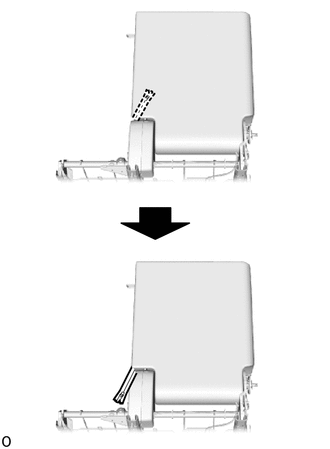
Detach the hook.
Pull out the fastener.
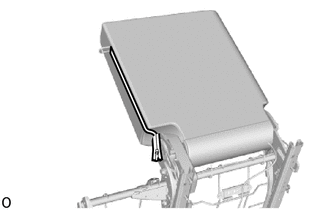
Open the fastener.
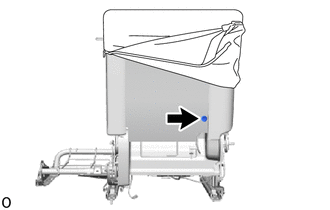
Remove the clip.
for Wagon:
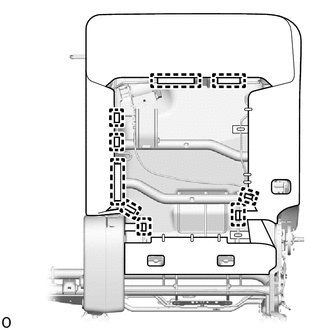
Detach the hook.
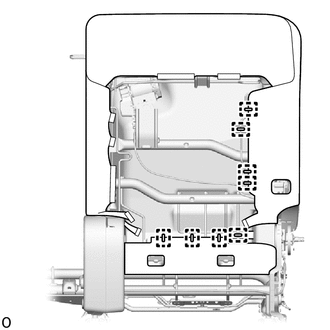
Remove the 8 hog rings.
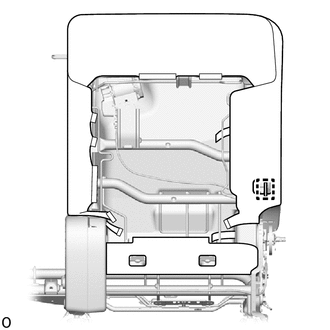
Remove the hook.
w/ Front Seat Side Airbag:
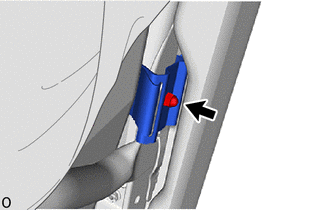
Remove the nut and bracket of the front seatback cover sub-assembly RH.
- CAUTION:
-
Do not reuse the nut.
|
|
Remove in this Direction |
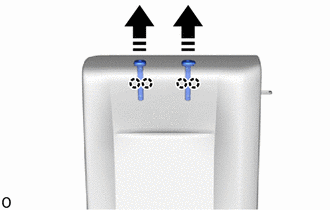
Detach the claw and remove the 2 front seat headrest support assemblies as shown in the illustration.
for Van:
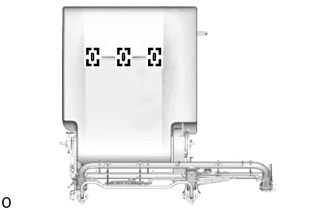
Remove the 3 hog rings and front seatback cover sub-assembly RH.
for Wagon:
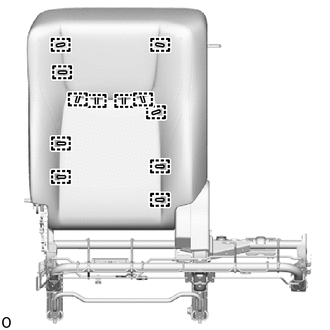
for Type A:
Remove the 12 hog rings and front seatback cover sub-assembly RH.
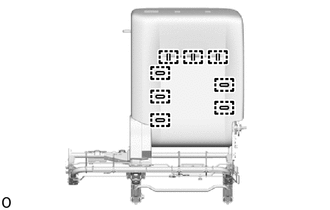
for Type B:
Remove the 8 hog rings and front seatback cover sub-assembly LH.
34.REMOVE SEAT COVER WIRE
for Van:
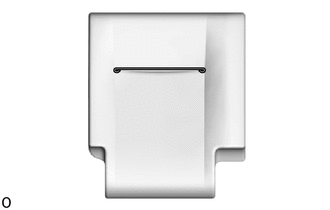
Remove the seat cover wire.
for Wagon:
Remove the seat cover wire.
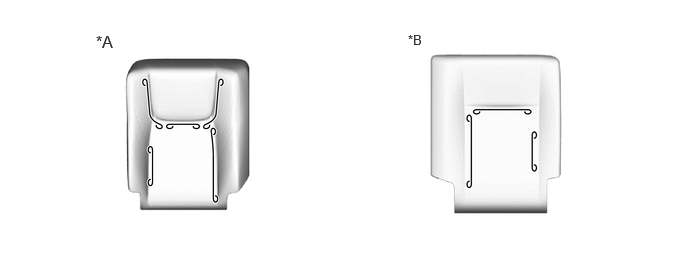
| *A | for Type A | *B | for Type B |
79158
35.REMOVE SEATBACK COVER PLATE RH
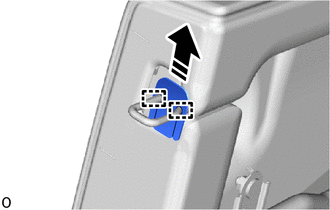
|
|
Remove in this Direction |
Detach the guide and remove the seatback cover plate RH as shown in the illustration.
71551A
36.REMOVE FRONT SEATBACK PAD RH
for Wagon:
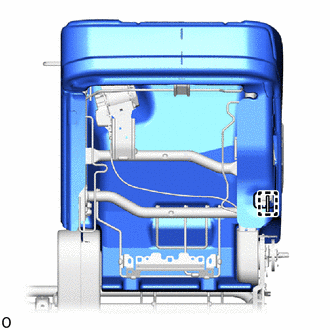
Detach the hook.
Remove the front seatback pad RH.
74810L
37.REMOVE FRONT PROTECTOR ASSEMBLY RH
for Van:
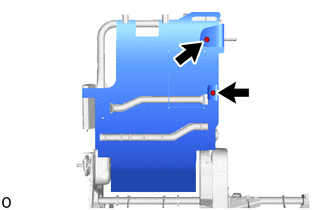
Using a clip remover, remove the 2 clips.
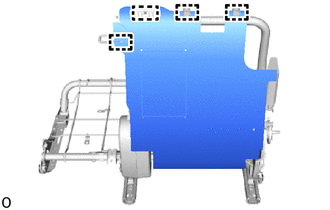
Detach the guide and remove the front protector assembly RH.
for Wagon:
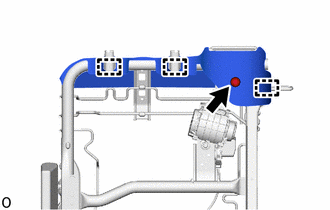
Using a clip remover, remove the clip.
Detach the guide and remove the front protector assembly RH.
73910B
38.REMOVE FRONT SEAT AIRBAG ASSEMBLY RH (w/ Front Seat Side Airbag)
89178C
39.REMOVE NO. 2 AIRBAG BRACKET (w/ Front Seat Side Airbag)
71H75B
40.REMOVE RH SEATBACK FRAME RECLINING ADJUSTER INSIDE COVER
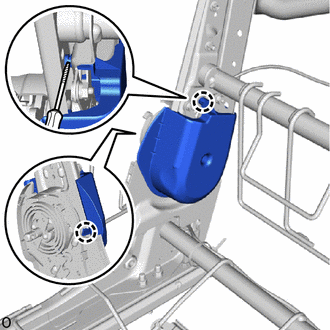
|
|
Remove in this Direction |
|
|
Protective Tape |
Using a thin-bladed screwdriver, detach the claw and remove the RH seatback frame reclining adjuster inside cover.
- HINT:
-
Tape the thin-bladed screwdriver tip before use.
73120
41.REMOVE FRONT SEAT 3 POINT TYPE BELT ASSEMBLY LH
73187
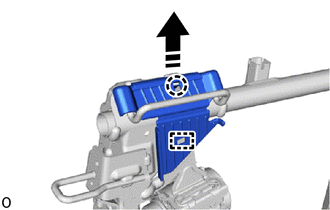
42.REMOVE FRONT SEAT SHOULDER BELT GUIDE
|
|
Remove in this Direction |
Detach the claw and guide and remove the front seat shoulder belt guide as shown in the illustration.
71862M
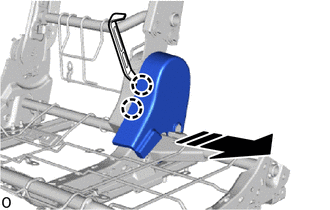
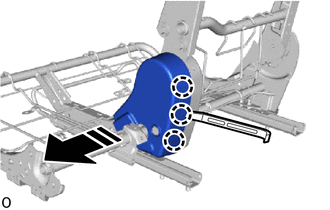
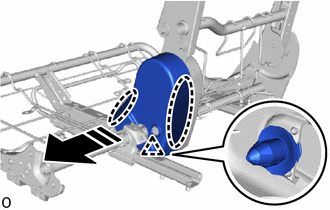
43.REMOVE FRONT SEAT INNER NO. 2 CUSHION SHIELD LH
|
|
Remove in this Direction |
Using moulding remover A, detach the claw as shown in the illustration.
|
|
Remove in this Direction |
Using moulding remover A, detach the claw as shown in the illustration.
|
|
Place Hands Here |
|
|
Remove in this Direction |
Place your hands at the position shown in the illustration and pull in the removal direction and detach the clip and remove the front seat inner No. 2 cushion shield LH.
71H75A
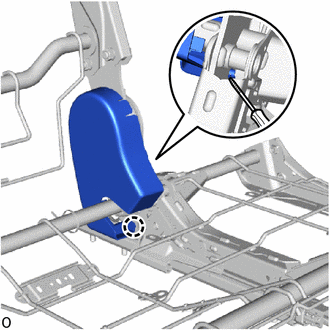
44.REMOVE RH SEAT RECLINING ADJUSTER INSIDE COVER
|
|
Protective Tape |
Using a thin-bladed screwdriver, detach the claw and remove the RH seat reclining adjuster inside cover.
- HINT:
-
Tape the thin-bladed screwdriver tip before use.
71H76
45.REMOVE RH SEAT RECLINING ADJUSTER INSIDE COVER RH
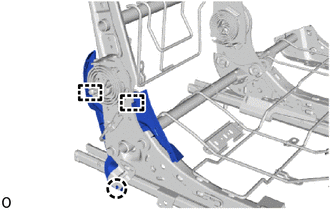
Detach the claw and guide and remove the RH seat reclining adjuster inside cover RH.
72580C
46.REMOVE RH SEAT RECLINING ADJUSTING CABLE ASSEMBLY
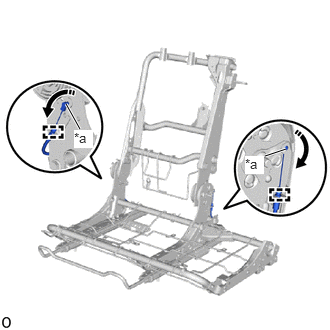
| *a | Cable End |
|
|
Move in this Direction |
Detach the 2 cable clamp.
Disconnect the 2 cable ends by moving them in the direction of the arrows in the illustration and remove the RH seat reclining adjusting cable assembly.
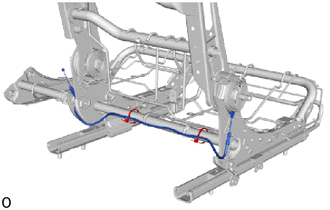
Cut off the 2 cable ties and remove the RH seat reclining adjusting cable assembly.
47.REMOVE FRONT SEATBACK ASSEMBLY RH
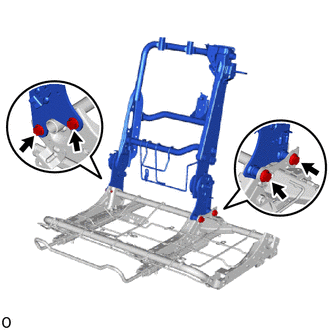
Remove the 4 bolts and front seatback assembly RH.
48.REMOVE SCREW GROMMET (for Wagon)
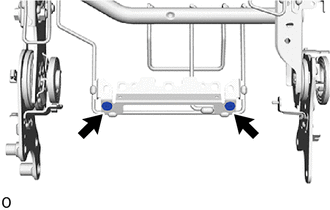
Remove the 2 screw grommets.
72211F
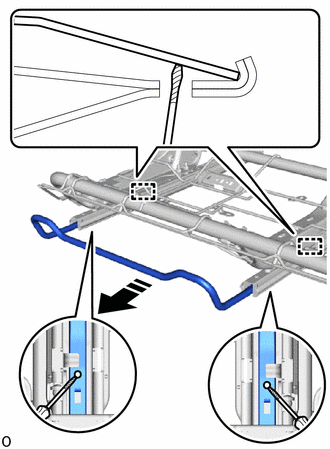
49.REMOVE SEAT TRACK ADJUSTING HANDLE RH
Operate the seat track adjusting handle RH and move the front seat assembly RH to the rearmost position.
|
|
Remove in this Direction |
|
|
Protective Tape |
Using a thin-bladed screwdriver, push up the plate and state of the detached the guide and pull the seat track adjusting handle RH in the removal direction shown in the illustration and remove it.
- HINT:
-
Tape the thin-bladed screwdriver tip before use.