DOOR / HATCH BACK DOOR(for Wagon) REASSEMBLY
PROCEDURE

 67837L
1.INSTALL DOOR DUST PROOF SEAL
67837L
1.INSTALL DOOR DUST PROOF SEAL
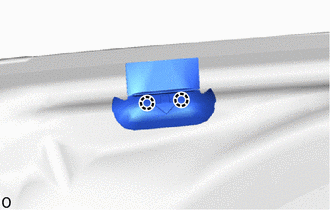
Attach the claw and install the door dust proof seal.
- HINT:
-
Use the same procedure for the RH and LH sides.
69359
2.INSTALL BACK DOOR LOCK CUSHION
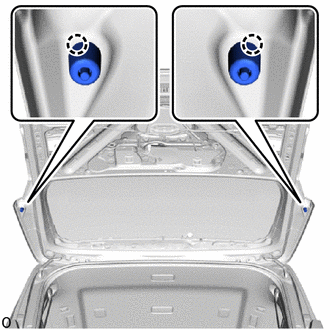
Attach the claw and install the 2 back door lock cushions.
69404A
3.INSTALL BACK DOOR SIDE FEMALE STOPPER SUB-ASSEMBLY LH (w/ Bracket)
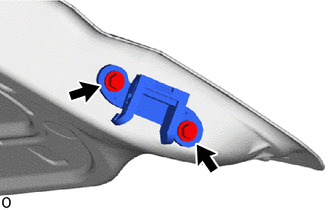
Temporarily install the back door side female stopper sub-assembly LH with the 2 bolts.
Fully close the back door panel sub-assembly.
Tighten the 2 bolts and install the back door side female stopper sub-assembly LH.
- Torque:
- 13 N*m (133 kgf*cm, 10 ft.*lbf)
69403A
4.INSTALL BACK DOOR SIDE FEMALE STOPPER SUB-ASSEMBLY RH (w/ Bracket)
- HINT:
-
Use the same procedure described for the LH side.
67282
5.INSTALL BACK DOOR NO. 1 STOPPER (w/o Bracket)
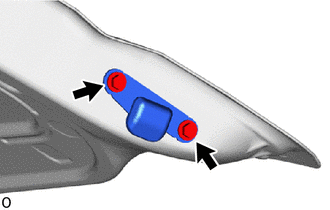
Install the back door No. 1 stopper with the 2 bolts.
- Torque:
- 13 N*m (133 kgf*cm, 10 ft.*lbf)
67281F
6.INSTALL BACK DOOR LOWER STOPPER (w/o Bracket)
- HINT:
-
Use the same procedure described for the back door No. 1 stopper.
67207C
7.INSTALL BACK DOOR STOPPER SUB-ASSEMBLY (w/ Bracket)
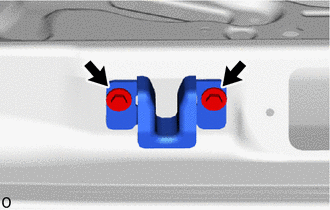
Temporarily install the back door stopper sub-assembly with the 2 bolts.
Fully close the back door panel sub-assembly.
Tighten the 2 bolts and install the back door stopper sub-assembly.
- Torque:
- 13 N*m (133 kgf*cm, 10 ft.*lbf)
68948
8.INSTALL BACK DOOR LOWER DAMPER STAY BRACKET LH
68947
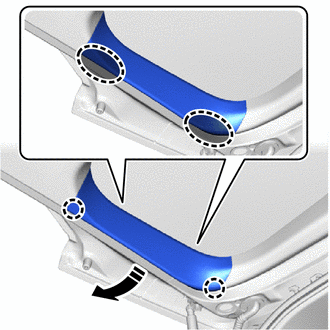
9.INSTALL BACK DOOR LOWER DAMPER STAY BRACKET RH
- HINT:
-
Use the same procedure described for the LH side.
68946
10.INSTALL BACK DOOR UPPER DAMPER STAY BRACKET LH
68945
11.INSTALL BACK DOOR UPPER DAMPER STAY BRACKET RH
68960
12.INSTALL BACK DOOR STAY ASSEMBLY LH
68950C
13.INSTALL BACK DOOR STAY ASSEMBLY RH
- HINT:
-
Use the same procedure described for the LH side.
81564
14.INSTALL REAR COMBINATION LIGHT BODY GASKET LH
81584D
15.INSTALL REAR LIGHT GASKET
81590A
16.INSTALL REAR LIGHT ASSEMBLY LH
81554
17.INSTALL REAR COMBINATION LIGHT BODY GASKET RH
- HINT:
-
Use the same procedure described for the LH side.
81584D
18.INSTALL REAR LIGHT GASKET
- HINT:
-
Use the same procedure described for the LH side.
81580D
19.INSTALL REAR LIGHT ASSEMBLY RH
- HINT:
-
Use the same procedure described for the LH side.
76804
20.INSTALL BACK DOOR OUTSIDE UPPER GARNISH SUB-ASSEMBLY LH
76803A
21.INSTALL BACK DOOR OUTSIDE UPPER GARNISH SUB-ASSEMBLY RH
- HINT:
-
Use the same procedure described for the LH side.
76802E
22.INSTALL BACK DOOR OUTSIDE LOWER GARNISH SUB-ASSEMBLY
81570
23.INSTALL CENTER STOP LIGHT ASSEMBLY
24.INSTALL CAMERA CLEANER NOZZLE ASSEMBLY (w/ Digital Inner Mirror)
86790
25.INSTALL TELEVISION CAMERA ASSEMBLY (w/o Parking Assist Monitor System)
86790
26.INSTALL TELEVISION CAMERA ASSEMBLY (w/ Parking Assist Monitor System)
84945
27.INSTALL LUGGAGE ELECTRICAL KEY SWITCH
81270
28.INSTALL LICENSE PLATE LIGHT ASSEMBLY
- HINT:
-
Use the same procedure for the RH and LH sides.
76801
29.INSTALL BACK DOOR OUTSIDE GARNISH SUB-ASSEMBLY
69211C
30.INSTALL BACK DOOR OUTSIDE HANDLE
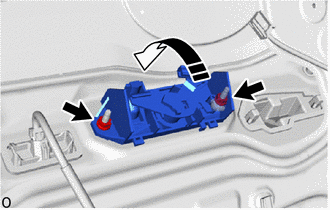

|
Install in this Direction |
Install the back door outside handle with the 2 nuts as shown in the illustration.
- Torque:
- 5.0 N*m (51 kgf*cm, 44 in.*lbf)
85976
31.INSTALL BACK DOOR CLOSER RELAY
69350P
32.INSTALL BACK DOOR LOCK ASSEMBLY WITH COURTESY LIGHT SWITCH
69690
33.INSTALL BACK DOOR REMOTE CONTROL ASSEMBLY
67290
34.INSTALL BACK DOOR DAMPER ASSEMBLY
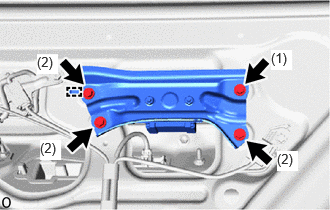
Attach the guide and install the back door damper assembly with the 4 bolts in the order shown in the illustration.
- Torque:
- 12.5 N*m (127 kgf*cm, 9 ft.*lbf)
85035R
35.INSTALL REAR WASHER NOZZLE SUB-ASSEMBLY
76085
36.INSTALL REAR SPOILER SUB-ASSEMBLY
85143R
37.INSTALL REAR WIPER MOTOR GROMMET
85110R
38.INSTALL REAR WIPER MOTOR ASSEMBLY
39.INSTALL REAR WIPER ARM AND BLADE ASSEMBLY
67751
40.INSTALL BACK DOOR TRIM BOARD
Attach the clip and guide to install the back door trim board.
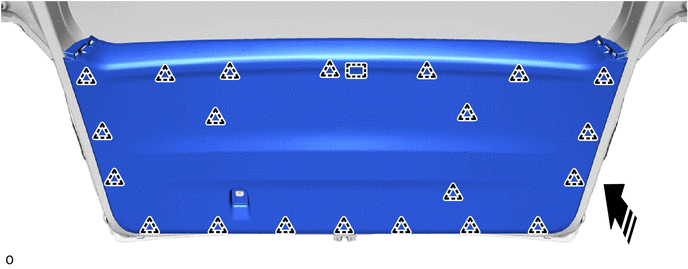
|
|
Install in this Direction | - | - |
67961A
41.INSTALL BACK DOOR PULL STRAP
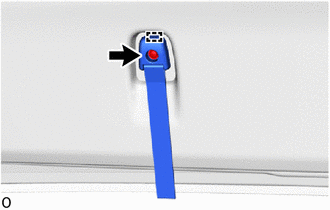
Attach the guide and install the back door pull strap with the screw.
69783B
42.INSTALL BACK DOOR INSIDE HANDLE BEZEL (w/ Handle)
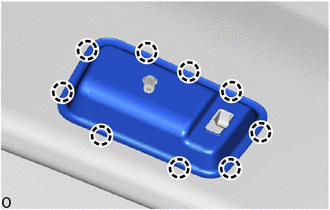
Attach the claw and install the back door inside handle bezel.
69291
43.INSTALL BACK DOOR INSIDE HANDLE ASSEMBLY (w/ Handle)
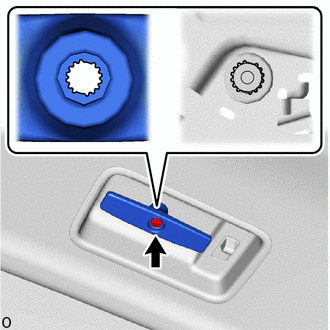
| *a | Large Protrusion |
| *b | Large Cutout |
Align the 2 large protrusions of the back door inside handle assembly with the 2 large cutouts of the back door remote control assembly and install the back door inside handle assembly with the screw as shown in the illustration.
67760A
44.INSTALL BACK DOOR UPPER TRIM BOARD ASSEMBLY
Attach the clip and install the back door upper trim board assembly as shown in the illustration.

|
|
Install in this Direction | - | - |
67938A
45.INSTALL BACK DOOR SIDE GARNISH LH
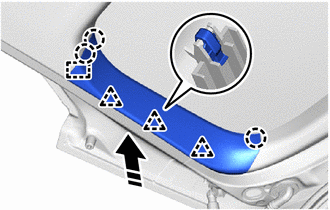
|
|
Install in this Direction |
Attach the guide, claw and clip to install the back door side garnish LH in the direction indicated by the arrow shown in the illustration.

|
Place Hand Here |
|
|
Install in this Direction |
Place your hand at the position shown in the illustration and attach the claw while pull in the installation direction.
67937B
46.INSTALL BACK DOOR SIDE GARNISH RH
- HINT:
-
Use the same procedure described for the LH side.
47.ADJUST TELEVISION CAMERA ASSEMBLY