RM35X0E
_59
Vehicle Exterior
_079256
LIGHTING (EXT)
_0396169
HEIGHT CONTROL SENSOR
A
LIGHTING (EXT) HEIGHT CONTROL SENSOR REMOVAL
CAUTION / NOTICE / HINT
The necessary procedures (adjustment, calibration, initialization or registration) that must be performed after parts are installed, removed or replaced during the rear height control sensor sub-assembly LH removal/installation are shown below.
| Replacement Part or Procedure | Necessary Procedures | Effects/Inoperative Functions when not Performed | Link |
|---|---|---|---|
| Replacement of the rear height control sensor sub-assembly LH, removal and reinstallation of the rear height control sensor sub-assembly LH, replacement of the suspension, etc. have been performed | Perform headlight ECU sub-assembly LH initialization | Lighting system (EXT) | ( 201906,999999,_59,_079256,_0396321,RM100000001IGX8,) 201906,999999,_59,_079256,_0396321,RM100000001IGX8,)
|
PROCEDURE

 58399D
1.REMOVE NO. 2 FLOOR UNDER COVER
58399D
1.REMOVE NO. 2 FLOOR UNDER COVER
a.
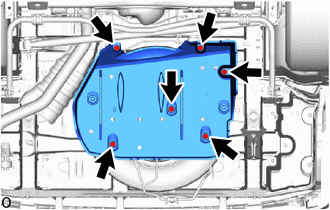
Remove the 6 bolts.
b.
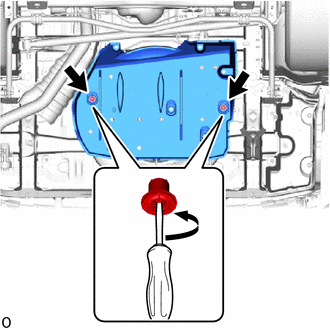
Using a screwdriver, loosen the 2 clips, and remove the No. 2 floor under cover.
89408C
2.REMOVE REAR HEIGHT CONTROL SENSOR SUB-ASSEMBLY LH
- NOTICE:
-
If the rear height control sensor sub-assembly LH has been dropped, replace it with a new one.
a.
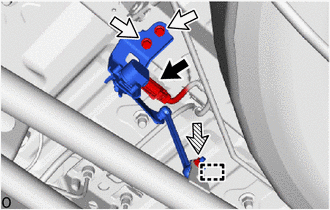
0,0 0,0
false

|
Connector |

|
Bolt |

|
Nut |
Disconnect the connector.
b.
Remove the 2 bolts and nut.
- CAUTION:
-
Do not reuse the nut.
c.
Detach the guide and remove the rear height control sensor sub-assembly LH.