SEAT REAR SEAT ASSEMBLY(for Commuter, 3-Passenger Seat with 2-Point Type Seat Belt and Headrest) DISASSEMBLY
CAUTION / NOTICE / HINT
- CAUTION:
- ·
Wear protective gloves. Sharp areas on the parts may injure your hands.
·There is risk of injury.
- HINT:
- ·
Use the same procedure for RHD and LHD vehicles.
·The procedure listed below is for LHD vehicles.
·The procedure listed below is a representative example.
·Use the same procedure for all rows, unless otherwise specified.
PROCEDURE

 79967V
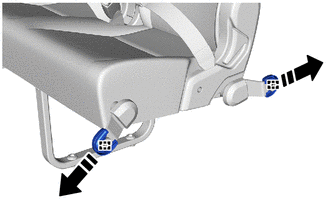
1.REMOVE REAR NO. 1 SEAT NO. 3 LEG SIDE COVER
79967V
1.REMOVE REAR NO. 1 SEAT NO. 3 LEG SIDE COVER

|
Remove in this Direction |
Detach the hook and remove the 2 rear No. 1 seat No. 3 leg side covers as shown in the illustration.
79967T
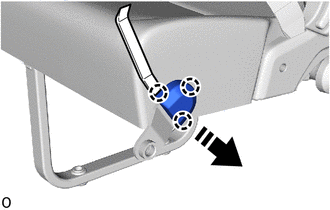
2.REMOVE REAR NO. 1 SEAT NO. 1 LEG SIDE COVER
|
|
Remove in this Direction |
Using moulding remover A, detach the claw and remove the rear No. 1 seat No. 1 leg side cover as shown in the illustration.
79967U
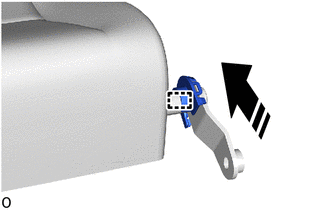
3.REMOVE REAR NO. 1 SEAT NO. 2 LEG SIDE COVER
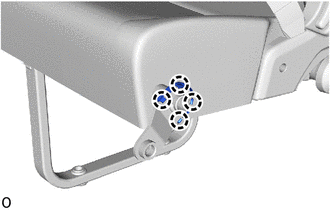
Detach the claw.
|
|
Remove in this Direction |
Detach the hook and remove the rear No. 1 seat No. 2 leg side cover as shown in the illustration.
79967W
4.REMOVE REAR NO. 1 SEAT NO. 4 LEG SIDE COVER
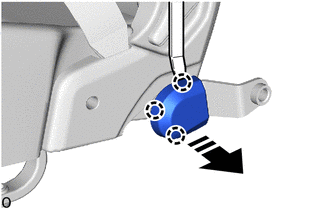
|
|
Remove in this Direction |
Using moulding remover A, detach the claw and remove the rear No. 1 seat No. 4 leg side cover as shown in the illustration.
79967X
5.REMOVE REAR NO. 1 SEAT NO. 5 LEG SIDE COVER
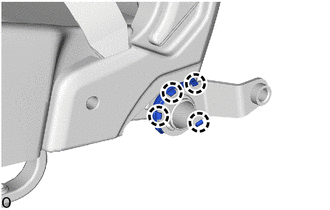
Detach the claw.
Rotate the rear No. 1 seat No. 5 leg side cover as shown in the illustration.
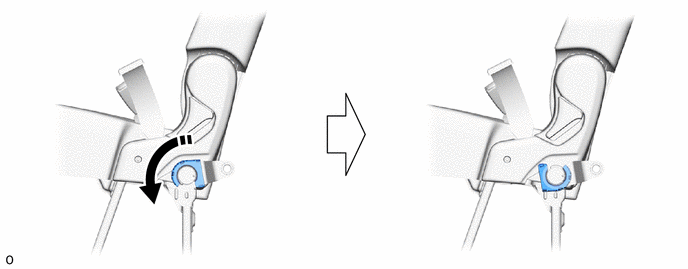
|
|
Rotate in this Direction | - | - |
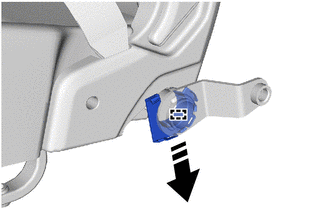
|
|
Remove in this Direction |
Detach the hook and remove the rear No. 1 seat No. 5 leg side cover as shown in the illustration.
72526J
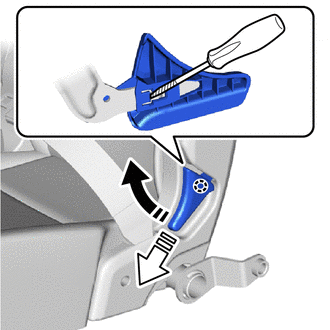
6.REMOVE NO. 1 SEAT RECLINING ADJUSTER RELEASE HANDLE LH
|
|
Lift in this Direction |

|
Remove in this Direction |

|
Protective Tape |
Using a thin-bladed screwdriver, detach the claw and remove the No. 1 seat reclining adjuster release handle LH while lifting it up as shown in the illustration.
- HINT:
-
Tape the thin-bladed screwdriver tip before use.
72525N
7.REMOVE NO. 1 SEAT RECLINING ADJUSTER RELEASE HANDLE RH
- HINT:
-
Use the same procedure described for the LH side.
72525S
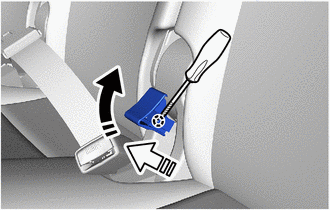
8.REMOVE CENTER NO. 1 SEAT RECLINING ADJUSTER RELEASE HANDLE
|
|
Lift in this Direction |
|
|
Remove in this Direction |
|
|
Protective Tape |
Using a thin-bladed screwdriver, detach the claw and remove the center No. 1 seat reclining adjuster release handle while lifting it up as shown in the illustration.
- HINT:
-
Tape the thin-bladed screwdriver tip before use.
71834J
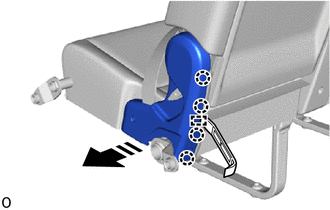
9.REMOVE NO. 1 SEAT OUTER NO. 1 RECLINING COVER LH
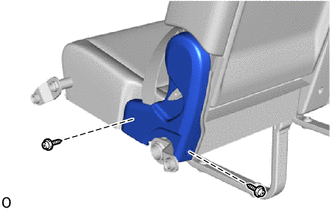
Remove the 2 screws.
|
|
Remove in this Direction |
Using moulding remover A, detach the claw and guide as shown in the illustration.
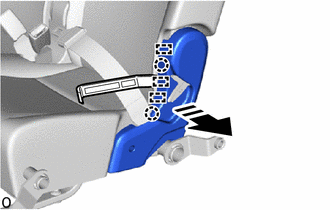
|
|
Remove in this Direction |
Using moulding remover A, detach the claw and guide and remove the No. 1 seat outer No. 1 reclining cover LH as shown in the illustration.
71833K
10.REMOVE NO. 1 SEAT OUTER NO. 1 RECLINING COVER RH
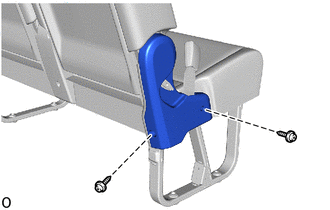
Remove the 2 screws.
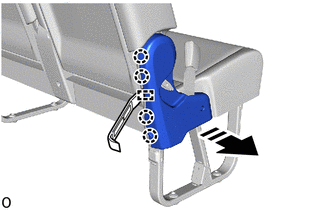
|
|
Remove in this Direction |
Using moulding remover A, detach the claw and guide as shown in the illustration.
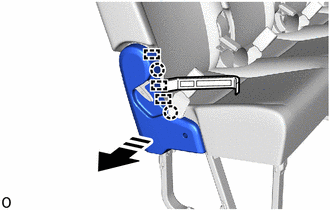
|
|
Remove in this Direction |
Using moulding remover A, detach the claw and guide and remove the No. 1 seat outer No. 1 reclining cover RH as shown in the illustration.
73330J
11.REMOVE REAR 3 PERSONS SEAT LAP TYPE BELT ASSEMBLY LH
73380R
12.REMOVE REAR 3 PERSONS SEAT BELT ASSEMBLY RH
74690A
13.REMOVE REAR SEAT ASSIST GRIP ASSEMBLY
- HINT:
-
Use the same procedure for all rear seat assist grip assemblies.
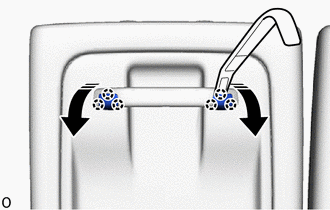
|
|
Open in this Direction |
Using moulding remover A, detach the claw and open the 2 covers as shown in the illustration.
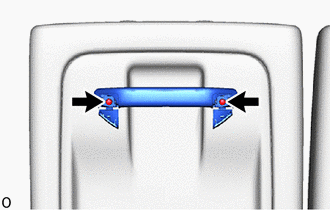
Remove the 2 screws and rear seat assist grip assembly.
71701A
14.REMOVE REAR SEATBACK BOARD SUB-ASSEMBLY RH
- HINT:
-
Use the same procedure for all rear seatback board sub-assemblies.
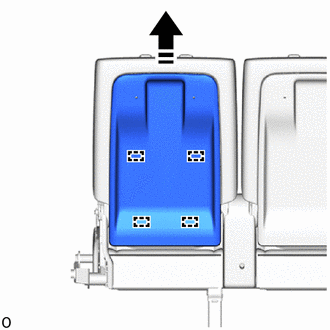
|
|
Remove in this Direction |
Detach the guide and remove the rear seatback board sub-assembly RH as shown in the illustration.
79014B
15.REMOVE NO. 1 SEATBACK COVER SUB-ASSEMBLY LH
- HINT:
-
Use the same procedure for all No. 1 seatback cover sub-assemblies.
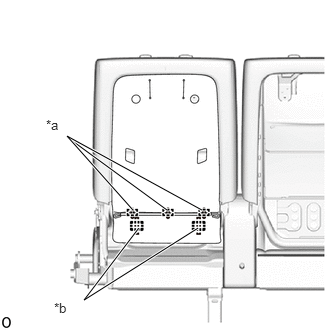
| *a | Hog Ring |
| *b | Hook |
Remove the 3 hog rings.
Detach the hook.
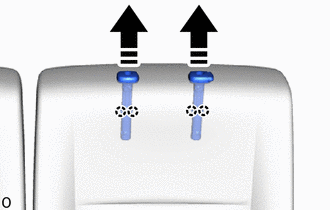
|
|
Remove in this Direction |
Detach the claw and remove the 2 rear seat headrest supports as shown in the illustration.
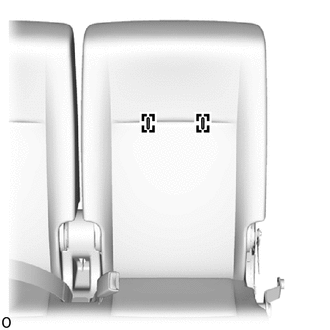
Remove the 2 hog rings and No. 1 seatback cover sub-assembly LH.
- NOTICE:
-
Be careful not to damage the No. 1 seatback cover sub-assembly LH.
16.REMOVE SEAT COVER WIRE
- HINT:
-
Use the same procedure for all seat cover wires.
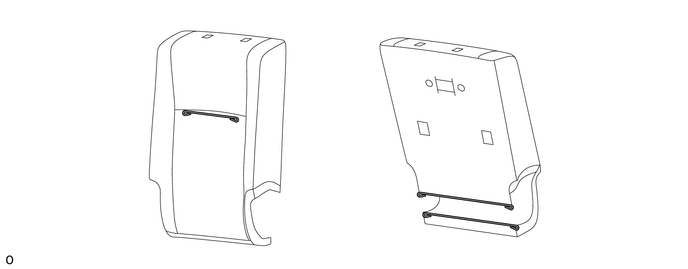
Remove the seat cover wire.
79185A
17.REMOVE NO. 1 SEATBACK PAD LH
- HINT:
-
Use the same procedure for all No. 1 seatback pads.
Remove the No. 1 seatback pad LH.
18.REMOVE SEAT CUSHION COVER WITH PAD
Detach the fastening tape.
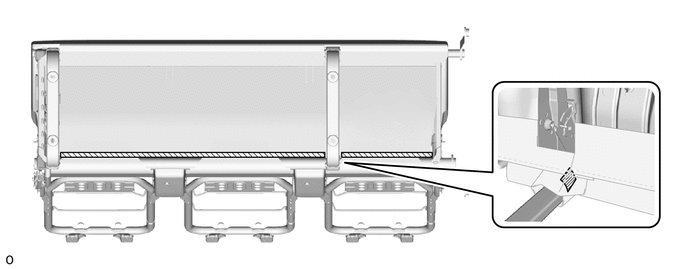
|
|
Fastening tape | - | - |
Detach the hook and remove the seat cushion cover with pad.
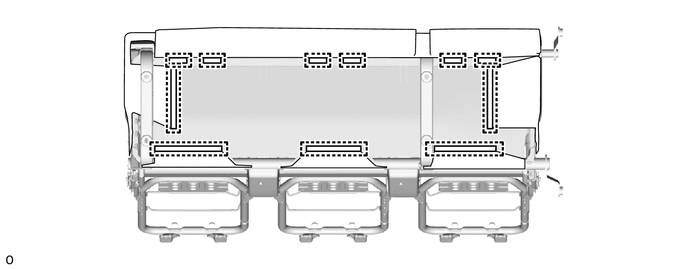
79012A
19.REMOVE NO. 1 SEAT CUSHION COVER SUB-ASSEMBLY LH
Detach the fastening tape.
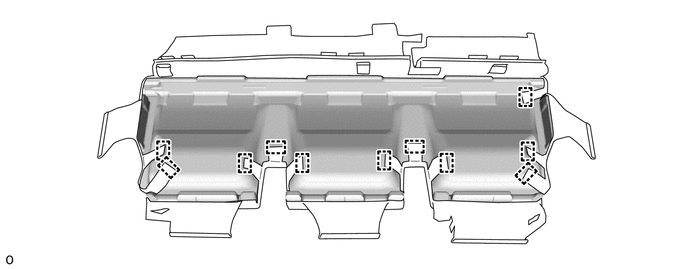
|
|
Fastening tape | - | - |
Remove the 26 hog rings and remove the No. 1 seat cushion cover sub-assembly LH from the No. 1 seat cushion pad as shown in the illustration.
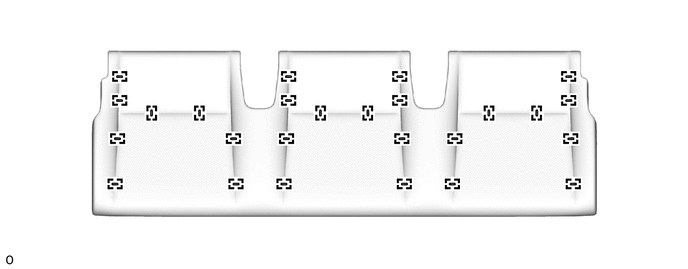
- NOTICE:
-
Be careful not to damage the No. 1 seat cushion cover sub-assembly LH.
20.REMOVE SEAT COVER WIRE
Remove the seat cover wire.
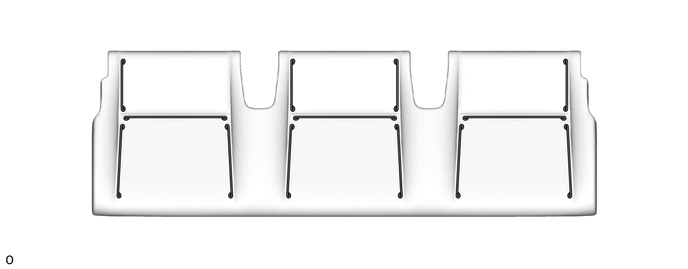
72345Q
21.REMOVE NO. 1 SEAT STAND FRAME CAP LH
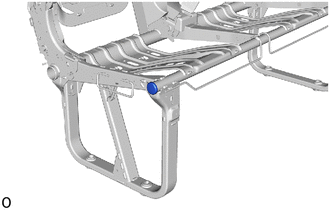
Remove the No. 1 seat stand frame cap LH.
72552P
22.REMOVE LH SEAT RECLINING HINGE COVER LH
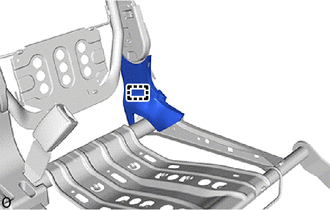
Detach the guide and remove the LH seat reclining hinge cover LH.
72551R
23.REMOVE LH SEAT RECLINING HINGE COVER RH
- HINT:
-
Use the same procedure described for the LH side.
71844J
24.REMOVE REAR NO. 1 SEAT NO. 2 RECLINING COVER LH
Remove the screw.
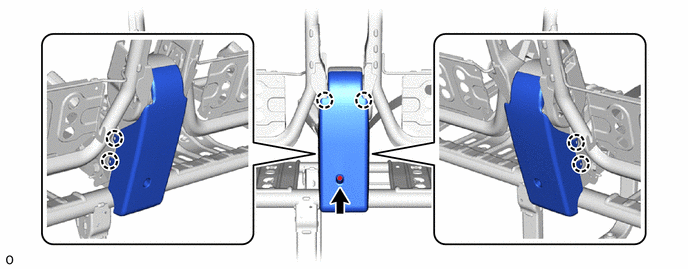
Detach the claw and remove the rear No. 1 seat No. 2 reclining cover LH.
71834L
25.REMOVE REAR SEAT RECLINING COVER LH
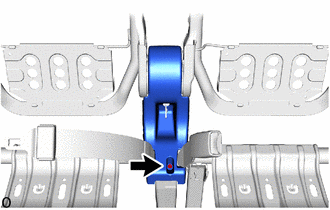
Remove the screw and rear seat reclining cover LH.
71H74A
26.REMOVE LOWER NO. 1 SEAT CUSHION SHIELD LH
Remove the screw.
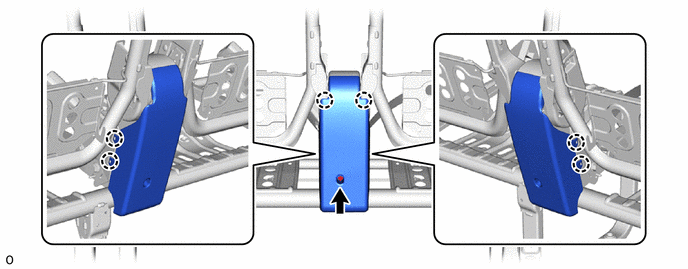
Detach the claw and remove the lower No. 1 seat cushion shield LH.
71H73A
27.REMOVE REAR LOWER NO. 1 SEAT CUSHION SHIELD
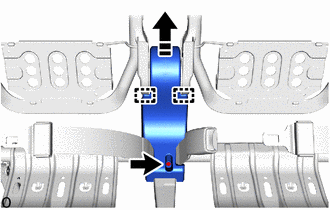
|
|
Remove in this Direction |
Remove the screw.
Detach the guide and remove the rear lower No. 1 seat cushion shield as shown in the illustration.
73380S
28.REMOVE REAR 3 PERSONS SEAT BELT ASSEMBLY LH
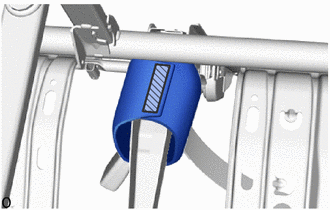
|
|
Fastening Tape |
Detach the fastening tape and open the rear seat cushion cover.
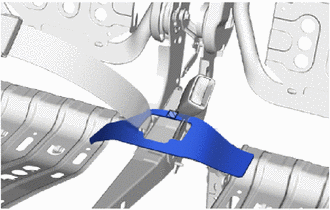
|
|
Fastening Tape |
Detach the fastening tape and remove the rear seat cushion cover.
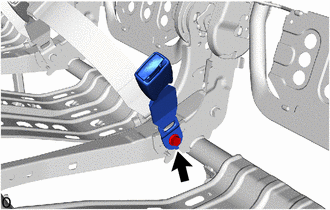
Remove the bolt and rear 3 persons seat belt assembly LH.
73330K
29.REMOVE REAR 3 PERSONS SEAT LAP TYPE BELT ASSEMBLY RH
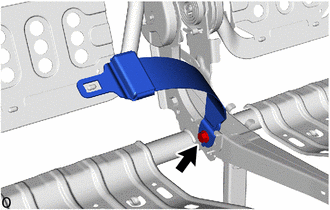
Remove the bolt and rear 3 persons seat lap type belt assembly RH.
73380T
30.REMOVE REAR 3 PERSONS SEAT BELT ASSEMBLY
|
|
Fastening Tape |
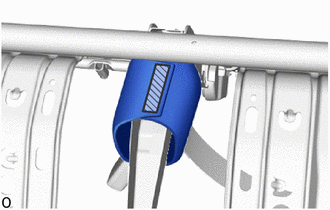
Detach the fastening tape and open the rear seat cushion cover.
|
|
Fastening Tape |
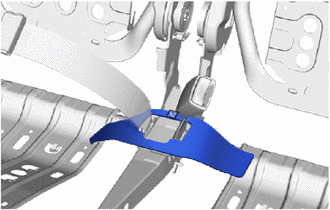
Detach the fastening tape and remove the rear seat cushion cover.
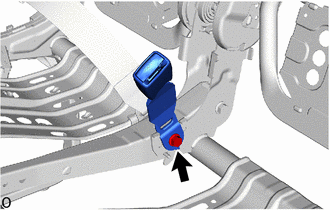
Remove the bolt and rear 3 persons seat belt assembly.
73330K
31.REMOVE REAR 3 PERSONS SEAT LAP TYPE BELT ASSEMBLY RH
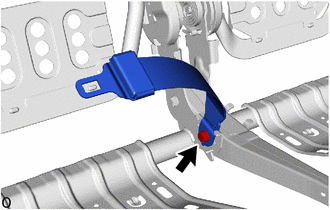
Remove the bolt and rear 3 persons seat lap type belt assembly RH.
71H76F
32.REMOVE REAR NO. 1 LH SEAT RECLINING ADJUSTER INSIDE COVER LH
- HINT:
-
Use the same procedure for the center side.
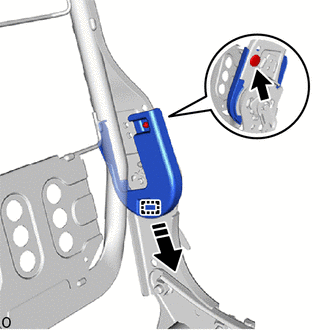
|
|
Remove in this Direction |
Remove the clip.
Detach the guide and remove the rear No. 1 LH seat reclining adjuster inside cover LH as shown in the illustration.
71H76N
33.REMOVE LH SEAT RECLINING ADJUSTER INSIDE COVER LH
- HINT:
-
Use the same procedure for the rear No. 1 LH seat reclining adjuster inside cover LH.
71H75F
34.REMOVE REAR NO. 1 LH SEAT RECLINING ADJUSTER INSIDE COVER RH
- HINT:
-
Use the same procedure for the center side.
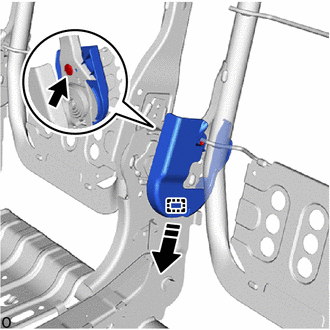
|
|
Remove in this Direction |
Remove the clip.
Detach the guide and remove the rear No. 1 LH seat reclining adjuster inside cover RH as shown in the illustration.
71H75R
35.REMOVE LH SEAT RECLINING ADJUSTER INSIDE COVER RH
- HINT:
-
Use the same procedure for the rear No. 1 LH seat reclining adjuster inside cover RH.
79290B
36.REMOVE NO. 1 SEATBACK SPRING ASSEMBLY LH
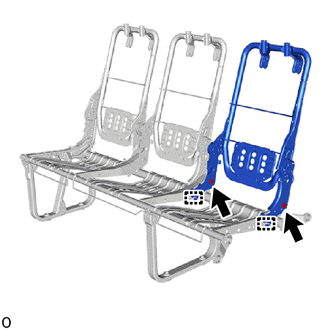
Remove the 2 bolts.
Detach the guide and remove the No. 1 seatback spring assembly LH.
79290D
37.REMOVE CENTER NO. 1 SEATBACK SPRING ASSEMBLY LH
- HINT:
-
Use the same procedure for the No. 1 seatback spring assembly LH.
79280B
38.REMOVE NO. 1 SEATBACK SPRING ASSEMBLY RH
- HINT:
-
Use the same procedure for the No. 1 seatback spring assembly LH.