SEAT REAR SEAT ASSEMBLY(for Folding Type) REASSEMBLY
CAUTION / NOTICE / HINT
- CAUTION:
- ·
Wear protective gloves. Sharp areas on the parts may injure your hands.
·There is risk of injury.
- HINT:
- ·
Use the same procedure for the RH and LH sides.
·The following procedure is for the LH side.
PROCEDURE

 71647J
1.INSTALL REAR SEAT CUSHION EDGE PROTECTOR LH (w/ Under Cover)
71647J
1.INSTALL REAR SEAT CUSHION EDGE PROTECTOR LH (w/ Under Cover)
- HINT:
-
When installing the rear seat cushion edge protector LH, heat the rear seat cushion spring sub-assembly LH using a heat light.
- Standard:
Item Temperature Rear Seat Cushion Spring Sub-assembly LH 20 to 30°C (68 to 86°F)
- CAUTION:
-
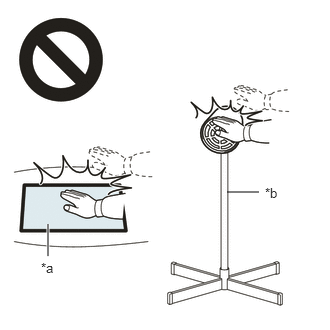 2.365,2 2.698,2 false 0.5,2.333 0.5,2.667 true 0.427,2.708 0.74,2.865 0.313,0.156 10 false *a 2.76,1.927 3.073,2.083 0.313,0.156 10 false *b
*a Heated Part *b Heat Light
- ·
Do not touch the heat light and heated parts.
·Touching the heat light may result in burns.
·Touching heated parts for a long time may result in burns.
When reusing the rear seat cushion spring sub-assembly LH:
Using a heat light, heat the rear seat cushion spring sub-assembly LH surface.
Remove any remaining double-sided tape from the rear seat cushion spring sub-assembly LH.
Wipe off any tape adhesive residue with cleaner.
- NOTICE:
- ·
Installing the rear seat cushion edge protector LH with some double-sided tape remaining may cause poor adhesion. Perform this procedure until sufficiently removed it.
·Make sure to use a cloth when removing. Using a screwdriver, etc., may cause damage and poor adhesion.
·Clean the new rear seat cushion spring sub-assembly LH surface.
Remove the release paper of a new rear seat cushion edge protector LH trying not to touch the adhesional surface.
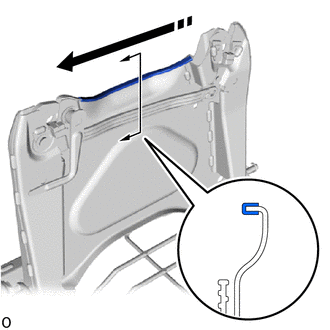
| *a | R End |
| *b | Application Start Position |

|
Install in this Direction |
Align the rear seat cushion edge protector LH with the application start position and install it shown in the illustration.
72658H
2.INSTALL REAR SEAT LOCK HANDLE KNOB LH (w/ Under Cover)
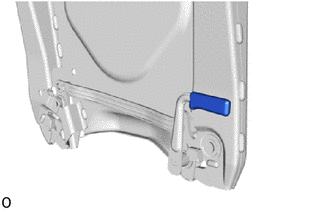
Install the rear seat lock handle knob LH.
79958B
3.INSTALL REAR SEAT REAR BRACKET COVER LH
w/o Under Cover:
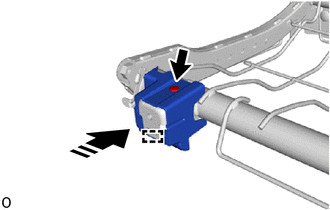

|
Seat Under Tray Bracket Cover LH |
|
|
Install in this Direction |
Attach the guide as shown in the illustration.
Install the rear seat rear bracket cover LH with the seat under tray bracket cover LH.
w/ Under Cover:
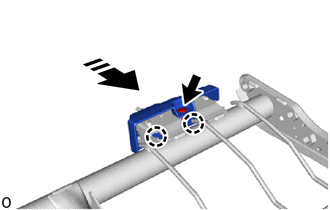
|
|
Seat Under Tray Bracket Cover LH |
|
|
Install in this Direction |
Attach the claw as shown in the illustration.
Install the rear seat rear bracket cover LH with the seat under tray bracket cover LH.
4.INSTALL SEAT COVER WIRE

Install the seat cover wire.
- HINT:
- ·
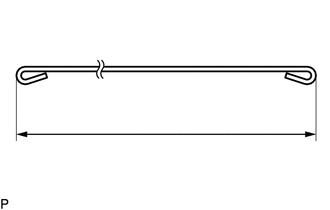
Wire 1000 mm (3.28 ft.) or longer and shaped wire are available as supplied parts.
·When a wire that is less than 1000 mm (3.28 ft.) in length is needed, cut or shape 1000 mm (3.28 ft.) wire into the dimensions shown in the illustration.
·Make sure to read the Precaution section before preparing the wire.
- Dimensions:
A 120 mm (4.72 in.) B 210 mm (8.27 in.)
- HINT:
-
-
The dimensions shown in the illustration are the lengths.
79042A
5.INSTALL NO. 4 SEAT CUSHION COVER SUB-ASSEMBLY LH
- HINT:
-
When installing the No. 4 seat cushion cover sub-assembly LH, refer to the Precaution section in order to prevent wrinkles from forming.
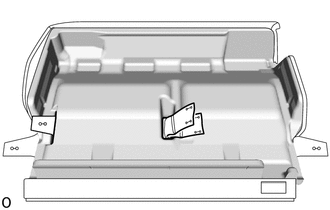
| *a | Hole |
Insert the bracket of the No. 4 seat cushion cover sub-assembly LH to the hole of the No. 4 seat cushion pad LH.
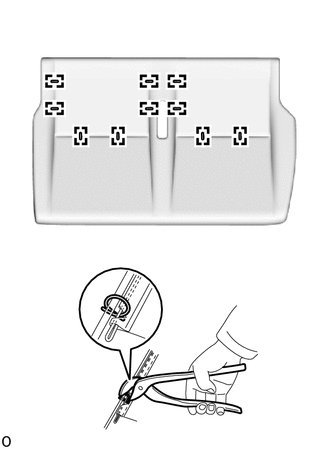
| *a | Hog Ring Pliers |
Using a hog ring pliers, install the No. 4 seat cushion cover sub-assembly LH with 10 new hog rings in the order indicated in the illustration.
- NOTICE:
- ·
Be careful not to damage the No. 4 seat cushion cover sub-assembly LH.
- ·
Be sure to securely install the hog rings as shown in the illustration while preventing wrinkles from forming on the No. 4 seat cushion cover sub-assembly LH.
w/o Under Cover:
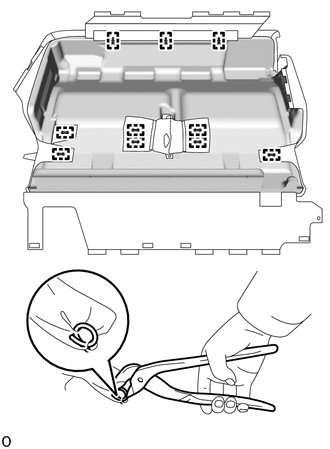
| *a | Hog Ring Pliers |
Using a hog ring pliers, install the 10 new hog rings.
- NOTICE:
-
Be careful not to damage the No. 4 seat cushion cover sub-assembly LH.
w/ Under Cover:
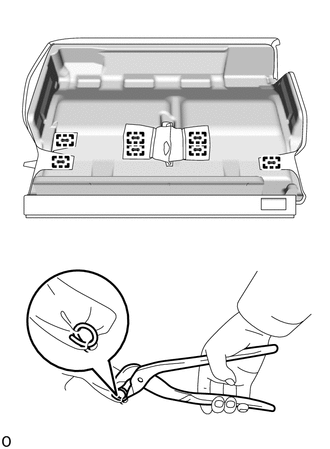
| *a | Hog Ring Pliers |
Using a hog ring pliers, install the 7 new hog rings.
- NOTICE:
-
Be careful not to damage the No. 4 seat cushion cover sub-assembly LH.
6.INSTALL NO. 4 SEAT CUSHION COVER WITH PAD
Install the No. 4 seat cushion cover with pad.
73380P
7.INSTALL SPACE UP SEAT REAR SEAT BELT ASSEMBLY RH
73380Q
8.INSTALL SPACE UP SEAT REAR SEAT BELT ASSEMBLY LH
58959K
9.INSTALL REAR SEAT CUSHION UNDER COVER CUSHION LH (w/ Under Cover)
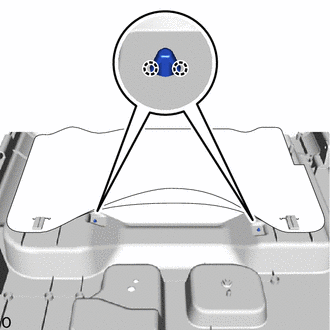
Attach the claw and install the 2 rear seat cushion under cover cushions LH.
72928E
10.INSTALL REAR SEAT CUSHION UNDER COVER LH (w/ Under Cover)
Install the rear seat cushion under cover LH with the 6 screws.
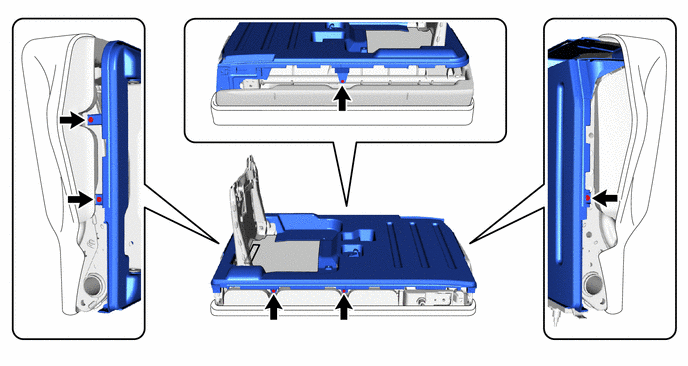

|
Fastening Tape | - | - |
Attach the fastening tape.
79408C
11.INSTALL REAR SEAT HOOK SUB-ASSEMBLY LH (w/ Under Cover)
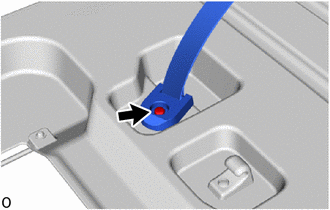
Install the rear seat hook sub-assembly LH with the screw.
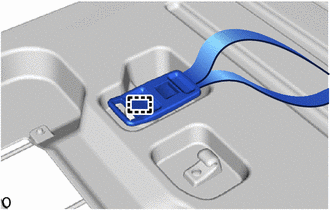
Attach the guide.
79328A
12.INSTALL REAR SEAT FRONT LEG BRACKET LH
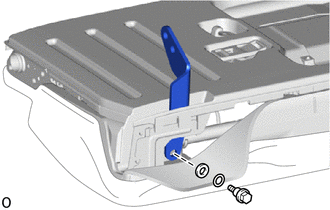
| *1 | Rear Seat Reclining Spacer LH |
| *a | Washer |
Install the rear seat front leg bracket LH with the rear seat reclining spacer LH, washer and bolt.
- Torque:
- 29 N*m (296 kgf*cm, 21 ft.*lbf)
w/o Under Cover:
Attach the hook.
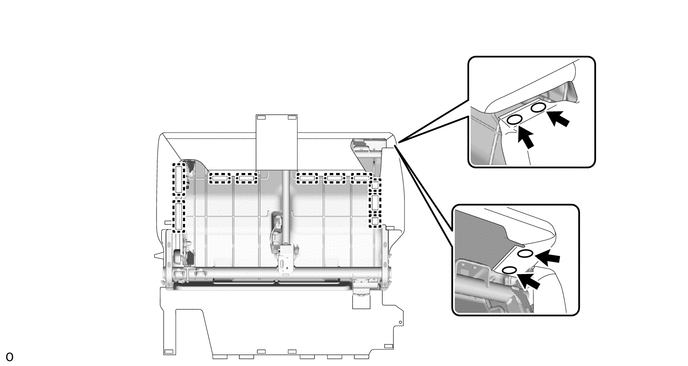
|
|
Seat Cover Fastener LH | - | - |
Install the 4 seat cover fasteners LH.
Attach the hook.
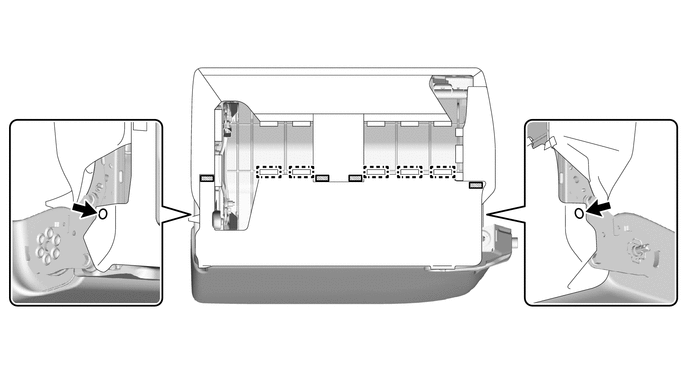
|
|
Rear Seat Cushion Spring Clip LH |
|
Fastening Tape |
Install the 2 rear seat cushion spring clips LH.
Attach the fastening tape.
w/ Under Cover:
Attach the hook.
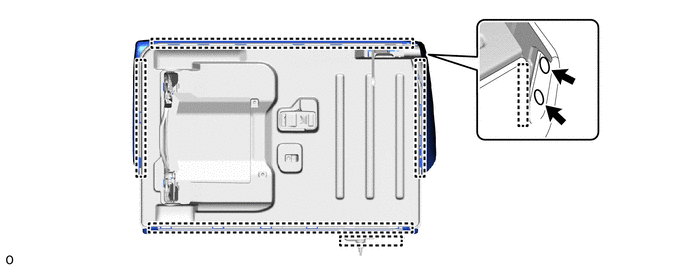
|
|
Seat Cover Fastener LH | - | - |
Install the 2 seat cover fasteners LH.
79977L
13.INSTALL SPACE UP SEAT SEATBACK FELT (w/ Felt)
- HINT:
-
When installing the space up seat seatback felt, heat the No. 3 seatback spring assembly LH using a heat light.
- Standard:
Item Temperature No. 3 Seatback Spring Assembly LH 20 to 30°C (68 to 86°F)
- CAUTION:
-
2.365,2 2.698,2 false 0.5,2.333 0.5,2.667 true 0.427,2.708 0.74,2.865 0.313,0.156 10 false *a 2.76,1.927 3.073,2.083 0.313,0.156 10 false *b
*a Heated Part *b Heat Light
- ·
Do not touch the heat light and heated parts.
·Touching the heat light may result in burns.
·Touching heated parts for a long time may result in burns.
When reusing the No. 3 seatback spring assembly LH:
Using a heat light, heat the No. 3 seatback spring assembly LH surface.
Remove any remaining double-sided tape from the No. 3 seatback spring assembly LH.
Wipe off any tape adhesive residue with cleaner.
- NOTICE:
- ·
Installing the space up seat seatback felt with some double-sided tape remaining may cause poor adhesion. Perform this procedure until sufficiently removed it.
·Make sure to use a cloth when removing. Using a screwdriver, etc., may cause damage and poor adhesion.
·Clean the new No. 3 seatback spring assembly LH surface.
Remove the release paper of a new space up seat seatback felt trying not to touch the adhesional surface.
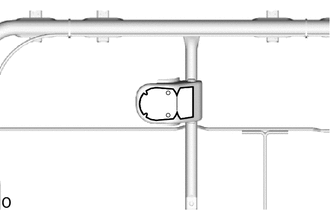
Install the space up seat seatback felt as shown in the illustration.
71T76B
14.INSTALL RECLINING ADJUSTER INSIDE COVER LH (for 2 Point Type Rear Seat Belt)
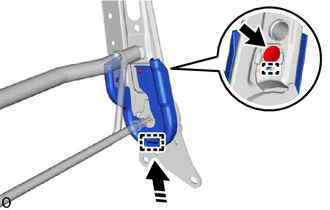
|
|
Install in this Direction |
Attach the guide as shown in the illustration.
Install the reclining adjuster inside cover LH with the clip.
71T75
15.INSTALL RECLINING ADJUSTER INSIDE COVER RH (for 2 Point Type Rear Seat Belt)
- HINT:
-
Use the same procedure described for the LH side.
79977J
16.INSTALL SEATBACK FELT (for 3 Point Type Rear Seat Belt)
- HINT:
-
When installing the seatback felt, heat the rear seatback spring assembly LH using a heat light.
- Standard:
Item Temperature Rear Seatback Spring Assembly LH 20 to 30°C (68 to 86°F)
- CAUTION:
-
2.365,2 2.698,2 false 0.5,2.333 0.5,2.667 true 0.427,2.708 0.74,2.865 0.313,0.156 10 false *a 2.76,1.927 3.073,2.083 0.313,0.156 10 false *b
*a Heated Part *b Heat Light
- ·
Do not touch the heat light and heated parts.
·Touching the heat light may result in burns.
·Touching heated parts for a long time may result in burns.
When reusing the rear seatback spring assembly LH:
Using a heat light, heat the rear seatback spring assembly LH surface.
Remove any remaining double-sided tape from the rear seatback spring assembly LH.
Wipe off any tape adhesive residue with cleaner.
- NOTICE:
- ·
Installing the seatback felt with some double-sided tape remaining may cause poor adhesion. Perform this procedure until sufficiently removed it.
·Make sure to use a cloth when removing. Using a screwdriver, etc., may cause damage and poor adhesion.
·Clean the new rear seatback spring assembly LH surface.
Remove the release paper of a new seatback felt trying not to touch the adhesional surface.
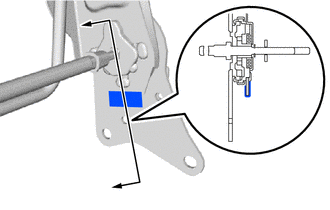
Install the seatback felt as shown in the illustration.
71868T
17.INSTALL REAR SEAT INNER NO. 1 CUSHION SHIELD LH (for 3 Point Type Rear Seat Belt)
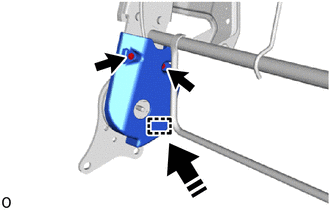
|
|
Install in this Direction |
Attach the guide as shown in the illustration.
Install the rear seat inner No. 1 cushion shield LH with the 2 screws.
73390
18.INSTALL REAR SEAT 3 POINT TYPE BELT ASSEMBLY LH (for 3 Point Type Rear Seat Belt)
73375
19.INSTALL REAR SEAT SHOULDER BELT COVER LH (for 3 Point Type Rear Seat Belt)
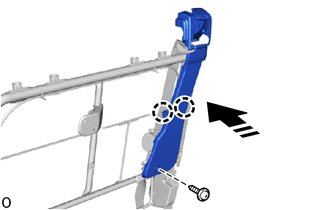
|
|
Install in this Direction |
Attach the claw as shown in the illustration.
Install the rear seat shoulder belt cover LH with the screw.
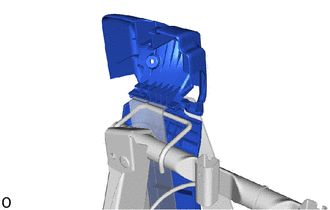
| *a | Slit |
Pass the rear seat 3 point type belt assembly LH to the slit of the rear seat shoulder belt cover LH.
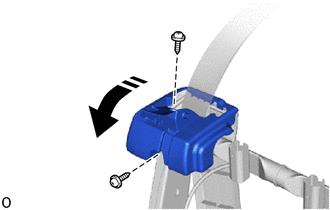
|
|
Close in this Direction |
Close the rear seat shoulder belt cover LH as shown in the illustration.
Install the 2 screws.
20.INSTALL SEAT COVER WIRE
Install the seat cover wire.
- HINT:
- ·
Wire 1000 mm (3.28 ft.) or longer and shaped wire are available as supplied parts.
·When a wire that is less than 1000 mm (3.28 ft.) in length is needed, cut or shape 1000 mm (3.28 ft.) wire into the dimensions shown in the illustration.
·Make sure to read the Precaution section before preparing the wire.
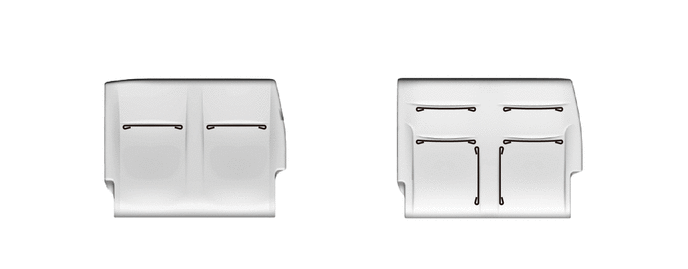
| *A | for Type A | *B | for Type B |
- Dimensions:
A 210 mm (8.27 in.) - -
- HINT:
-
-
The dimensions shown in the illustration are the lengths.
79034A
21.INSTALL NO. 3 SEATBACK COVER SUB-ASSEMBLY LH
- HINT:
-
When installing the No. 3 seatback cover sub-assembly LH, refer to the Precaution section in order to prevent wrinkles from forming.
for Type A:
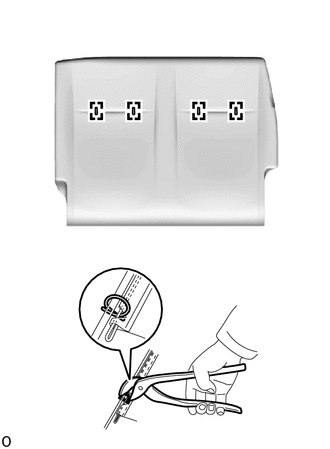
| *a | Hog Ring Pliers |
Using a hog ring pliers, install the No. 3 seatback cover sub-assembly LH with 4 new hog rings in the order indicated in the illustration.
- NOTICE:
- ·
Be careful not to damage the No. 3 seatback cover sub-assembly LH.
- ·
Be sure to securely install the hog rings as shown in the illustration while preventing wrinkles from forming on the No. 3 seatback cover sub-assembly LH.
for Type B:
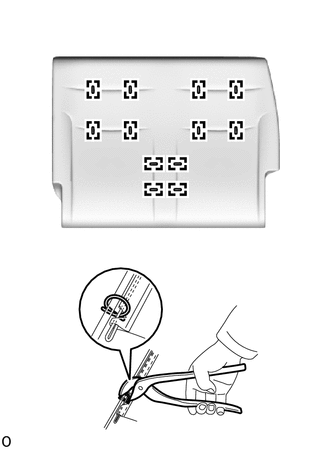
| *a | Hog Ring Pliers |
Using a hog ring pliers, install the No. 3 seatback cover sub-assembly LH with 12 new hog rings in the order indicated in the illustration.
- NOTICE:
- ·
Be careful not to damage the No. 3 seatback cover sub-assembly LH.
- ·
Be sure to securely install the hog rings as shown in the illustration while preventing wrinkles from forming on the No. 3 seatback cover sub-assembly LH.
22.INSTALL NO. 3 SEATBACK COVER WITH PAD
Set the No. 3 seatback cover with pad.
|
|
Install in this Direction |
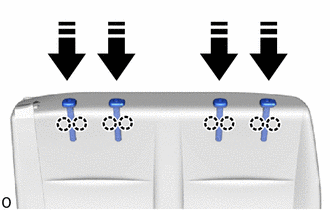
w/ Headrest:
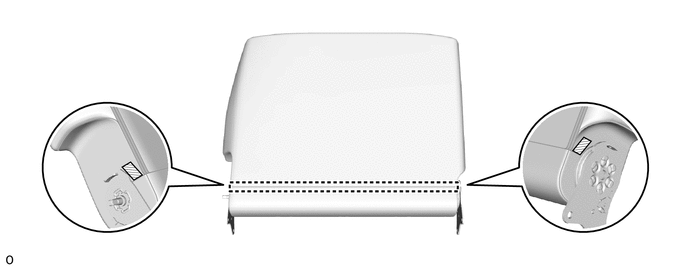
Attach the claw and install the 4 rear seat headrest support assemblies as shown in the illustration.
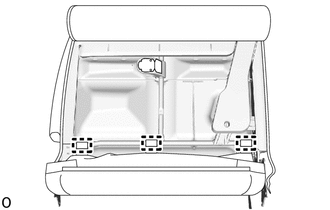
Attach the hook.
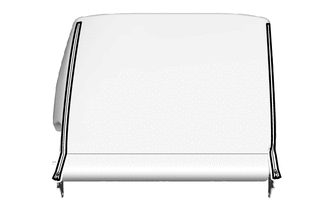
Close the 2 fasteners.
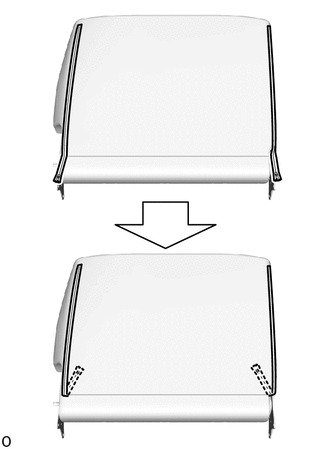
Insert the 2 fasteners.
Attach the hook.
|
|
Fastening Tape | - | - |
Attach the fastening tape and install the No. 3 seatback cover with pad.
72667D
23.INSTALL REAR SEATBACK UPPER LOCK BEZEL LH (for 3 Point Type Rear Seat Belt)
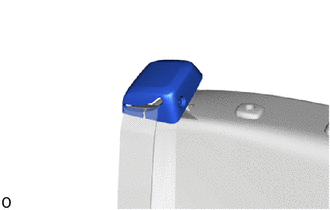
| *a | Slit |
Pass the rear seat 3 point type belt assembly LH to the slit of the rear seatback upper lock bezel LH.
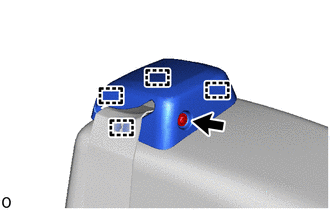
Attach the guide.
Install the rear seatback upper lock bezel LH with the screw.
24.INSTALL REAR SEATBACK ASSEMBLY
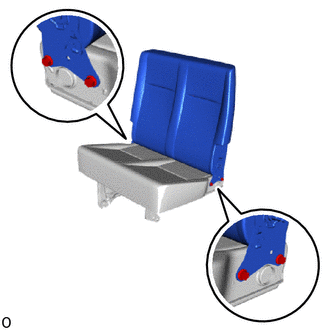
Install the rear seatback assembly with the 4 bolts.
- Torque:
- 42 N*m (428 kgf*cm, 31 ft.*lbf)
71834R
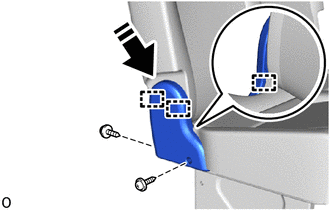
25.INSTALL REAR SEAT RECLINING COVER LH
|
|
Install in this Direction |
Attach the guide as shown in the illustration.
Install the rear seat reclining cover LH with the 2 screws.
73330P
26.INSTALL SPACE UP SEAT REAR SEAT LAP TYPE BELT ASSEMBLY LH (for 2 Point Type Rear Seat Belt)
71834S
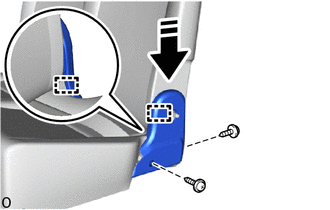
27.INSTALL REAR SEAT NO. 1 RECLINING COVER LH
|
|
Install in this Direction |
Attach the guide as shown in the illustration.
Install the rear seat No. 1 reclining cover LH with the 2 screws.
72526L
28.INSTALL RECLINING ADJUSTER RELEASE HANDLE LH
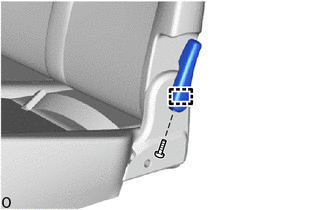
Attach the guide.
Install the reclining adjuster release handle LH with the screw.
79329B
29.INSTALL REAR SEAT REAR LEG BRACKET LH
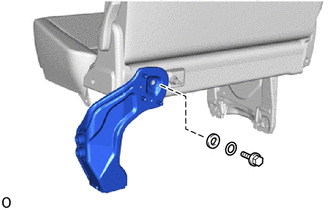
| *a | Bush |
| *b | Washer |
Install the rear seat rear leg bracket LH with the bush, washer and bolt.
- Torque:
- 29 N*m (296 kgf*cm, 21 ft.*lbf)
71384C
30.INSTALL REAR SEAT REAR CUSHION SET BRACKET LH (w/ Under Cover)
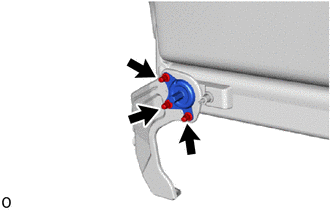
Install the rear seat rear cushion set bracket LH with the 3 nuts.
- Torque:
- 42 N*m (428 kgf*cm, 31 ft.*lbf)
71499U
31.INSTALL SEAT CUSHION SPRING DAMPER LH (w/ Under Cover)
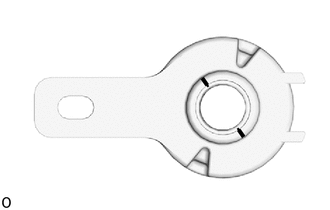
| *a | Matchmarks |
Align the matchmarks of the seat cushion spring damper LH.
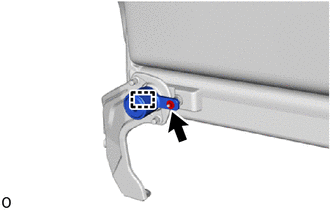
Attach the guide.
Install the seat cushion spring damper LH with the nut.
- Torque:
- 6.0 N*m (61 kgf*cm, 53 in.*lbf)
71629G
32.INSTALL REAR SEAT CUSHION HINGE COVER (w/ Under Cover)
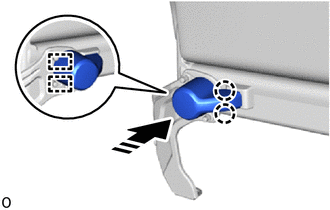
|
|
Install in this Direction |
Attach the guide and claw and install the rear seat cushion hinge cover as shown in the illustration.
71324P
33.INSTALL NO. 1 SEAT CUSHION RH (w/ Under Cover)
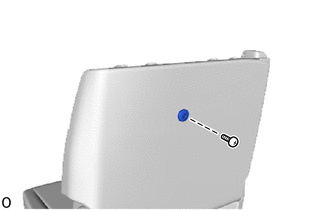
Install the No. 1 seat cushion RH with the screw.
73390
34.INSTALL REAR SEAT 3 POINT TYPE BELT ASSEMBLY LH (SEAT ANCHOR) (for 3 Point Type Rear Seat Belt)
73330Q
35.INSTALL SPACE UP SEAT REAR SEAT LAP TYPE BELT ASSEMBLY RH (for 2 Point Type Rear Seat Belt)
73233D
36.INSTALL OUTER LAP BELT ANCHOR COVER (w/ Cover)