LIGHTING (INT) ROOM LIGHT REMOVAL
PROCEDURE

 81240
1.REMOVE NO. 1 ROOM LIGHT ASSEMBLY (for LED Type)
81240
1.REMOVE NO. 1 ROOM LIGHT ASSEMBLY (for LED Type)
- HINT:
-
Use the same procedure for all No. 1 room light assemblies.
for Type A:
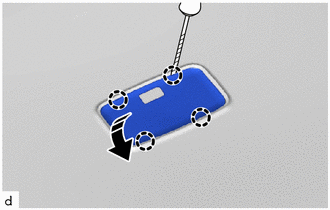

|
Remove in this Direction |

|
Protective Tape |
Using a screwdriver with its tip wrapped in protective tape, detach the claw and remove the room light lens as shown in the illustration.
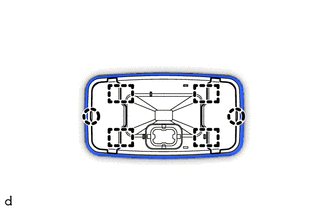
Detach the claw and guide and remove the inner cover from No. 1 room light assembly.
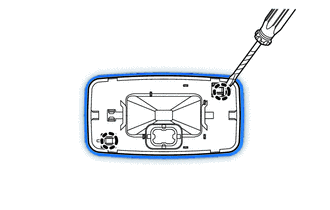
|
|
Protective Tape |
Using a screwdriver with its tip wrapped in protective tape, detach the claw and remove the No. 1 room light assembly.
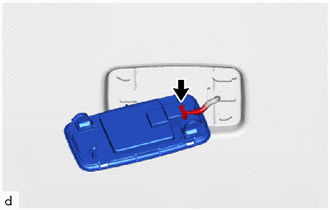
Disconnect the connector and remove the No. 1 room light assembly.
for Type B:
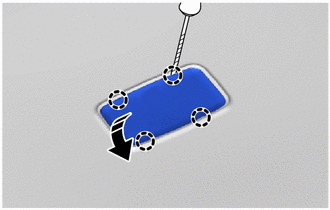
|
|
Remove in this Direction |
|
|
Protective Tape |
Using a screwdriver with its tip wrapped in protective tape, detach the claw and remove the room light lens as shown in the illustration.
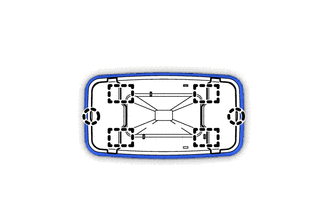
Detach the claw and guide and remove the inner cover from No. 1 room light assembly.
|
|
Protective Tape |
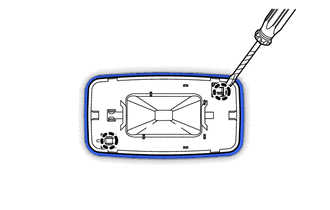
Using a screwdriver with its tip wrapped in protective tape, detach the claw and remove the No. 1 room light assembly.
Disconnect the connector and remove the No. 1 room light assembly.
81240D
2.REMOVE NO. 2 ROOM LIGHT ASSEMBLY (for LED Type)
for Type A:
|
|
Remove in this Direction |
|
|
Protective Tape |
Using a screwdriver with its tip wrapped in protective tape, detach the claw and remove the room light lens as shown in the illustration.
Detach the claw and guide and remove the inner cover from No. 2 room light assembly.
|
|
Protective Tape |
Using a screwdriver with its tip wrapped in protective tape, detach the claw and remove the No. 2 room light assembly.
Disconnect the connector and remove the No. 2 room light assembly.
for Type B:
|
|
Remove in this Direction |
|
|
Protective Tape |
Using a screwdriver with its tip wrapped in protective tape, detach the claw and remove the room light lens as shown in the illustration.
Detach the claw and guide and remove the inner cover from No. 2 room light assembly.
|
|
Protective Tape |
Using a screwdriver with its tip wrapped in protective tape, detach the claw and remove the No. 2 room light assembly.
Disconnect the connector and remove the No. 2 room light assembly.
81240
3.REMOVE NO. 1 ROOM LIGHT ASSEMBLY (for Bulb Type)
- HINT:
-
Use the same procedure for all No. 1 room light assemblies.
|
|
Remove in this Direction |
|
|
Protective Tape |
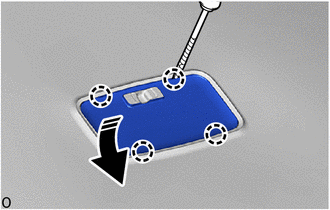
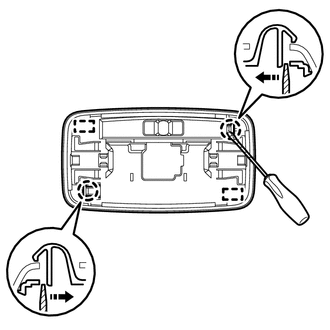
Using a screwdriver with its tip wrapped in protective tape, detach the claw and remove the No. 1 room light lens as shown in the illustration.
|
|
Remove in this Direction |
|
|
Protective Tape |
Using a screwdriver with its tip wrapped in protective tape, detach the claw and guide and remove the No. 1 room light housing from the roof headlining assembly.
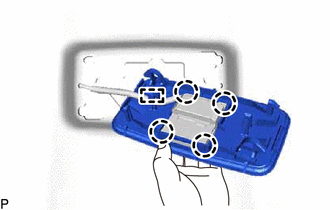
Detach the claw and guide and remove the No. 1 room light housing from the No. 1 room light switch base.
81240B
4.REMOVE NO. 1 ROOM LIGHT BULB (for Bulb Type)
- HINT:
-
Use the same procedure for all No. 1 room blubs.
|
|
Remove in this Direction (1) |

|
Remove in this Direction (2) |
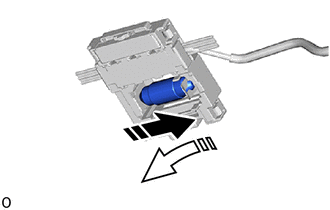
Remove the No. 1 room light bulb as shown in the illustration.