INTERIOR PANELS / TRIM ROOF HEADLINING(for Semi-trim) REASSEMBLY
CAUTION / NOTICE / HINT
- HINT:
- ·
Use the same procedure for RHD and LHD vehicles.
·The procedure listed below is for LHD vehicles.
PROCEDURE

 63610C
1.INSTALL NO. 1 AIR OUTLET REGISTER ASSEMBLY (for Standard Roof, w/ Rear Air Duct)
63610C
1.INSTALL NO. 1 AIR OUTLET REGISTER ASSEMBLY (for Standard Roof, w/ Rear Air Duct)
867C1
2.INSTALL MIRROR CAMERA WIRE (for Standard Roof, w/ Digital Inner Mirror)
w/o Rear Air Duct:
Fix the mirror camera wire in place with tape as shown in the illustration.
- HINT:
-
Align the tape with the markings when attaching it.
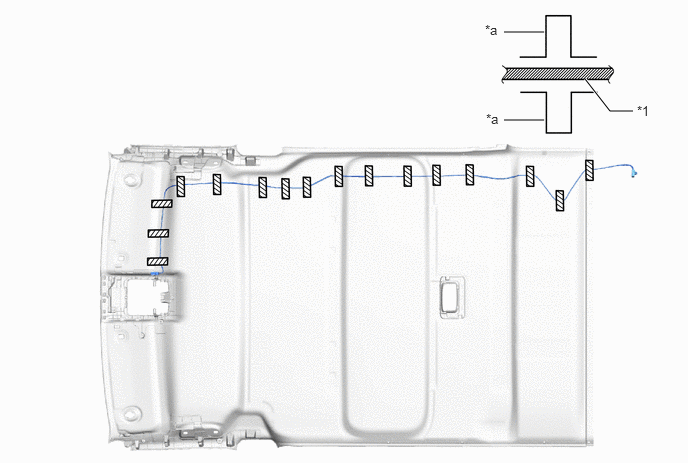
| *1 | Mirror Camera Wire | - | - |
| *a | Marking | - | - |

|
Tape | - | - |
82172
3.INSTALL NO. 2 ROOF WIRE (for Standard Roof)
w/ Rear Wiper or w/ Digital Inner Mirror:
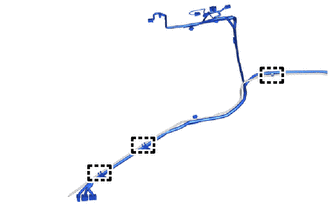
Attach the clamp to install the No. 2 roof wire to the washer hose.
w/ Rear Air Duct:
Fix the No. 2 roof wire in place with tape as shown in the illustration.
- HINT:
- ·
Align the tape with the markings when attaching it.
·Align the No. 2 roof wire positioning tape and washer hose positioning tape with the position shown in the illustration.
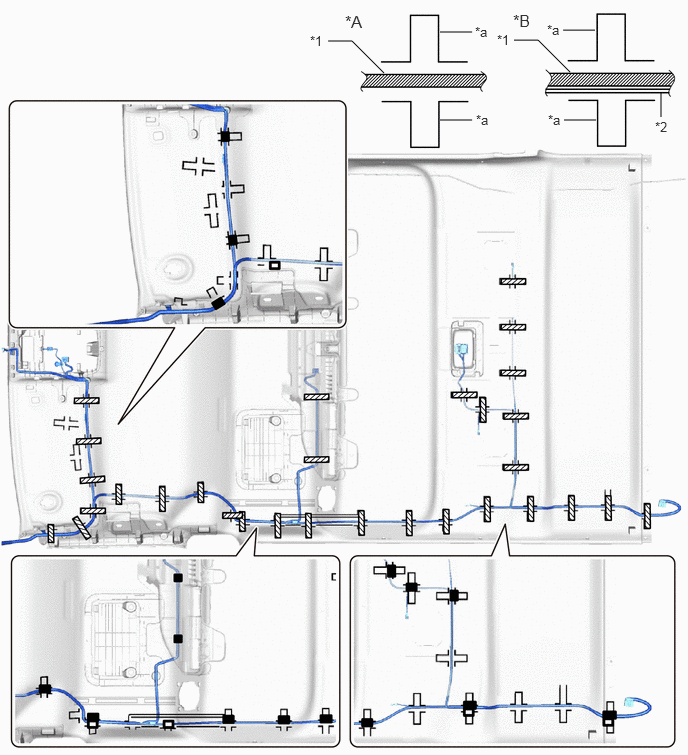
| *A | w/o Rear Wiper or w/o Digital Inner Mirror: | *B | w/ Rear Wiper or w/ Digital Inner Mirror: |
| *1 | No. 2 Roof Wire | *2 | Washer Hose |
| *a | Marking | - | - |

|
No. 2 Roof Wire Positioning Tape | 
|
Washer Hose Positioning Tape |
|
|
Tape | - | - |
w/o Rear Air Duct:
Fix the No. 2 roof wire in place with tape as shown in the illustration.
- HINT:
- ·
Align the tape with the markings when attaching it.
·Align the No. 2 roof wire positioning tape and washer hose positioning tape with the position shown in the illustration.
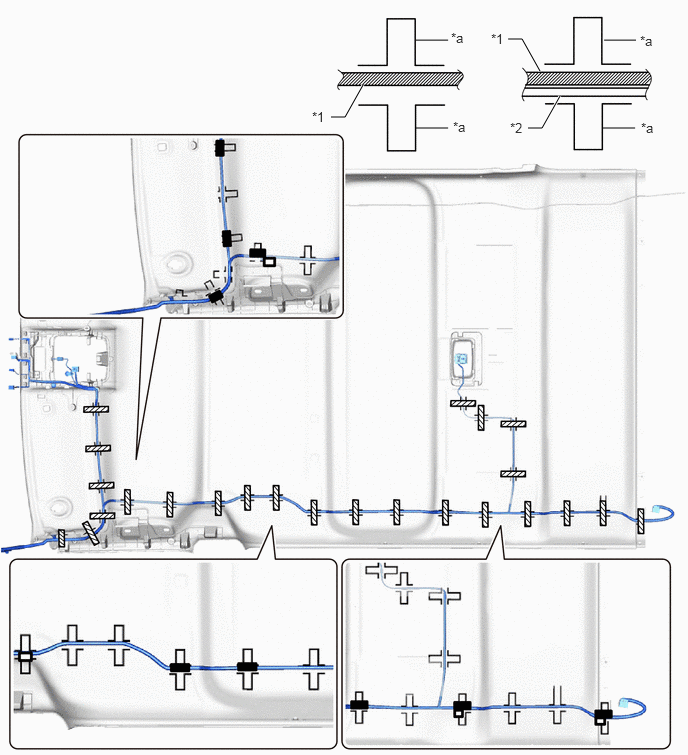
| *A | w/o Rear Wiper or w/o Digital Inner Mirror: | *B | w/ Rear Wiper or w/ Digital Inner Mirror: |
| *1 | No. 2 Roof Wire | *2 | Washer Hose |
| *a | Marking | - | - |
|
|
No. 2 Roof Wire Positioning Tape |
|
Washer Hose Positioning Tape |
|
|
Tape | - | - |
w/ Digital Inner Mirror:
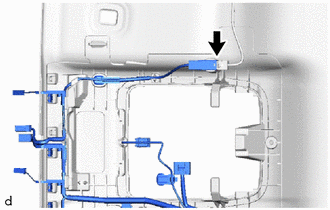
Connect the connector.
Attach each clamp.
63416B
4.INSTALL ROOF SPEAKER GRILLE LH (for Standard Roof, 4 Speakers)
63415B
5.INSTALL ROOF SPEAKER GRILLE RH (for Standard Roof, 4 Speakers)
- HINT:
-
Use the same procedure described for the LH side.
63342
6.INSTALL NO. 2 ROOF SILENCER PAD (for Standard Roof, LH Side)
for 4 Door:
Remove the release paper from No. 2 roof silencer pads.
- HINT:
-
After removing the release paper, keep the exposed adhesive free from foreign matter.
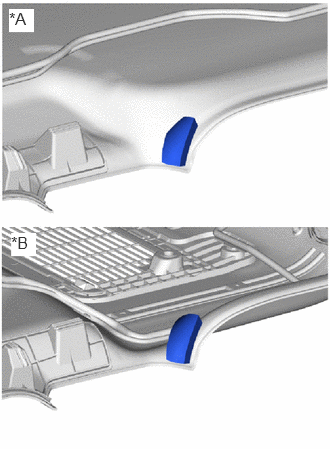
| *A | w/o Rear Air Duct |
| *B | w/ Rear Air Duct |
Install a new No. 2 roof silencer pad.
for 5 Door:
Remove the release paper from 3 No. 2 roof silencer pads.
- HINT:
-
After removing the release paper, keep the exposed adhesive free from foreign matter.
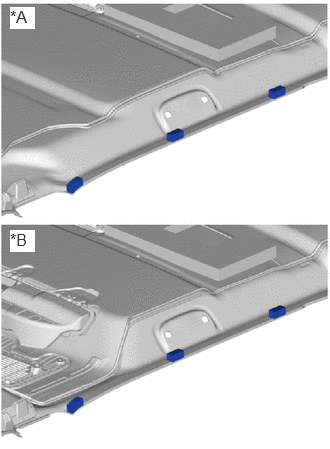
| *A | w/o Rear Air Duct |
| *B | w/ Rear Air Duct |
Install the 3 new No. 2 roof silencer pads.
63342
7.INSTALL NO. 2 ROOF SILENCER PAD (for Standard Roof, RH Side)
for 4 Door:
Remove the release paper from No. 2 roof silencer pads.
- HINT:
-
After removing the release paper, keep the exposed adhesive free from foreign matter.
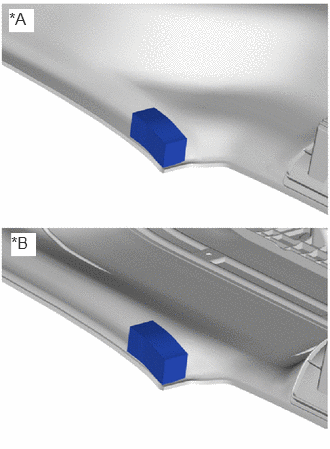
| *A | w/o Rear Air Duct |
| *B | w/ Rear Air Duct |
Install a new No. 2 roof silencer pad.
for 5 Door:
Remove the release paper from 3 No. 2 roof silencer pads.
- HINT:
-
After removing the release paper, keep the exposed adhesive free from foreign matter.
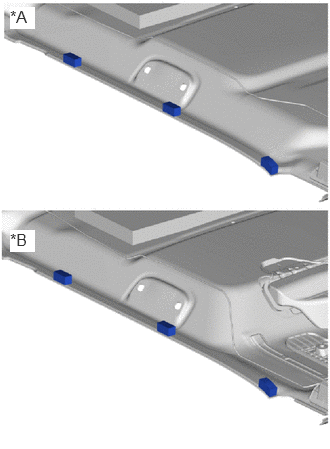
| *A | w/o Rear Air Duct |
| *B | w/ Rear Air Duct |
Install the 3 new No. 2 roof silencer pads.
867C1
8.INSTALL MIRROR CAMERA WIRE (for High Roof)
w/o Rear Air Duct:
Apply butyl tape as shown in the illustration.
- HINT:
-
Place the tape securely so that it is not misaligned or peeling.
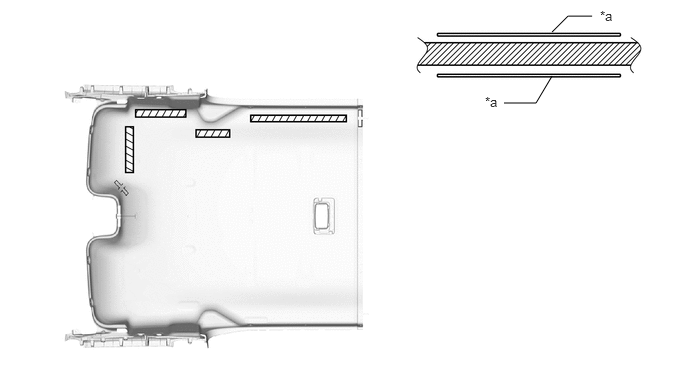
| *a | Marking | - | - |
|
|
Butyl Tape | - | - |
Install the mirror camera wire to the butyl tape, and then secure the mirror camera wire with the 2 pieces of tape.
- HINT:
- ·
Align the mirror camera wire positioning tape the position shown in the illustration.
·Make sure that the mirror camera wire is securely attached to the roof headlining along its entire length and not twisted.
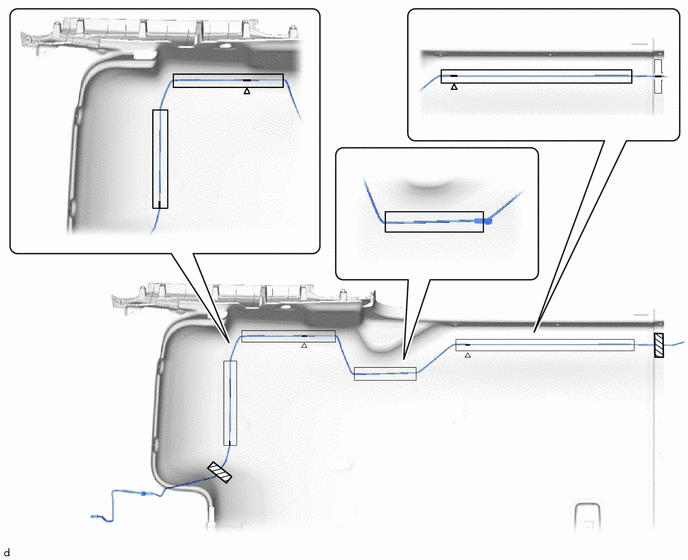
|
|
Positioning Tape |
|
Tape |
w/ Rear Air Duct:
Apply butyl tape as shown in the illustration.
- HINT:
-
Place the tape securely so that it is not misaligned or peeling.
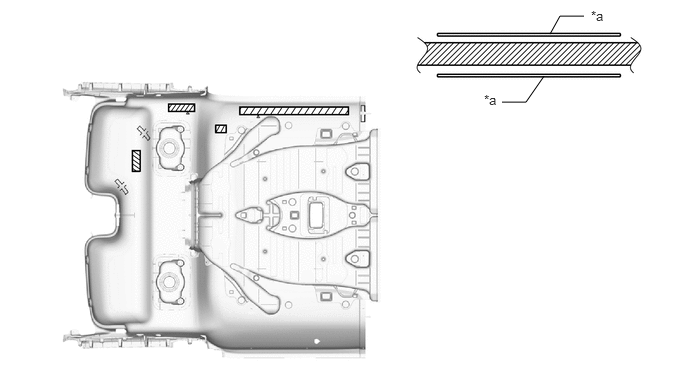
| *a | Marking | - | - |
|
|
Butyl Tape | - | - |
Install the mirror camera wire to the butyl tape, and then secure the mirror camera wire with the 3 pieces of tape.
- HINT:
- ·
Align the mirror camera wire positioning tape the position shown in the illustration.
·Make sure that the mirror camera wire is securely attached to the roof headlining along its entire length and not twisted.
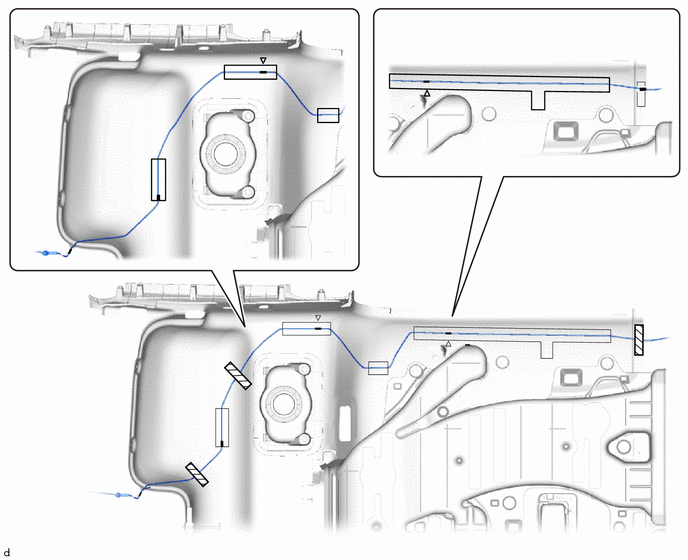
|
|
Positioning Tape |
|
Tape |
82172
9.INSTALL NO. 2 ROOF WIRE (for High Roof)
w/o Rear Air Duct:
Apply butyl tape as shown in the illustration.
- HINT:
-
Place the tape securely so that it is not misaligned or peeling.
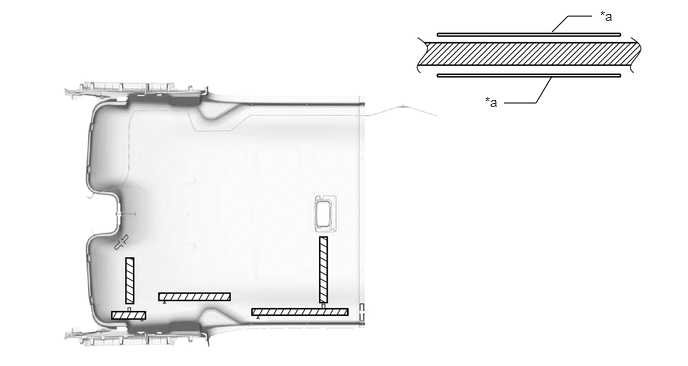
| *a | Marking | - | - |
|
|
Butyl Tape | - | - |
w/ Rear Wiper or w/ Digital Inner Mirror:
Attach the clamp.
Install the No. 2 roof wire to the butyl tape, and then secure the No. 2 roof wire with the 2 pieces of tape.
- HINT:
- ·
Align the No. 2 roof wire positioning tape and washer hose positioning tape together with the position shown in the illustration.
·Make sure that the No. 2 roof wire is securely attached to the roof headlining along its entire length and not twisted.
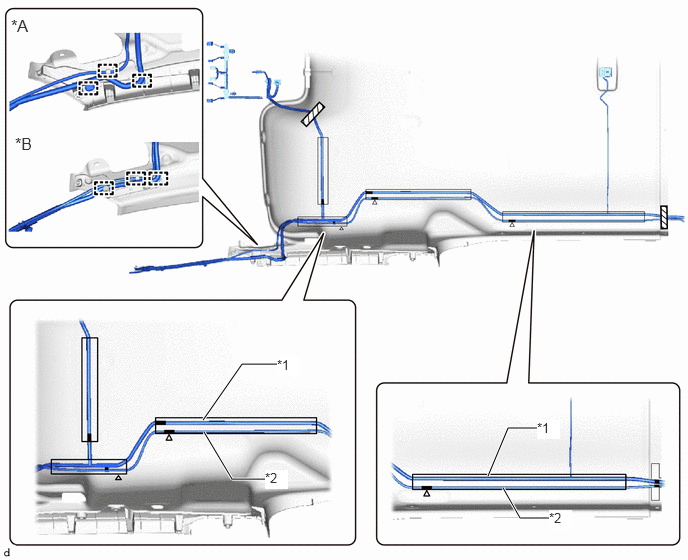
| *A | for Commuter | *B | for Van |
| *1 | No. 2 Roof Wire | *2 | Washer Hose |
|
|
Positioning Tape |
|
Tape |
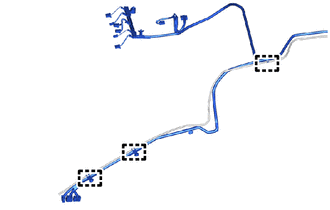
Attach the clamp to install the No. 2 roof wire to the washer hose.
w/o Rear Wiper or w/o Digital Inner Mirror:
Attach the clamp.
Install the No. 2 roof wire to the butyl tape, and then secure the No. 2 roof wire with the 2 pieces of tape.
- HINT:
-
Make sure that the No. 2 roof wire is securely attached to the roof headlining along its entire length and not twisted.
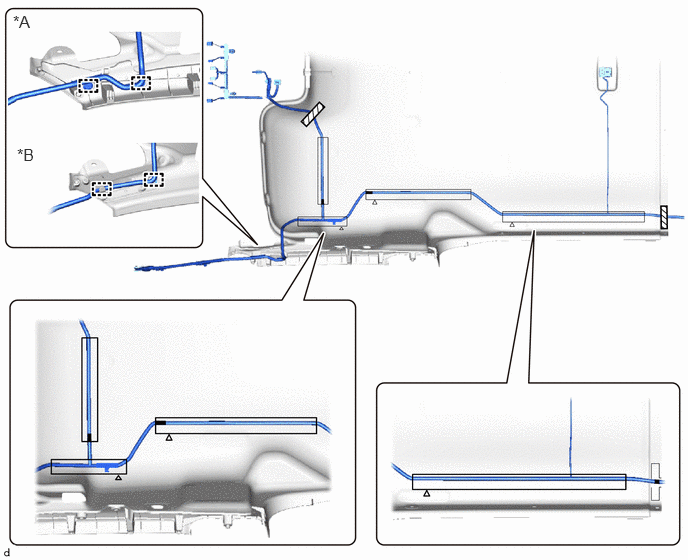
| *A | for Commuter | *B | for Van |
|
|
Positioning Tape |
|
Tape |
w/ Rear Air Duct:
Apply butyl tape as shown in the illustration.
- HINT:
-
Place the tape securely so that it is not misaligned or peeling.
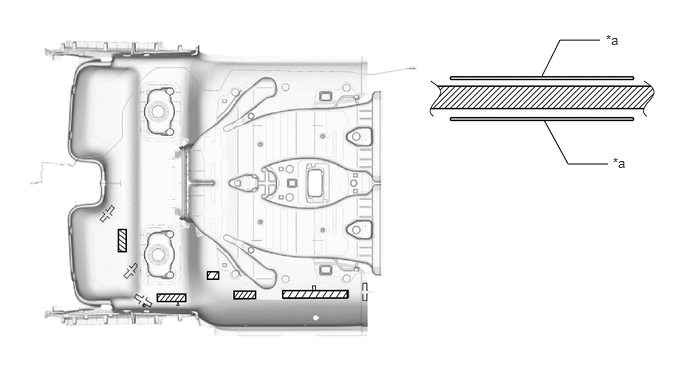
| *a | Marking | - | - |
|
|
Butyl Tape | - | - |
w/ Rear Wiper or w/ Digital Inner Mirror:
Attach the clamp.
Install the No. 2 roof wire to the butyl tape, and then secure the No. 2 roof wire with the 4 pieces of tape.
- HINT:
- ·
Align the No. 2 roof wire positioning tape and washer hose positioning tape together with the position shown in the illustration.
·Make sure that the No. 2 roof wire is securely attached to the roof headlining along its entire length and not twisted.
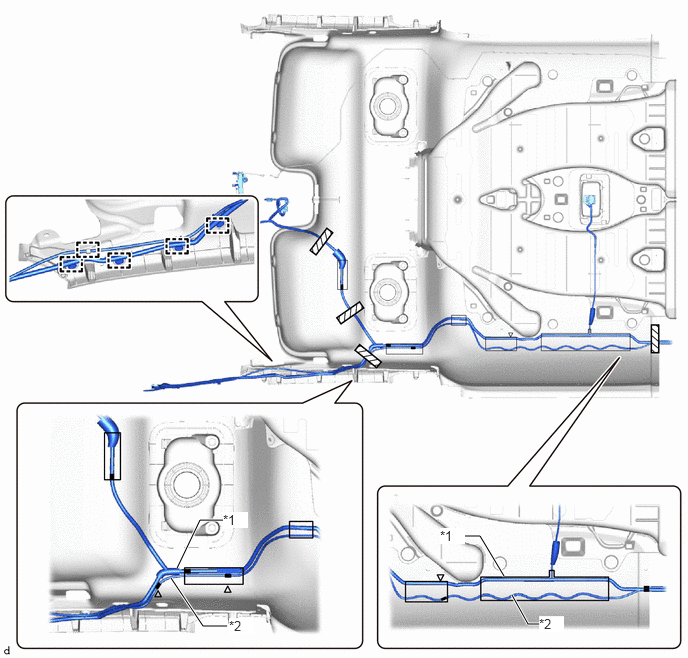
| *1 | No. 2 Roof Wire | *2 | Washer Hose |
|
|
Positioning Tape |
|
Tape |
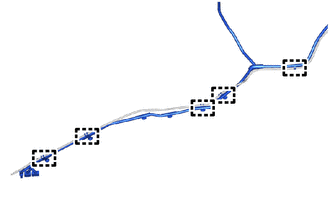
Attach the clamp to install the No. 2 roof wire to the washer hose.
w/o Rear Wiper or w/o Digital Inner Mirror:
Attach the clamp.
Install the No. 2 roof wire to the butyl tape, and then secure the No. 2 roof wire with the 4 pieces of tape.
- HINT:
-
Make sure that the No. 2 roof wire is securely attached to the roof headlining along its entire length and not twisted.
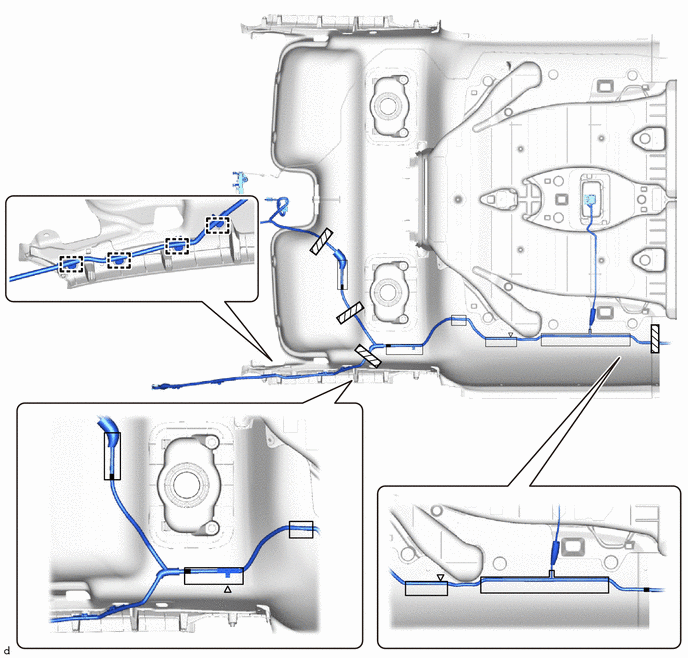
|
|
Positioning Tape |
|
Tape |
w/ Digital Inner Mirror:
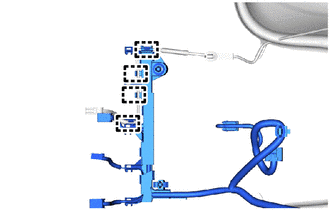
Attach the guide.
63341
10.INSTALL NO. 1 ROOF SILENCER PAD (for High Roof)
for Van:
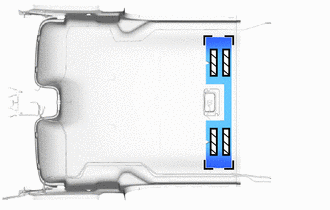
|
|
Marking |
|
|
Butyl Tape |
Align the No. 1 roof silencer pad with the marking on the roof headlining and install the roof silencer pad using butyl tape as shown in the illustration.
for Commuter, w/o Rear Air Duct:
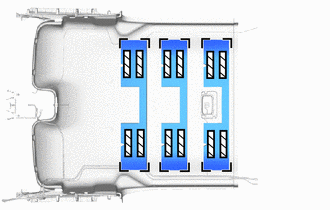
|
|
Marking |
|
|
Butyl Tape |
Align the 3 No. 1 roof silencer pads with the marking on the roof headlining and install the roof silencer pad using butyl tape as shown in the illustration.
for Commuter, w/ Rear Air Duct:
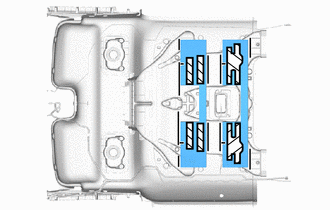
|
|
Marking |
|
|
Butyl Tape |
w/o Roof Window Glass:
Align the 2 No. 1 roof silencer pads with the marking on the roof headlining and install the roof silencer pad using butyl tape as shown in the illustration.
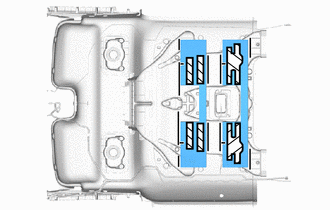
|
|
Marking |
|
|
Butyl Tape |
w/ Roof Window Glass:
Align the 2 No. 1 roof silencer pads with the marking on the roof headlining and install the roof silencer pad using butyl tape as shown in the illustration.
63341H
11.INSTALL ROOF SILENCER PAD (for High Roof)
for Commuter, w/o Rear Air Duct:
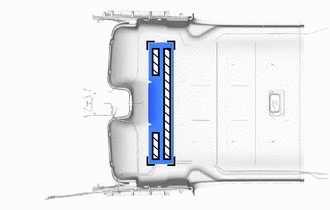
|
|
Marking |
|
|
Butyl Tape |
Align the roof silencer pad with the marking on the roof headlining and install the roof silencer pad using butyl tape as shown in the illustration.
w/ Rear Air Duct:
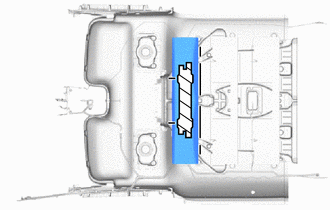
|
|
Marking |
|
|
Butyl Tape |
Align the roof silencer pad with the marking on the roof headlining and install the roof silencer pad using butyl tape as shown in the illustration.
63341G
12.INSTALL ROOF SILENCER PAD (for High Roof)
for Commuter, w/o Rear Air Duct:
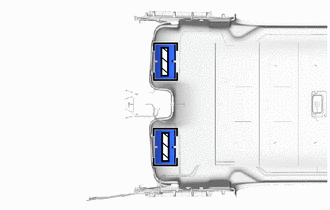
|
|
Marking |
|
|
Butyl Tape |
Align the roof silencer pad with the marking on the roof headlining and install the roof silencer pad using butyl tape as shown in the illustration.
w/ Rear Air Duct:
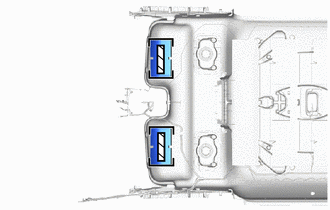
|
|
Marking |
|
|
Butyl Tape |
Align the roof silencer pad with the marking on the roof headlining and install the roof silencer pad using butyl tape as shown in the illustration.
63341D
13.INSTALL FRONT ROOF SILENCER PAD (for High Roof, w/ Silencer Pad)
Remove the release paper from front roof silencer pad.
- HINT:
-
After removing the release paper, keep the exposed adhesive free from foreign matter.
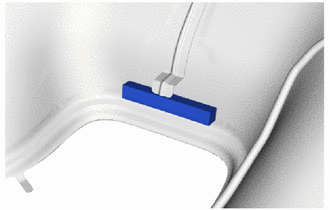
Install a new front roof silencer pad to the position shown in the figure with double-sided tape.
63342
14.INSTALL NO. 2 ROOF SILENCER PAD (for High Roof)
w/o Rear Air Duct, except Slide Door Side:
Remove the release paper from No. 2 roof silencer pad.
- HINT:
-
After removing the release paper, keep the exposed adhesive free from foreign matter.
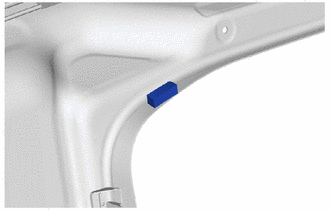
Install a new No. 2 roof silencer pad to the position shown in the figure with double-sided tape.
for Slide Door Side:
Remove the release paper from 3 No. 2 roof silencer pads.
- HINT:
-
After removing the release paper, keep the exposed adhesive free from foreign matter.
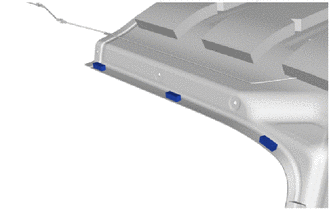
Install the 3 new No. 2 roof silencer pads to the position shown in the figure with double-sided tape.
w/o Rear Air Duct, for 5 Door:
Remove the release paper from 3 No. 2 roof silencer pads.
- HINT:
-
After removing the release paper, keep the exposed adhesive free from foreign matter.
Install the 3 new No. 2 roof silencer pads to the position shown in the figure with double-sided tape.
- HINT:
-
Use the same procedure for the opposite side.
63610C
15.INSTALL NO. 1 AIR OUTLET REGISTER ASSEMBLY (for High Roof, w/ Rear Air Duct)
63415D
16.INSTALL CENTER ROOF SPEAKER GRILLE (for High Roof, 4 Speakers)
63344
17.INSTALL NO. 4 ROOF SILENCER PAD (for High Roof)
w/o Rear Air Duct:
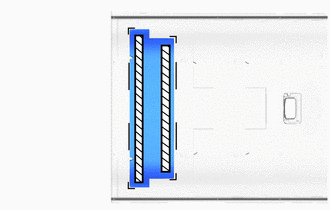
|
|
Marking |
|
|
Butyl Tape |
for Front Side:
Align the No. 4 roof silencer pad with the marking on the roof headlining and install the roof silencer pad using butyl tape as shown in the illustration.
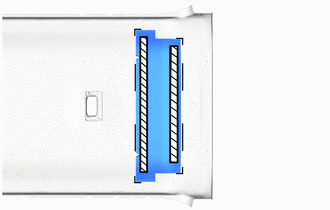
|
|
Marking |
|
|
Butyl Tape |
for Rear Side:
Align the No. 4 roof silencer pad with the marking on the roof headlining and install the roof silencer pad using butyl tape as shown in the illustration.
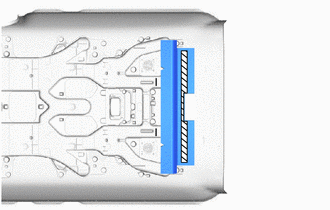
w/ Rear Air Duct:
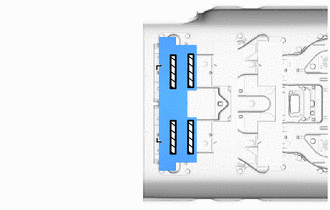
|
|
Marking |
|
|
Butyl Tape |
for Front Side:
Align the No. 4 roof silencer pad with the marking on the roof headlining and install the roof silencer pad using butyl tape as shown in the illustration.
|
|
Marking |
|
|
Butyl Tape |
for Rear Side:
Align the No. 4 roof silencer pad with the marking on the roof headlining and install the roof silencer pad using butyl tape as shown in the illustration.
63343
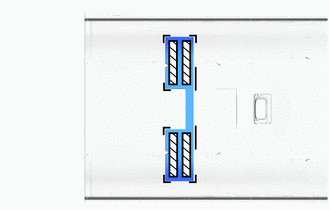
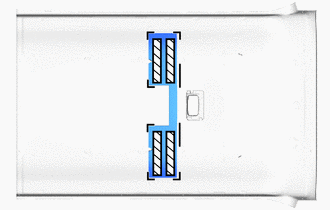
18.INSTALL NO. 3 ROOF SILENCER PAD (for High Roof)
w/o Rear Air Duct:
|
|
Marking |
|
|
Butyl Tape |
for Front Side:
Align the No. 3 roof silencer pad with the marking on the roof headlining and install the roof silencer pad using butyl tape as shown in the illustration.
|
|
Marking |
|
|
Butyl Tape |
for Rear Side:
Align the No. 3 roof silencer pad with the marking on the roof headlining and install the roof silencer pad using butyl tape as shown in the illustration.
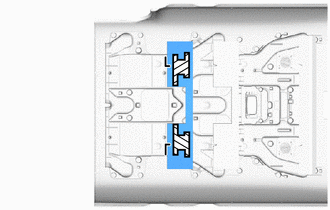
w/ Rear Air Duct:
|
|
Marking |
|
|
Butyl Tape |
for Front Side:
Align the No. 3 roof silencer pad with the marking on the roof headlining and install the roof silencer pad using butyl tape as shown in the illustration.
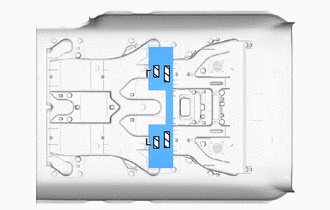
|
|
Marking |
|
|
Butyl Tape |
for Rear Side:
Align the No. 3 roof silencer pad with the marking on the roof headlining and install the roof silencer pad using butyl tape as shown in the illustration.
84010A
19.INSTALL INTEGRATION CONTROL AND PANEL ASSEMBLY (w/ Integration Control Panel)