EXTERIOR PANELS / TRIM NAME PLATE INSTALLATION
CAUTION / NOTICE / HINT
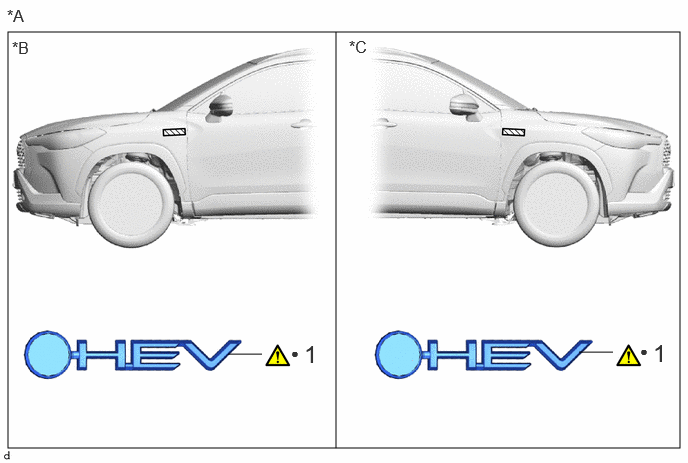
| Procedure | Part Name Code | 
|

|

|
|
|---|---|---|---|---|---|
| 1 | SIDE PANEL EMBLEM | 75374 | ( 202405,999999,_59,_114126,_0505944,RM100000002MPXD_02_0083,) 202405,999999,_59,_114126,_0505944,RM100000002MPXD_02_0083,)
|
- | - |
| *A | for HEV Model | *B | for LH Side |
| *C | for RH Side | - | - |
| ● | Non-reusable part | - | - |
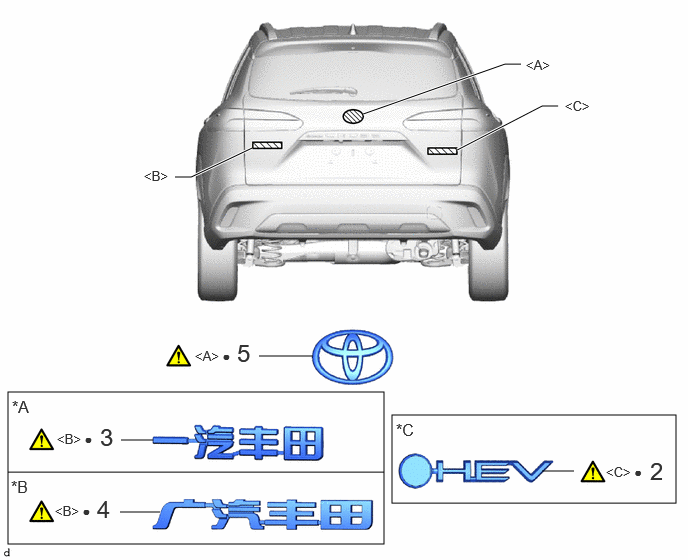
| Procedure | Part Name Code |
|
|
|
|
|---|---|---|---|---|---|
| 2 | NO. 3 LUGGAGE COMPARTMENT DOOR PLATE | 75443A | (202405,999999,_59,_114126,_0505944,RM100000002MPXD_02_0082,)
|
- | - |
| 3 | NO. 1 LUGGAGE COMPARTMENT DOOR NAME PLATE | 75441A | (202405,999999,_59,_114126,_0505944,RM100000002MPXD_02_0076,)
|
- | - |
| 4 | NO. 1 LUGGAGE COMPARTMENT DOOR NAME PLATE | 75441A | (202405,999999,_59,_114126,_0505944,RM100000002MPXD_02_0081,)
|
- | - |
| 5 | SYMBOL EMBLEM | 75741E | (202405,999999,_59,_114126,_0505944,RM100000002MPXD_02_0075,)
|
- | - |
| *A | for FTMC Made | *B | for GTMC Made |
| *C | for HEV Model | - | - |
| ● | Non-reusable part | - | - |
CAUTION / NOTICE / HINT
|
|
|
- Standard:
Item Temperature Vehicle Body 40 to 60 °C (104 to 140 °F) Name Plates or Emblems 20 to 30°C (68 to 86°F)
- CAUTION:
-
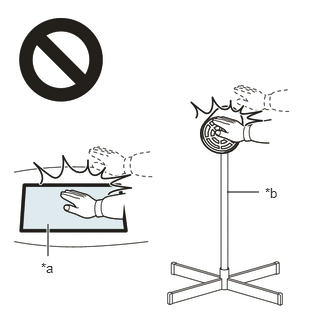 2.365,2 2.698,2 false 0.5,2.333 0.5,2.667 true 0.427,2.708 0.74,2.865 0.313,0.156 10 false *a 2.76,1.927 3.073,2.083 0.313,0.156 10 false *b
*a Heated Part *b Heat Light
- ·
Do not touch the heat light and heated parts, touching the heat light may result in burns.
·Touching heated parts for a long time may result in burns.
- NOTICE:
-
Do not heat vehicle body, name plates or emblems excessively.
PROCEDURE

 75374
1.INSTALL SIDE PANEL EMBLEM (for HEV Model)
75374
1.INSTALL SIDE PANEL EMBLEM (for HEV Model)
for FTMC Made LH Side:
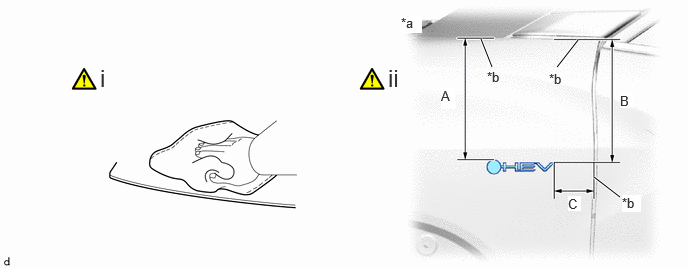
| *a | Reference Values | *b | End of R |
- Standard Measurement:
Area Measurement Area Measurement A 219.3 mm (8.63 in.) B 205.6 mm (8.09 in.) C 51.3 mm (2.02 in.) - -
Clean the vehicle body surface by the below procedure.
1. Using a heat light, heat the vehicle body surface.
2. Remove any remaining double-sided tape from the vehicle body.
3. Wipe off any tape adhesive residue with cleaner.
- NOTICE:
- ·
Installing the side panel emblem with some double-sided tape remaining may cause poor adhesion. Perform this procedure until the tape is sufficiently removed.
·Make sure to use a cloth when removing. Using a screwdriver, etc., may cause damage and poor adhesion.
Install a new side panel emblem by the below procedure.
1. Using a heat light, heat the vehicle body and side panel emblem.
2. Remove the release paper from the side panel emblem.
- HINT:
-
After removing the release paper, keep the exposed adhesive free from foreign matter.
3. Install the side panel emblem as shown in the illustration.
- HINT:
-
Press the side panel emblem firmly to install it.
for GTMC Made LH Side:
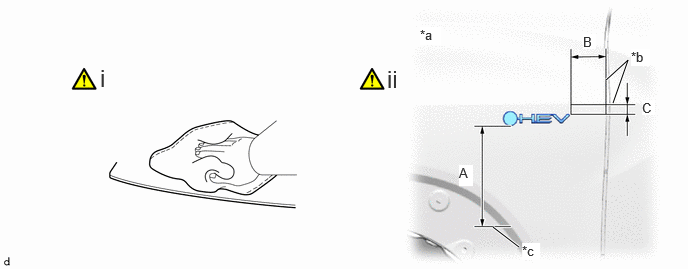
| *a | Reference Values | *b | End of R |
| *c | Front Fender Moulding Sub-assembly LH Upper Side Edge | - | - |
- Standard Measurement:
Area Measurement Area Measurement A 134.6 mm (5.30 in.) B 50.2 mm (1.98 in.) C 14.5 mm (0.571 in.) - -
Clean the vehicle body surface by the below procedure.
1. Using a heat light, heat the vehicle body surface.
2. Remove any remaining double-sided tape from the vehicle body.
3. Wipe off any tape adhesive residue with cleaner.
- NOTICE:
- ·
Installing the side panel emblem with some double-sided tape remaining may cause poor adhesion. Perform this procedure until the tape is sufficiently removed.
·Make sure to use a cloth when removing. Using a screwdriver, etc., may cause damage and poor adhesion.
Install a new side panel emblem by the below procedure.
1. Using a heat light, heat the vehicle body and side panel emblem.
2. Remove the release paper from the side panel emblem.
- HINT:
-
After removing the release paper, keep the exposed adhesive free from foreign matter.
3. Install the side panel emblem as shown in the illustration.
- HINT:
-
Press the side panel emblem firmly to install it.
for FTMC Made RH Side:
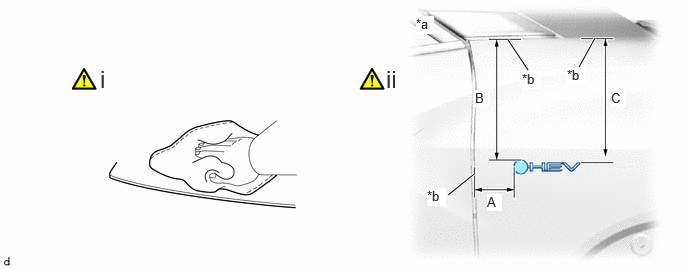
| *a | Reference Values | *b | End of R |
- Standard Measurement:
Area Measurement Area Measurement A 51 mm (2.01 in.) B 203.1 mm (8.00 in.) C 226.8 mm (8.93 in.) - -
Clean the vehicle body surface by the below procedure.
1. Using a heat light, heat the vehicle body surface.
2. Remove any remaining double-sided tape from the vehicle body.
3. Wipe off any tape adhesive residue with cleaner.
- NOTICE:
- ·
Installing the side panel emblem with some double-sided tape remaining may cause poor adhesion. Perform this procedure until the tape is sufficiently removed.
·Make sure to use a cloth when removing. Using a screwdriver, etc., may cause damage and poor adhesion.
Install a new side panel emblem by the below procedure.
1. Using a heat light, heat the vehicle body and side panel emblem.
2. Remove the release paper from the side panel emblem.
- HINT:
-
After removing the release paper, keep the exposed adhesive free from foreign matter.
3. Install the side panel emblem as shown in the illustration.
- HINT:
-
Press the side panel emblem firmly to install it.
for GTMC Made RH Side:
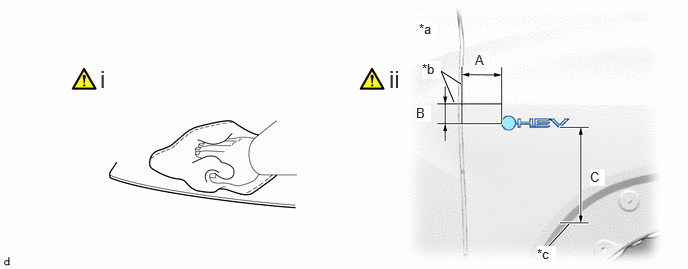
| *a | Reference Values | *b | End of R |
| *c | Front Fender Moulding Sub-assembly RH Upper Side Edge | - | - |
- Standard Measurement:
Area Measurement Area Measurement A 49.9 mm (1.96 in.) B 20.7 mm (0.815 in.) C 142.4 mm (5.61 in.) - -
Clean the vehicle body surface by the below procedure.
1. Using a heat light, heat the vehicle body surface.
2. Remove any remaining double-sided tape from the vehicle body.
3. Wipe off any tape adhesive residue with cleaner.
- NOTICE:
- ·
Installing the side panel emblem with some double-sided tape remaining may cause poor adhesion. Perform this procedure until the tape is sufficiently removed.
·Make sure to use a cloth when removing. Using a screwdriver, etc., may cause damage and poor adhesion.
Install a new side panel emblem by the below procedure.
1. Using a heat light, heat the vehicle body and side panel emblem.
2. Remove the release paper from the side panel emblem.
- HINT:
-
After removing the release paper, keep the exposed adhesive free from foreign matter.
3. Install the side panel emblem as shown in the illustration.
- HINT:
-
Press the side panel emblem firmly to install it.
75443A
2.INSTALL NO. 3 LUGGAGE COMPARTMENT DOOR PLATE (for HEV Model)
for FTMC Made:
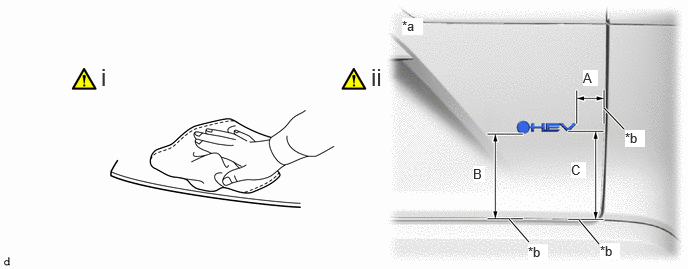
| *a | Reference Values | *b | End of R |
- Standard Measurement:
Area Measurement Area Measurement A 46.1 mm (1.81 in.) B 140.1 mm (5.52 in.) C 145.8 mm (5.74 in.) - -
Clean the vehicle body surface by the below procedure.
1. Using a heat light, heat the vehicle body surface.
2. Remove any remaining double-sided tape from the vehicle body.
3. Wipe off any tape adhesive residue with cleaner.
- NOTICE:
- ·
Installing the No. 3 luggage compartment door plate with some double-sided tape remaining may cause poor adhesion. Perform this procedure until the tape is sufficiently removed.
·Make sure to use a cloth when removing. Using a screwdriver, etc., may cause damage and poor adhesion.
Install a new No. 3 luggage compartment door plate by the below procedure.
1. Using a heat light, heat the vehicle body and No. 3 luggage compartment door plate.
2. Remove the release paper from the No. 3 luggage compartment door plate.
- HINT:
-
After removing the release paper, keep the exposed adhesive free from foreign matter.
3. Install the No. 3 luggage compartment door plate as shown in the illustration.
- HINT:
-
Press the No. 3 luggage compartment door plate firmly to install it.
for GTMC Made:
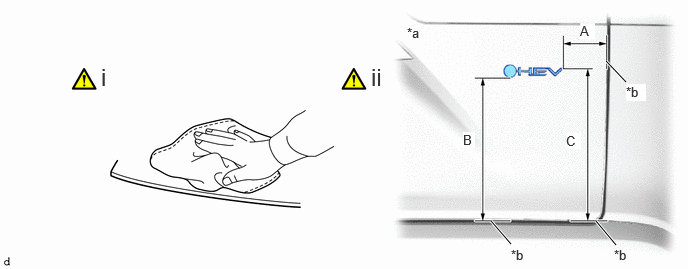
| *a | Reference Values | *b | End of R |
- Standard Measurement:
Area Measurement Area Measurement A 88.3 mm (3.48 in.) B 232.1 mm (9.14 in.) C 250.4 mm (9.86 in.) - -
Clean the vehicle body surface by the below procedure.
1. Using a heat light, heat the vehicle body surface.
2. Remove any remaining double-sided tape from the vehicle body.
3. Wipe off any tape adhesive residue with cleaner.
- NOTICE:
- ·
Installing the No. 3 luggage compartment door plate with some double-sided tape remaining may cause poor adhesion. Perform this procedure until the tape is sufficiently removed.
·Make sure to use a cloth when removing. Using a screwdriver, etc., may cause damage and poor adhesion.
Install a new No. 3 luggage compartment door plate by the below procedure.
1. Using a heat light, heat the vehicle body and No. 3 luggage compartment door plate.
2. Remove the release paper from the No. 3 luggage compartment door plate.
- HINT:
-
After removing the release paper, keep the exposed adhesive free from foreign matter.
3. Install the No. 3 luggage compartment door plate as shown in the illustration.
- HINT:
-
Press the No. 3 luggage compartment door plate firmly to install it.
75441A
3.INSTALL NO. 1 LUGGAGE COMPARTMENT DOOR NAME PLATE (for FTMC Made)
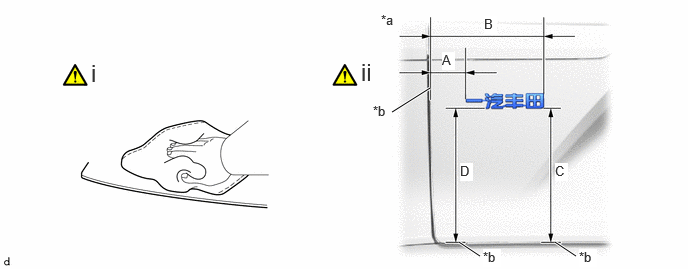
| *a | Reference Values | *b | End of R |
- Standard Measurement:
Area Measurement Area Measurement A 64.1 mm (2.52 in.) B 200.2 mm (7.88 in.) C 233 mm (9.17 in.) D 234 mm (9.21 in.)
Clean the vehicle body surface by the below procedure.
1. Using a heat light, heat the vehicle body surface.
2. Remove any remaining double-sided tape from the vehicle body.
3. Wipe off any tape adhesive residue with cleaner.
- NOTICE:
- ·
Installing the No. 1 luggage compartment door name plate with some double-sided tape remaining may cause poor adhesion. Perform this procedure until the tape is sufficiently removed.
·Make sure to use a cloth when removing. Using a screwdriver, etc., may cause damage and poor adhesion.
Install a new No. 1 luggage compartment door name plate by the below procedure.
1. Using a heat light, heat the vehicle body and No. 1 luggage compartment door name plate.
2. Remove the release paper from the No. 1 luggage compartment door name plate.
- HINT:
-
After removing the release paper, keep the exposed adhesive free from foreign matter.
3. Install the No. 1 luggage compartment door name plate as shown in the illustration.
- HINT:
-
Press the No. 1 luggage compartment door name plate firmly to install it.
75441A
4.INSTALL NO. 1 LUGGAGE COMPARTMENT DOOR NAME PLATE (for GTMC Made)
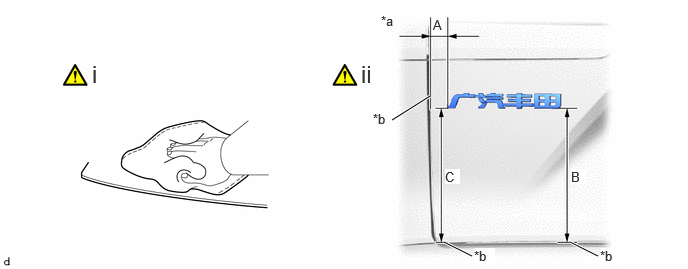
| *a | Reference Values | *b | End of R |
- Standard Measurement:
Area Measurement Area Measurement A 30.8 mm (1.21 in.) B 234.5 mm (9.23 in.) C 236.1 mm (9.30 in.) - -
Clean the vehicle body surface by the below procedure.
1. Using a heat light, heat the vehicle body surface.
2. Remove any remaining double-sided tape from the vehicle body.
3. Wipe off any tape adhesive residue with cleaner.
- NOTICE:
- ·
Installing the No. 1 luggage compartment door name plate with some double-sided tape remaining may cause poor adhesion. Perform this procedure until the tape is sufficiently removed.
·Make sure to use a cloth when removing. Using a screwdriver, etc., may cause damage and poor adhesion.
Install a new No. 1 luggage compartment door name plate by the below procedure.
1. Using a heat light, heat the vehicle body and No. 1 luggage compartment door name plate.
2. Remove the release paper from the No. 1 luggage compartment door name plate.
- HINT:
-
After removing the release paper, keep the exposed adhesive free from foreign matter.
3. Install the No. 1 luggage compartment door name plate as shown in the illustration.
- HINT:
-
Press the No. 1 luggage compartment door name plate firmly to install it.
75741E
5.INSTALL SYMBOL EMBLEM

| *a | Location Pin | - | - |
Clean the vehicle body surface by the below procedure.
1. Using a heat light, heat the vehicle body surface.
2. Remove any remaining double-sided tape from the vehicle body.
3. Wipe off any tape adhesive residue with cleaner.
- NOTICE:
- ·
Installing the symbol emblem with some double-sided tape remaining may cause poor adhesion. Perform this procedure until the tape is sufficiently removed.
·Make sure to use a cloth when removing. Using a screwdriver, etc., may cause damage and poor adhesion.
Install a new symbol emblem by the below procedure.
1. Using a heat light, heat the vehicle body and symbol emblem.
2. Remove the release paper from the symbol emblem.
- HINT:
-
After removing the release paper, keep the exposed adhesive free from foreign matter.
3. Engage the location pins to install the symbol emblem as shown in the illustration.
- HINT:
-
Press the symbol emblem firmly to install it.