SLIDING ROOF / CONVERTIBLE SLIDING ROOF HOUSING(for Panoramic Moon Roof) INSTALLATION
CAUTION / NOTICE / HINT
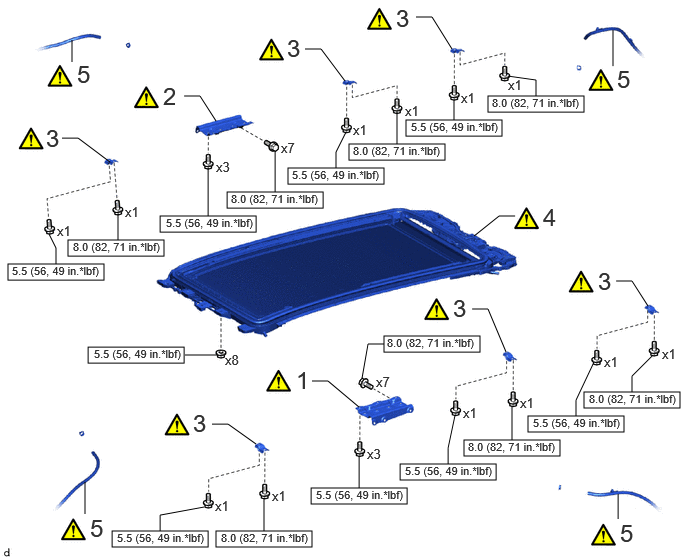
| Procedure | Part Name Code | 
|

|

|
|
|---|---|---|---|---|---|
| 1 | CENTER SLIDING ROOF HOUSING MOUNTING BRACKET LH | 63244C | ( 202307,999999,_59,_114986,_0509983,RM100000002CXMM_01_0382,) 202307,999999,_59,_114986,_0509983,RM100000002CXMM_01_0382,)
|
- | - |
| 2 | CENTER SLIDING ROOF HOUSING MOUNTING BRACKET RH | 63243C | (202307,999999,_59,_114986,_0509983,RM100000002CXMM_01_0382,)
|
- | - |
| 3 | FRONT SLIDING ROOF HOUSING MOUNTING BRACKET | 63241A | (202307,999999,_59,_114986,_0509983,RM100000002CXMM_01_0379,)
|
- | - |
| 4 | SLIDING ROOF HOUSING ASSEMBLY | - | (202307,999999,_59,_114986,_0509983,RM100000002CXMM_01_0380,)
|
- | - |
| 5 | SLIDING ROOF DRAIN HOSE | - | (202307,999999,_59,_114986,_0509983,RM100000002CXMM_01_0374,)
|
- | - |

|
N*m (kgf*cm, ft.*lbf): Specified torque | - | - |
| Procedure | Part Name Code |
|
|
|
|
|---|---|---|---|---|---|
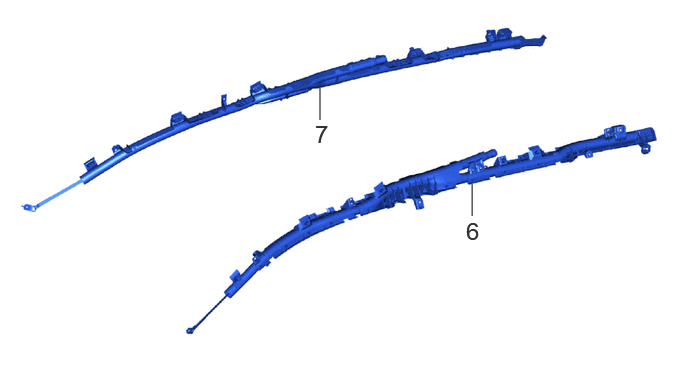
| 6 | CURTAIN SHIELD AIRBAG ASSEMBLY LH | 62180A | - | - | - |
| 7 | CURTAIN SHIELD AIRBAG ASSEMBLY RH | 62170A | - | - | - |
| Procedure | Part Name Code |
|
|
|
|
|---|---|---|---|---|---|
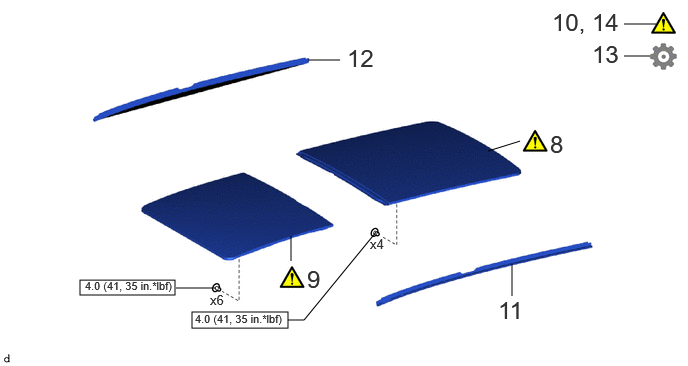
| 8 | SLIDING ROOF GLASS SUB-ASSEMBLY | 63201G | (202307,999999,_59,_114986,_0509983,RM100000002CXMM_01_0326,)
|
- | - |
| 9 | SLIDING ROOF PANEL SUB-ASSEMBLY | 63201H | (202307,999999,_59,_114986,_0509983,RM100000002CXMM_01_0327,)
|
- | - |
| 10 | INSPECT FOR LEAK | - | (202307,999999,_59,_114986,_0509983,RM100000002CXMM_01_0383,)
|
- | - |
| 11 | SLIDING ROOF SIDE GARNISH LH | 63218S | - | - | - |
| 12 | SLIDING ROOF SIDE GARNISH RH | 63217G | - | - | - |
| 13 | INITIALIZE SLIDING ROOF SYSTEM | - | - | - | (202307,999999,_59,_114986,_0509983,RM100000002CXMM_01_0332,)
|
| 14 | CHECK SLIDING ROOF SYSTEM | - | (202307,999999,_59,_114986,_0509983,RM100000002CXMM_01_0333,)
|
- | - |
|
|
N*m (kgf*cm, ft.*lbf): Specified torque | - | - |
PROCEDURE

 63244C
1.TEMPORARILY INSTALL CENTER SLIDING ROOF HOUSING MOUNTING BRACKET LH
63244C
1.TEMPORARILY INSTALL CENTER SLIDING ROOF HOUSING MOUNTING BRACKET LH
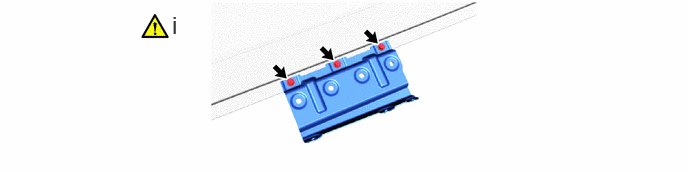
Temporarily install the center sliding roof housing mounting bracket LH to sliding roof housing assembly with the 3 bolts.
63243C
2.TEMPORARILY INSTALL CENTER SLIDING ROOF HOUSING MOUNTING BRACKET RH
63241A
3.TEMPORARILY INSTALL FRONT SLIDING ROOF HOUSING MOUNTING BRACKET
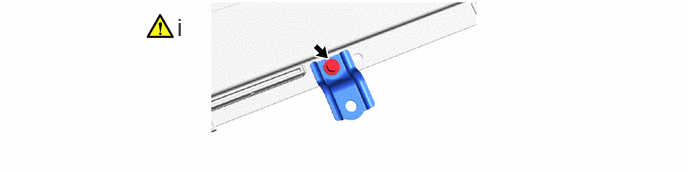
Temporarily install the front sliding roof housing mounting bracket to sliding roof housing assembly with the bolt.
Use the same procedure for all of the front sliding roof housing mounting bracket.
4.INSTALL SLIDING ROOF HOUSING ASSEMBLY
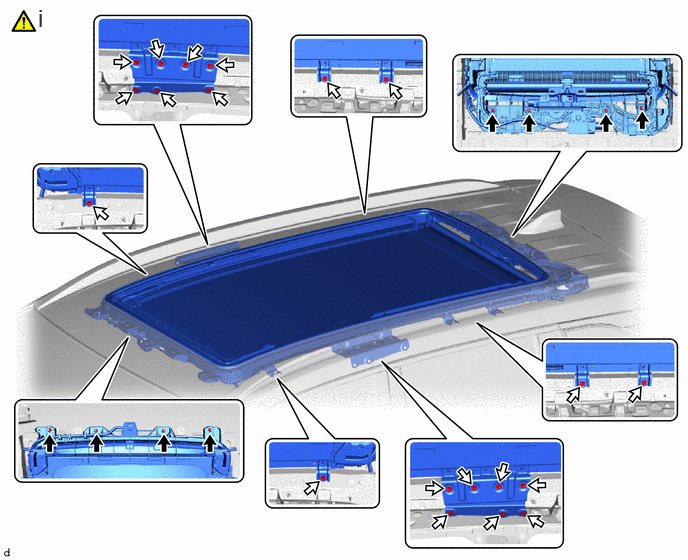

|
Nut | 
|
Bolt |
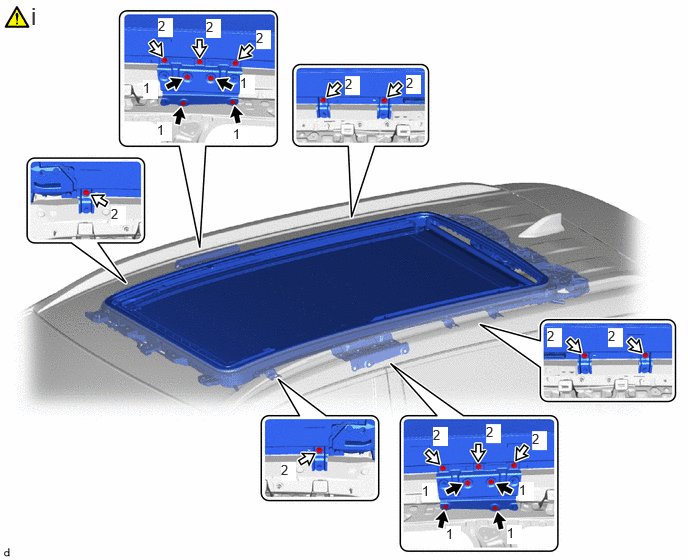
Temporarily install the sliding roof housing assembly with the 8 nuts and 20 bolts.
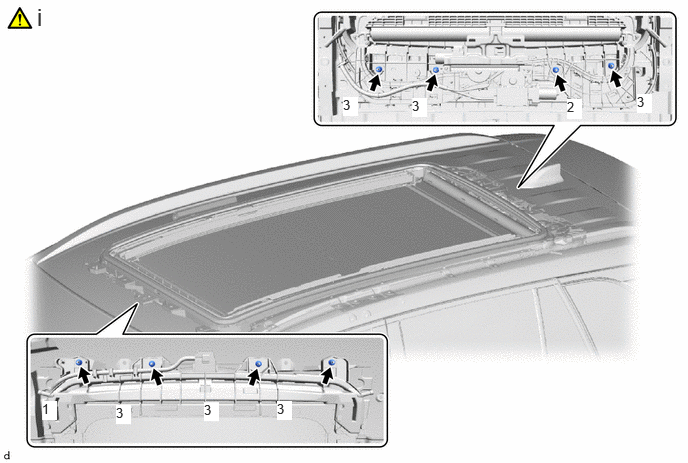
Tighten the 8 nuts in the order shown in the illustration.
- Torque:
- 5.5 N*m (56 kgf*cm, 49 in.*lbf)
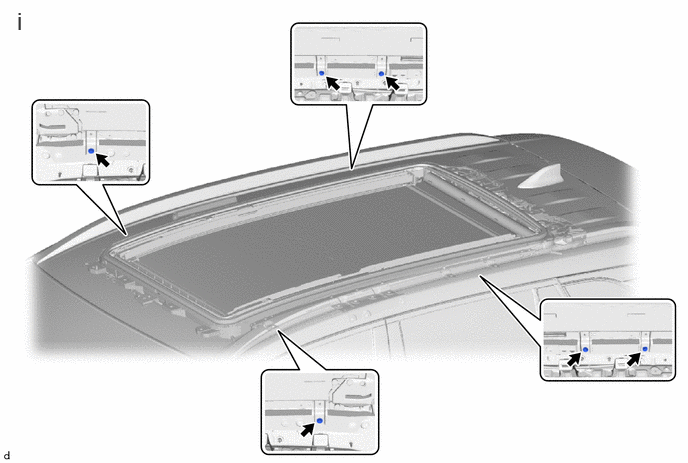
Tighten the 6 bolts.
- Torque:
- 8.0 N*m (82 kgf*cm, 71 in.*lbf)
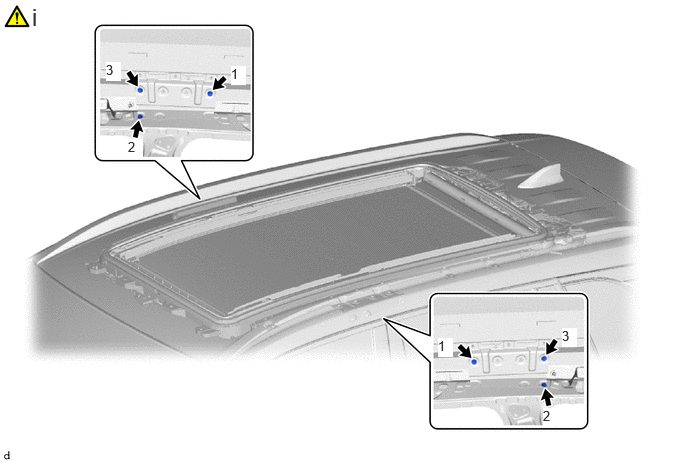
Tighten the 6 bolts in the order shown in the illustration.
- Torque:
- 8.0 N*m (82 kgf*cm, 71 in.*lbf)
|
|
Bolt (A) |
|
Bolt (B) |
Tighten the 20 bolts to install the sliding roof housing assembly in the order shown in the illustration.
- Torque:
- Bolt (A) : 8.0 N*m (82 kgf*cm, 71 in.*lbf)
- Bolt (B) : 5.5 N*m (56 kgf*cm, 49 in.*lbf)
5.CONNECT SLIDING ROOF DRAIN HOSE
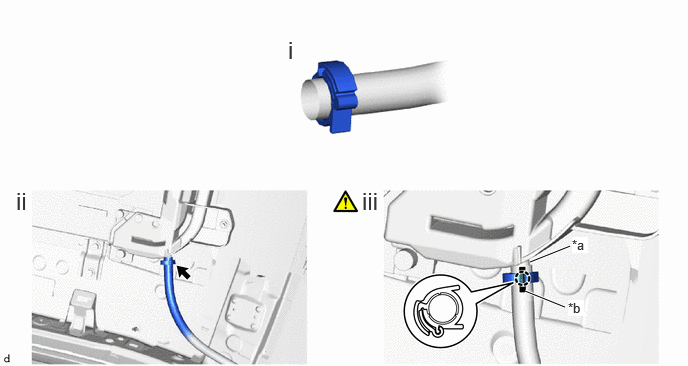
| *a | Drain Pipe | *b | Marking |
Temporarily install the clamp to the sliding roof drain hose.
Connect the sliding roof drain hose to the sliding roof housing assembly of the drain pipe.
Engage the claw to install the clamp as shown in the illustration.
- NOTICE:
-
Make sure that the clamp is on the marking or between the marking and hose end.
Use the same procedure for all of the sliding roof drain hose.
62180A
6.INSTALL CURTAIN SHIELD AIRBAG ASSEMBLY LH
62170A
7.INSTALL CURTAIN SHIELD AIRBAG ASSEMBLY RH
63201G
8.INSTALL SLIDING ROOF GLASS SUB-ASSEMBLY
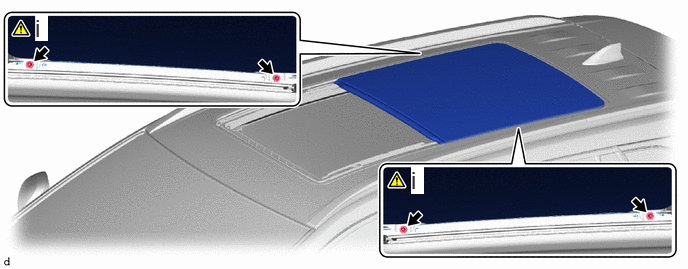
Using a T25 "TORX" socket wrench, temporarily install the sliding roof glass sub-assembly with the 4 screws.
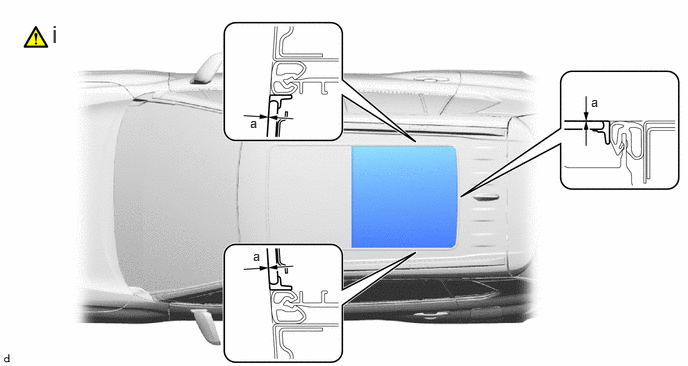
Perform a level check.
1. Check the difference in level "a" between the roof panel and the upper surface of the sliding roof glass sub-assembly when the sliding roof glass sub-assembly as shown in the illustration.
- Standard:
Area Measurement Area Measurement a -2.0 to 2.0 mm (-0.0787 to 0.0787 in.) - -
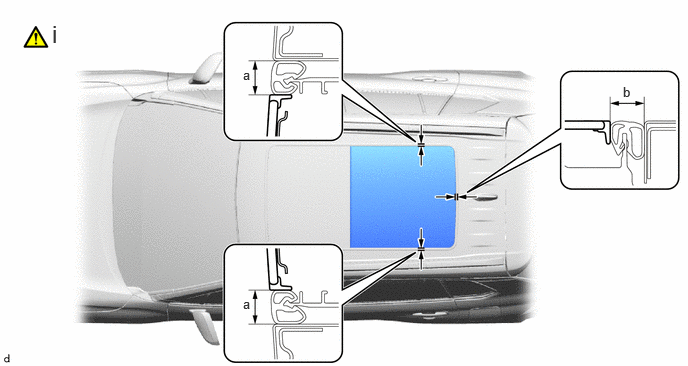
Perform a gap check.
1. Check the gap between the roof panel and sliding roof glass sub-assembly as shown in the illustration.
- Standard:
Area Measurement Area Measurement a 19 mm (0.748 in.) b 18.8 mm (0.740 in.)
Using a T25 "TORX" socket wrench, tighten the 4 screws to install the sliding roof glass sub-assembly.
- Torque:
- 4.0 N*m (41 kgf*cm, 35 in.*lbf)
63201H
9.INSTALL SLIDING ROOF PANEL SUB-ASSEMBLY
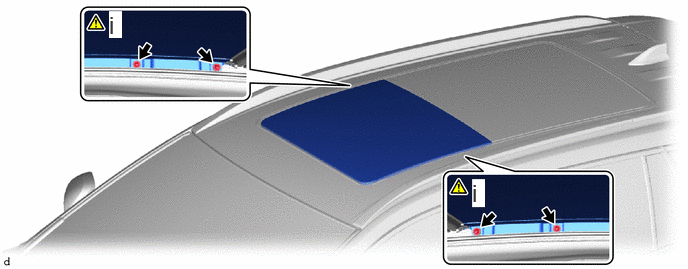
Using a T25 "TORX" socket wrench, temporarily install the sliding roof panel sub-assembly with the 4 screws.
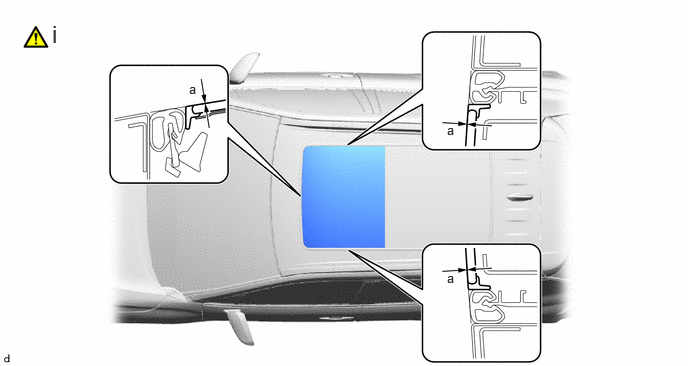
Perform a level check.
1. Check the difference in level "a" between the roof panel and the upper surface of the sliding roof panel sub-assembly when the sliding roof panel sub-assembly is fully closed as shown in the illustration.
- Standard:
Area Measurement Area Measurement a -2.0 to 2.0 mm (-0.0787 to 0.0787 in.) - -
Perform a gap check.
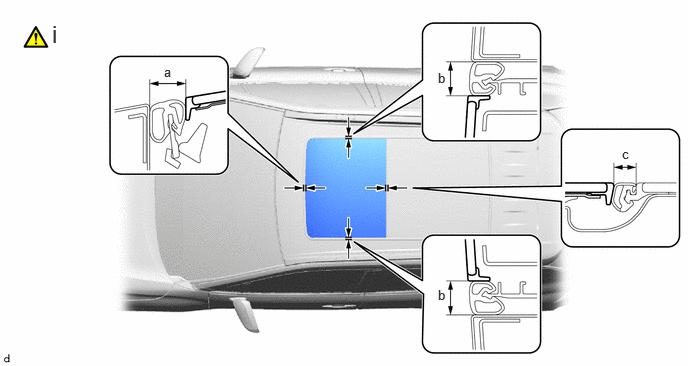
1. Check the gap between the roof panel and sliding roof panel sub-assembly as shown in the illustration.
- Standard:
Area Measurement Area Measurement a 18.3 mm (0.720 in.) b 19 mm (0.748 in.) c 9.5 mm (0.374 in.) - -
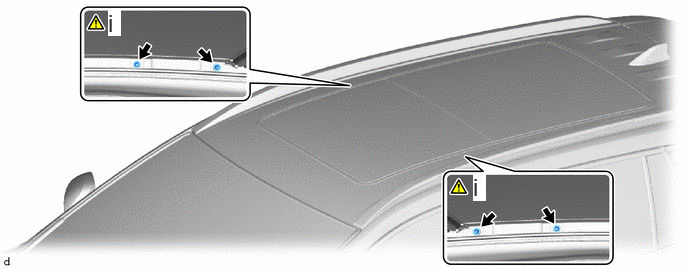
Using a T25 "TORX" socket wrench, tighten the 4 screws.
- Torque:
- 4.0 N*m (41 kgf*cm, 35 in.*lbf)
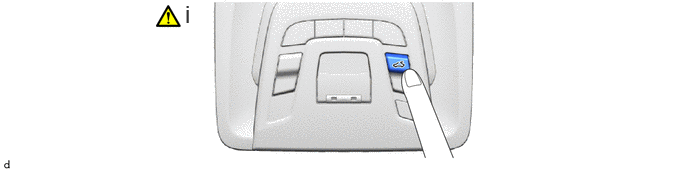
Open the sliding roof panel sub-assembly to a position where the 2 screws on the front side of the sliding roof panel sub-assembly can be installed.
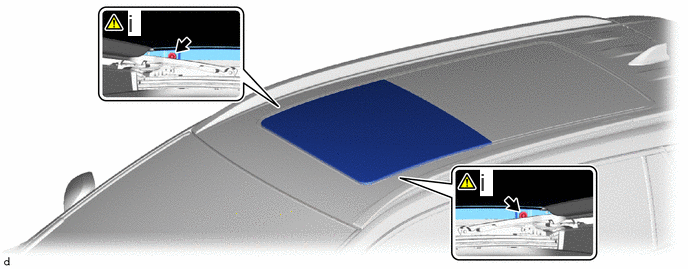
Using a T25 "TORX" socket wrench, install the sliding roof panel sub-assembly with the 2 screws.
- Torque:
- 4.0 N*m (41 kgf*cm, 35 in.*lbf)
10.INSPECT FOR LEAK
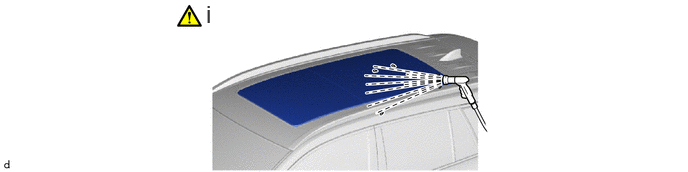
Inspect for leaks by the below procedure.
1. After adjusting the sliding roof glass sub-assembly and sliding roof panel sub-assembly, check for water leakage into the vehicle interior.
2. If there are any leaks, readjust the sliding roof glass sub-assembly and sliding roof panel sub-assembly.
63218S
11.INSTALL SLIDING ROOF SIDE GARNISH LH
63217G
12.INSTALL SLIDING ROOF SIDE GARNISH RH
13.INITIALIZE SLIDING ROOF SYSTEM