☰ Toyota Frontlander☰ فهرستEngine / Hybrid System › M20F-FXS, M20G-FXS EMISSION CONTROL › EXHAUST GAS TEMPERATURE SENSOR(for Rear)
RM38T0EC
_51
Engine / Hybrid System
_144996
M20F-FXS, M20G-FXS EMISSION CONTROL
_0604315
EXHAUST GAS TEMPERATURE SENSOR(for Rear)
A
M20F-FXS, M20G-FXS EMISSION CONTROL EXHAUST GAS TEMPERATURE SENSOR(for Rear) INSTALLATION
CAUTION / NOTICE / HINT
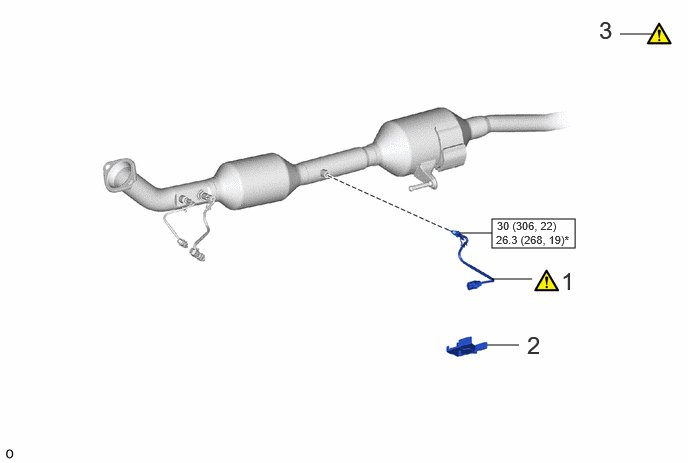
COMPONENTS (INSTALLATION)
5.125,2.281 5.99,2.583
0.865,0.302
5.073,3.594 5.406,3.594
false
5.125,2.906 5.542,2.906
false
4.792,2.427 5.125,2.427
false
6.458,0.354 6.792,0.354
false
6.24,0.167 6.792,0.521
0.552,0.354
18
false
3
5.844,2.781 6.396,3.135
0.552,0.354
18
false
1
5.49,3.448 6.042,3.802
0.552,0.354
18
false
2
5.177,2.281 6.646,2.438
1.469,0.156
8
false
30 (306, 22)
5.167,2.427 6.635,2.583
1.469,0.156
8
false
26.3 (268, 19)*
| Procedure | Part Name Code | 
|

|

|
|
|---|---|---|---|---|---|
| 1 | NO. 2 EXHAUST GAS TEMPERATURE SENSOR | 89425A | ( 202307,999999,_51,_144996,_0604315,RM100000002BTV9_01_0002,) 202307,999999,_51,_144996,_0604315,RM100000002BTV9_01_0002,)
|
- | - |
| 2 | COVER | - | - | - | - |
| 3 | INSPECT FOR EXHAUST GAS LEAK | - | (202307,999999,_51,_144996,_0604315,RM100000002BTV9_01_0003,)
|
- | - |

|
N*m (kgf*cm, ft.*lbf): Specified torque | * | For use with union nut wrench |
PROCEDURE

 89425A
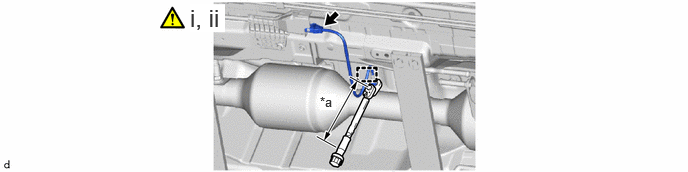
1.INSTALL NO. 2 EXHAUST GAS TEMPERATURE SENSOR
89425A
1.INSTALL NO. 2 EXHAUST GAS TEMPERATURE SENSOR
a.
3.333,0.979 3.5,1.146
0.167,0.167
10
true
*a
1.979,0.042 2.344,0.333
0.365,0.292
18
true
i, ii
| *a | Torque Wrench Fulcrum Length | - | - |
i.
Using a 14 mm union nut wrench, install the No. 2 exhaust gas temperature sensor.
- NOTICE:
-
If the No. 2 exhaust gas temperature sensor is dropped, replace it with a new one.
- Torque:
- 30 N*m (306 kgf*cm, 22 ft.*lbf)
- HINT:
- ·
Calculate the torque wrench reading when changing the fulcrum length of the torque wrench.
·When using a union nut wrench (fulcrum length of 25 mm (0.984 in.)) + torque wrench (fulcrum length of 180 mm (7.09 in.)): 26.3 N*m (268 kgf*cm, 19 ft.*lbf)
ii.
Install the clamp and connect the No. 2 exhaust gas temperature sensor connector.
2.INSTALL COVER
3.INSPECT FOR EXHAUST GAS LEAK