M20F-FXS, M20G-FXS ENGINE CONTROL AIR FUEL RATIO SENSOR(for Sensor 2) INSTALLATION
CAUTION / NOTICE / HINT
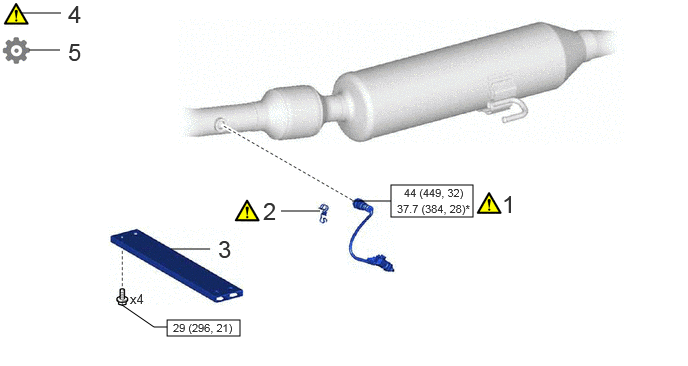
| Procedure | Part Name Code | 
|

|

|
|
|---|---|---|---|---|---|
| 1 | NO. 2 AIR FUEL RATIO SENSOR | 89467C | ( 202307,999999,_51,_144956,_0604227,RM100000002BTJ1_01_0013,) 202307,999999,_51,_144956,_0604227,RM100000002BTJ1_01_0013,)
|
- | - |
| 2 | WIRING HARNESS CLAMP BRACKET | 82715W | (202307,999999,_51,_144956,_0604227,RM100000002BTJ1_01_0017,)
|
- | - |
| 3 | FRONT FLOOR CENTER BRACE | 57533B | - | - | - |
| 4 | INSPECT FOR EXHAUST GAS LEAK | - | (202307,999999,_51,_144956,_0604227,RM100000002BTJ1_01_0015,)
|
- | - |
| 5 | PERFORM INITIALIZATION | - | - | - | (202307,999999,_51,_144956,_0604227,RM100000002BTJ1_01_0016,)
|

|
N*m (kgf*cm, ft.*lbf): Specified torque | * | For use with SST |
PROCEDURE

 89467C
1.INSTALL NO. 2 AIR FUEL RATIO SENSOR
89467C
1.INSTALL NO. 2 AIR FUEL RATIO SENSOR
|
|
|

| *a | Torque Wrench Fulcrum Length | - | - |
Using SST, install the air fuel ratio sensor to the front exhaust pipe assembly (TWC: Rear Catalyst).
- SST
- 09224-00012
- Torque:
- Specified tightening torque : 44 N*m (449 kgf*cm, 32 ft.*lbf)
- HINT:
- ·
Calculate the torque wrench reading when changing the fulcrum length of the torque wrench.
·When using SST (fulcrum length of 30 mm (1.18 in.)) + torque wrench (fulcrum length of 180 mm (7.09 in.)):
37.7 N*m (384 kgf*cm, 28 ft.*lbf)
Engage the wire harness clamp.
Connect the heated oxygen sensor connector.
82715W
2.INSTALL WIRING HARNESS CLAMP BRACKET

| *a | Correct | *b | Incorrect |
| *c | Standard Position | - | - |
Install the wire harness clamp bracket to the No. 2 air fuel ratio sensor.
- NOTICE:
-
Align the edge of the wire harness clamp bracket and No. 2 air fuel ratio sensor as shown in the illustration.
57533B
3.INSTALL FRONT FLOOR CENTER BRACE
- Torque:
- 29 N*m (296 kgf*cm, 21 ft.*lbf)
4.INSPECT FOR EXHAUST GAS LEAK
5.PERFORM INITIALIZATION
Perform "Inspection After Repair" after replacing the air fuel ratio sensor.