ADVANCED DRIVER ASSISTANCE SYSTEM MILLIMETER WAVE RADAR SENSOR(Production Date from 2023/04) TARGET ADJUSTMENT(FLAT SURFACE TARGET)
PROCEDURE

 1. PREPARATION FOR MILLIMETER WAVE RADAR SENSOR ASSEMBLY ADJUSTMENT
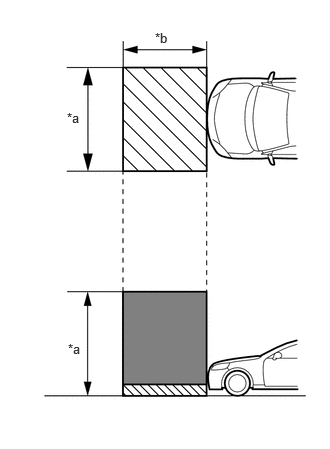
| *a | 2.5 m (8.2 ft.) |
| *b | 2 m (6.6 ft.) |

|
Do not place any metal objects in this area |

|
Do not place metal objects with a height of more than 50 mm (1.97 in.) in this area |
Park the vehicle on a level surface where the area in front of the vehicle shown in the illustration is free of metal objects.
- HINT:
-
Metal objects with a height of 50 mm (1.97 in.) or less placed within the area shown in the illustration will not affect the adjustment.
Check the levelness of the ground.
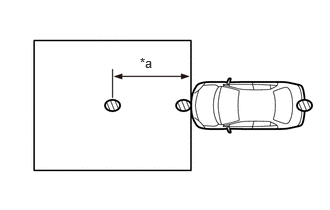
| *a | 1.5 m (4.92 ft.) |
|
|
Levelness Check Point |
Check the levelness of the ground at the 3 points shown in the illustration.
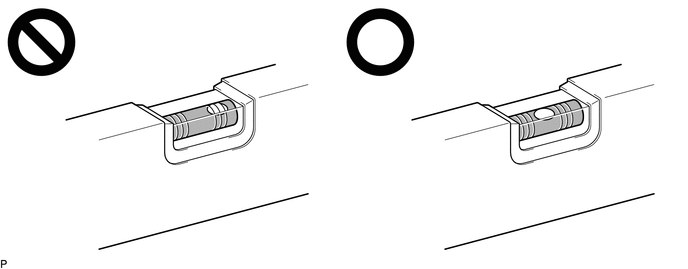
Place the level on each levelness check point and check that the air bubble of the level is centered.
Adjust the tire inflation pressure to the specified pressure.
Clean the radiator grille emblem or millimeter wave radar sensor assembly.
Visually inspect the front of the vehicle.
- HINT:
-
Confirm that there is no damage or deformation.
Visually inspect the front bumper assembly, radiator grille and stays.
- HINT:
-
Confirm that there is no damage or deformation.
Check that the radiator grille and front bumper assembly are securely installed, and that there is no damage or deformation around the installation areas. If any abnormalities are found, repair or replace parts as necessary.
2. ADJUST MILLIMETER WAVE RADAR SENSOR ASSEMBLY HORIZONTALLY
- HINT:
-
The vertical axis deviation can only be checked and cannot be adjusted.
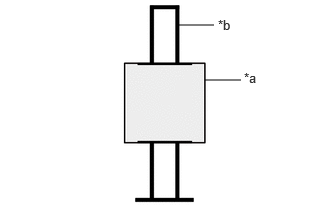
| *a | SST (Flat Surface Target) |
| *b | SST (Panel Stand) |
Adjust SST (flat surface target) height.
Check that SST (flat surface target) has no damage or deformation.
- SST
- 09870-60100
09870-60110
Check that SST (flat surface target) is assembled correctly.
Check that SST (flat surface target) has no looseness or wobble.
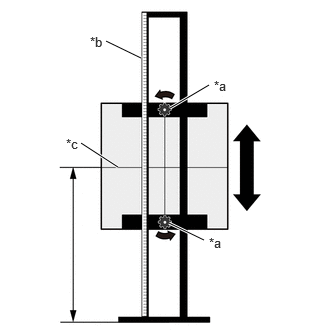
| *a | Handle |
| *b | Scale |
| *c | Height Reference Line |
Loosen the top and bottom handles of SST (panel stand), and while checking the included scale, adjust the height of SST (flat surface target) as shown in the illustration so that its height reference line is at the same height as the millimeter wave radar sensor assembly, then re-tighten the top and bottom handles.
- HINT:
- ·
Adjust SST (flat surface target) so that its center is aligned with the millimeter wave radar sensor assembly (center of radiator grille emblem).
·Height adjustment can be performed using the scale included with SST (flat surface target).
- Reference Value:
- for TFTM Made:
778 mm (2.55 ft.)
- for GTMC Made:
800 mm (2.62 ft.)
Place SST (flat surface target).
Hang a weight with a pointed tip from the center of the rear emblem, and mark the rear center point of the vehicle (point A) on the ground.
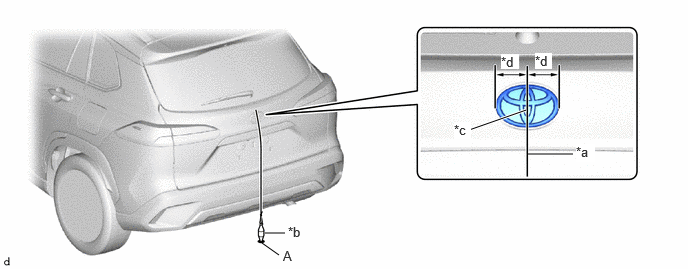
| *a | String | *b | Weight |
| *c | Center | *d | Bilateral Symmetry |
- HINT:
-
Lightly flick the string with your fingers several times to confirm that the string is perpendicular to the ground.
Hang a weight with a pointed tip from the center of the front emblem, and mark the front center point of the vehicle (point B) on the ground.
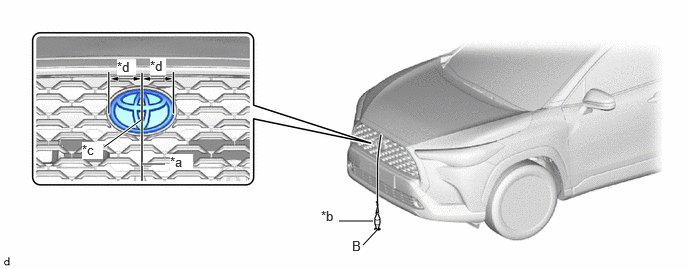
| *a | String | *b | Weight |
| *c | Center | *d | Bilateral Symmetry |
- HINT:
-
Lightly flick the string with your fingers several times to confirm that the string is perpendicular to the ground.
When using a laser line marker:
- NOTICE:
-
Do not look directly into the laser beam.
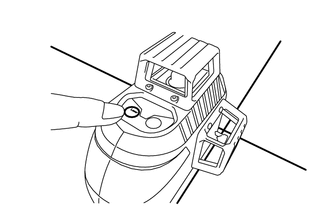
Press the laser mode button on the laser line marker to activate the laser line emitters.
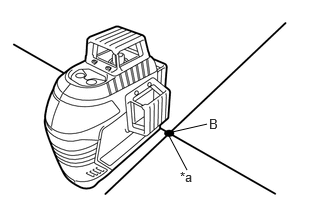
| *a | Ground Marking Point (Cross Portion) |
Align the laser beam ground marking point (cross portion) with point B.
Align the center of the target panel with point A, and set the target panel so that it faces forward.
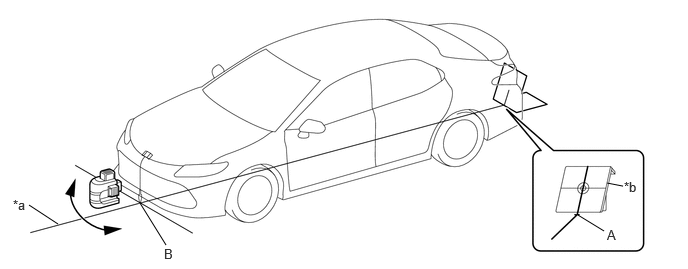
| *a | Center Line | *b | Target Panel |
Adjust the position of the laser line marker so that the laser beam is aligned with the center line of the target panel.
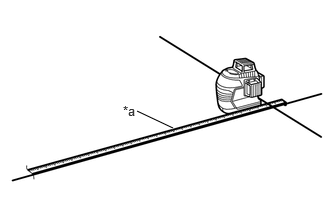
| *a | Tape Measure |
Extend a tape measure at least 1500 mm (4.92 ft.) in length from point B, and set the tape measure in place.
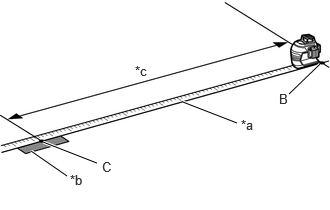
| *a | Tape Measure |
| *b | Tape |
| *c | 1500 mm (4.92 ft.) |
Mark point C at a distance of 1500 mm (4.92 ft.) from point B, and apply a 300 mm (11.81 in.) piece of tape alongside the tape measure so that the tape extends 150 mm (5.91 in.) to the front and rear of point C.
When not using a laser line marker:
Using tape and a string, create a line that connects point B to point A and extends at least 1500 mm (4.92 ft.) beyond the front center point of the vehicle.
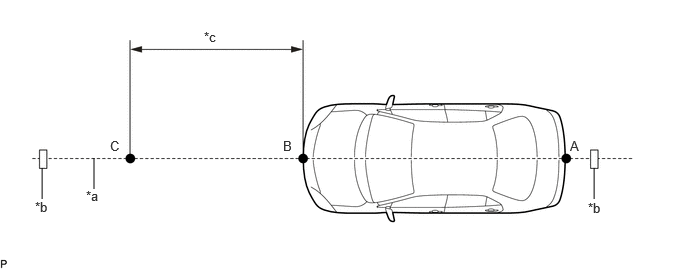
| *a | String | *b | Tape |
| *c | 1500 mm (4.92 ft.) | - | - |
- HINT:
- ·
Make sure the string is taut when securing it with tape.
·Lightly flick the string with your fingers several times to confirm that the string is aligned with point B.
Mark point C (SST (flat surface target) placement position) at a position 1500 mm (4.92 ft.) from point B.
Position SST (panel stand) so that it is aligned with the target position line and the mark-off line is aligned with point C as shown in the illustration.
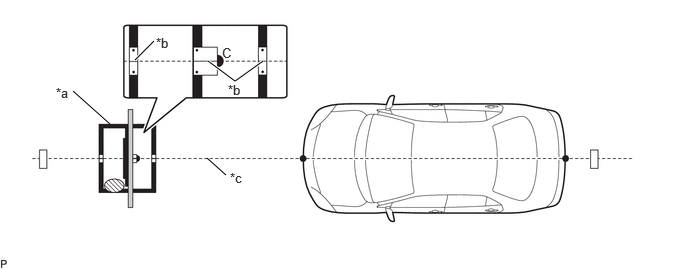
| *a | SST (Panel Stand) | *b | Mark-off Line |
| *c | Reference Line | - | - |
|
|
Levelness Check Point | - | - |
- NOTICE:
- ·
Make sure that the mark-off lines of the SST (panel stand) are aligned with the reference line.
·Place the level on each levelness check point shown in the illustration and check that the air bubble of the level is centered.
Perform Front Beam Axis Adjustment.
- NOTICE:
- ·
Close all of the doors.
·Ensure that nobody enters the adjustment area during the adjustment.
·Do not move or shake the vehicle during adjustment (do not get in or out of the vehicle).
·Do not turn off the GTS or ignition switch.
·If the vehicle moves or is shaken during beam axis adjustment such as during strong winds or a door is opened or closed, perform the adjustment again.
Connect the GTS to the DLC3.
Turn the ignition switch to ON.
Turn the GTS on.
Enter the following menus: Body Electrical / Front Radar Sensor / Utility / Front Beam Axis Adjustment.
- Body Electrical > Front Radar Sensor > Utility
-
Tester Display Front Beam Axis Adjustment - 50005 429 4953
Confirm the conditions displayed on the screen and then press "Next".
Select "Flat surface" and then press "Next".
Perform the adjustment according to the display on the GTS.
- NOTICE:
-
If an error code is displayed, perform troubleshooting according to the following table, then perform the adjustment again.
Error No. Error Description Cause of Error Action to be Taken 1 No target abnormality ·SST (flat surface target) is placed incorrectly.
·The radiator grille emblem or millimeter wave radar sensor assembly is covered by dirt or snow.
·The destination does not match.
Place SST (flat surface target) in the correct position. (See page 2. ADJUST MILLIMETER WAVE RADAR SENSOR ASSEMBLY HORIZONTALLY (b) Place SST (flat surface target)) Clean the radiator grille emblem or millimeter wave radar sensor assembly. Check the installation condition of the front bumper assembly and radiator grille. 2 Target distance abnormality ·SST (flat surface target) is placed incorrectly.
Place SST (flat surface target) in the correct position. (See page 2. ADJUST MILLIMETER WAVE RADAR SENSOR ASSEMBLY HORIZONTALLY (b) Place SST (flat surface target)) 3 Plural targets abnormality ·There is a reflective object near SST (flat surface target).
·A person entered the adjustment area.
Remove any reflective objects. Ensure that nobody enters the adjustment area during the adjustment. (See page 1. PREPARATION FOR MILLIMETER WAVE RADAR SENSOR ASSEMBLY ADJUSTMENT) 4 Target move abnormality ·SST (flat surface target) was moved out of position or shaking during the adjustment due to wind.
·A person entered the adjustment area.
Place SST (flat surface target) in the correct position. (See page 2. ADJUST MILLIMETER WAVE RADAR SENSOR ASSEMBLY HORIZONTALLY (b)Place SST (flat surface target)) Perform adjustment in an area with no wind. Ensure that nobody enters the adjustment area during the adjustment. (See page 1. PREPARATION FOR MILLIMETER WAVE RADAR SENSOR ASSEMBLY ADJUSTMENT) 5 Axis adjustment ·Optical axis adjustment has not been performed.
Optical axis adjustment. (See page 2. ADJUST MILLIMETER WAVE RADAR SENSOR ASSEMBLY HORIZONTALLY (c) Front Beam Axis Adjustment) 6 Target angle abnormality ·SST (flat surface target) is placed incorrectly.
·The beam axis of the millimeter wave radar sensor assembly is outside the automatic correction range.
Place SST (flat surface target) in the correct position. (See page 2. ADJUST MILLIMETER WAVE RADAR SENSOR ASSEMBLY HORIZONTALLY (b)Place SST (flat surface target)) Check the condition of the millimeter wave radar sensor assembly, radiator grille and front bumper assembly. 7 Radar abnormality ·Operation of the millimeter wave radar sensor assembly is abnormal.
Replace the millimeter wave radar sensor assembly. 8 Radar dirtiness ·There is dirt on the radiator grille emblem or millimeter wave radar sensor assembly.
·Clean the radiator grille emblem or millimeter wave radar sensor assembly.
·Check that there is no foreign matter between the millimeter wave radar sensor assembly and radiator grille emblem.
9 Temperature abnormality ·The temperature around the millimeter wave radar sensor assembly is too high.
Wait until the temperature drops to the operable range (-30 to 50°C). 10 Voltage abnormality ·IG power source voltage is outside the operable range of the millimeter wave radar sensor assembly.
Check the battery voltage (specified condition: 10 to 16 V).
Click here( 202201,999999,_57,_105430,_0482035,RM100000001WZPJ_01_0014,)
11 External communication abnormality ·CAN communication between forward recognition camera and the millimeter wave radar sensor assembly is abnormal.
Check the condition of the connectors and wire harness. 12 Radar axis aiming failure upward ·The beam axis of the millimeter wave radar sensor assembly is deviated.
Check the condition of the millimeter wave radar sensor assembly, radiator grille and front bumper assembly. ·Check the height of SST (flat surface target).
·Check the placement of SST (flat surface target).
13 Radar axis aiming failure downward ·The beam axis of the millimeter wave radar sensor assembly is deviated.
Check the condition of the millimeter wave radar sensor assembly, radiator grille and front bumper assembly. ·Check the height of SST (flat surface target).
·Check the placement of SST (flat surface target).
14 Vehicle speed abnormality ·The vehicle is moving.
Ensure that the vehicle remains stationary. 16 Time out ·The vehicle cannot communicate with GTS normally.
·The vehicle does not keep still during beam axis adjustment.
·Operation of the millimeter wave radar sensor assembly is abnormal.
·Ensure that the vehicle is connected with the GTS correctly.
·Ensure that the vehicle remains stationary.
·Perform beam axis adjustment again and replace the millimeter wave radar sensor assembly if the same error code is output.
18 Vehicle information undefined ·CAN communication between forward recognition camera and the millimeter wave radar sensor assembly is abnormal.
Check the connectors of the millimeter wave radar sensor assembly, forward recognition camera and the junction block are firmly connected.
Press "Exit" to finish front beam axis adjustment.
Perform Front Beam Axis Misalignment Reading.
- NOTICE:
- ·
Close all of the doors.
·Do not move or shake the vehicle during adjustment (do not get in or out of the vehicle).
·Ensure that nobody enters the adjustment area during the adjustment.
·Do not turn off the GTS or ignition switch.
Enter the following menus: Body Electrical / Front Radar Sensor / Utility / Front Beam Axis Misalignment Reading.
- Body Electrical > Front Radar Sensor > Utility
-
Tester Display Front Beam Axis Misalignment Reading - 50005 429 4405
Confirm the conditions displayed on the screen and then press "Next".
Select "Flat surface" and then press "Next".
Perform the adjustment according to the display on the GTS.
- Specified Condition:
Vertical -0.6 to 0.6 deg. Horizontal -0.5 to 0.5 deg.
- NOTICE:
-
If the result is not as specified, perform beam axis adjustment again.
Turn the ignition switch off.
Disconnect the GTS from the DLC3.
After beam axis adjustment completes, clear the following system vehicle control history entries.
Clear vehicle control history (Front Radar Sensor System).
Clear vehicle control history (Front Camera System).
Clear vehicle control history (Automatic High Beam System).