SLIDING ROOF / CONVERTIBLE SLIDING ROOF HOUSING(for Moon Roof) REASSEMBLY
CAUTION / NOTICE / HINT
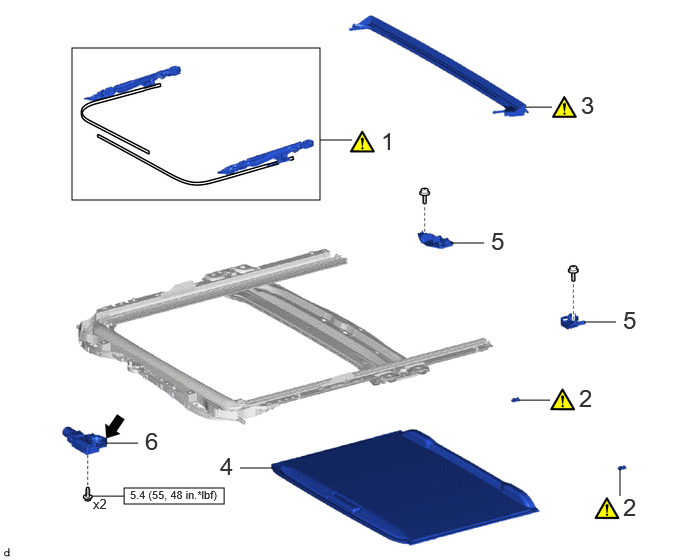
| Procedure | Part Name Code | 
|

|

|
|
|---|---|---|---|---|---|
| 1 | SLIDING ROOF DRIVE CABLE SUB-ASSEMBLY | 63205A | ( 202201,999999,_59,_114986,_0509985,RM10000000207AF_01_0001,) 202201,999999,_59,_114986,_0509985,RM10000000207AF_01_0001,)
|
- | - |
| 2 | REAR NO. 1 SLIDING ROOF SUNSHADE STOPPER | - | (202201,999999,_59,_114986,_0509985,RM10000000207AF_01_0012,)
|
- | - |
| 3 | REAR ROOF DRIP CHANNEL | - | (202201,999999,_59,_114986,_0509985,RM10000000207AF_01_0010,)
|
- | - |
| 4 | SUNSHADE TRIM SUB-ASSEMBLY | 63306 | - | - | - |
| 5 | SLIDING ROOF PIECE SUB-ASSEMBLY | - | - | - | - |
| 6 | SLIDING ROOF DRIVE GEAR SUB-ASSEMBLY | 63260K | (202201,999999,_59,_114986,_0509985,RM10000000207AF_01_0004,)
|
- | - |

|
N*m (kgf*cm, ft.*lbf): Specified torque | 
|
MP grease |
PROCEDURE

 63205A
1.INSTALL SLIDING ROOF DRIVE CABLE SUB-ASSEMBLY
63205A
1.INSTALL SLIDING ROOF DRIVE CABLE SUB-ASSEMBLY
|
|
|
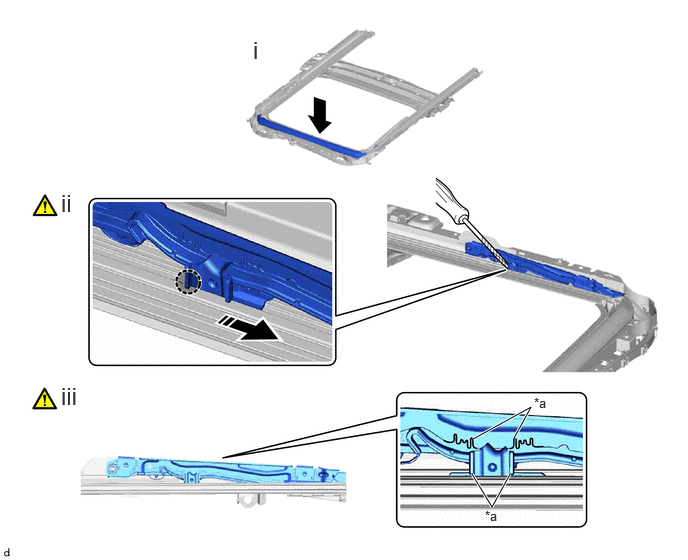
| *a | Alignment Mark | - | - |
| ● | Non-reusable part |
|
Hold Down |

|
Push Position | 
|
Install in this Direction |
Hold down the roof wind deflector panel sub-assembly.
Using a screwdriver with its tip wrapped with protective tapes, install the sliding roof drive cable sub-assembly as shown in the illustration.
- HINT:
-
Use the same procedure for the opposite side.
Adjust Fully Closed Position:
1. Using a screwdriver with its tip wrapped with protective tapes, align the alignment marks as shown in the illustration.
- HINT:
-
Use the same procedure for the opposite side.
2.INSTALL REAR NO. 1 SLIDING ROOF SUNSHADE STOPPER
|
|
|
3.INSTALL REAR ROOF DRIP CHANNEL
|
|
|
63306
4.INSTALL SUNSHADE TRIM SUB-ASSEMBLY
5.INSTALL SLIDING ROOF PIECE SUB-ASSEMBLY
63260K
6.INSTALL SLIDING ROOF DRIVE GEAR SUB-ASSEMBLY
- Torque:
- 5.4 N*m (55 kgf*cm, 48 in.*lbf)