SLIDING ROOF / CONVERTIBLE SLIDING ROOF HOUSING(for Panoramic Moon Roof) REASSEMBLY
CAUTION / NOTICE / HINT
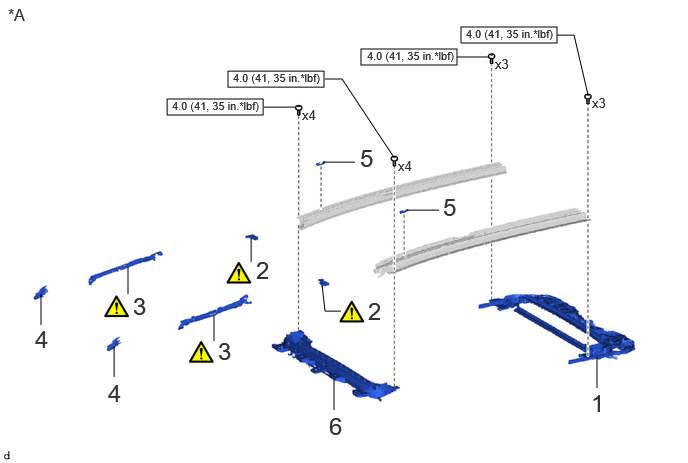
| Procedure | Part Name Code | 
|

|

|
|
|---|---|---|---|---|---|
| 1 | REAR SLIDING ROOF HOUSING PANEL | 63233C | - | - | - |
| 2 | SHADE SHOE | - | ( 202201,999999,_59,_114986,_0509983,RM10000000207A8_01_0022,) 202201,999999,_59,_114986,_0509983,RM10000000207A8_01_0022,)
|
- | - |
| 3 | SLIDING ROOF DRIVE CABLE SUB-ASSEMBLY | - | (202201,999999,_59,_114986,_0509983,RM10000000207A8_01_0017,)
|
- | - |
| 4 | RAIL END | - | - | - | - |
| 5 | STOPPER | - | - | - | - |
| 6 | FRONT SLIDING ROOF HOUSING PANEL | 63233C | - | - | - |
| *A | for GTMC Made | - | - |

|
N*m (kgf*cm, ft.*lbf): Specified torque | - | - |
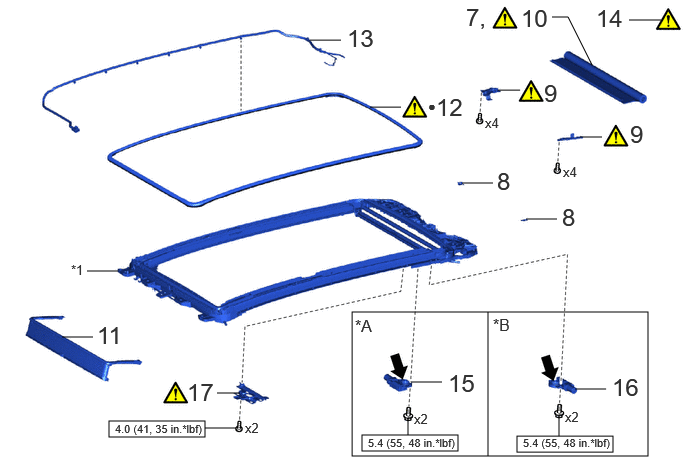
| Procedure | Part Name Code |
|
|
|
|
|---|---|---|---|---|---|
| 7 | CONNECT SUNSHADE TRIM SUB-ASSEMBLY | 63306 | - | - | - |
| 8 | SUNSHADE PLATE | - | - | - | - |
| 9 | SUNSHADE TRIM BRACKET | - | (202201,999999,_59,_114986,_0509983,RM10000000207A8_01_0023,)
|
- | - |
| 10 | INSTALL SUNSHADE TRIM SUB-ASSEMBLY | 63306 | (202201,999999,_59,_114986,_0509983,RM10000000207A8_01_0025,)
|
- | - |
| 11 | ROOF WIND DEFLECTOR PANEL SUB-ASSEMBLY | 63209 | - | - | - |
| 12 | SLIDING ROOF WEATHERSTRIP | 63251H | (202201,999999,_59,_114986,_0509983,RM10000000207A8_01_0014,)
|
- | - |
| 13 | NO. 2 ROOF WIRE | 82172 | - | - | - |
| 14 | ADJUST FULLY CLOSED POSITION | - | (202201,999999,_59,_114986,_0509983,RM10000000207A8_01_0010,)
|
- | - |
| 15 | SLIDING ROOF DRIVE GEAR ASSEMBLY | 63260J | - | - | - |
| 16 | SLIDING ROOF DRIVE GEAR ASSEMBLY | 63260H | - | - | - |
| 17 | ROOM LIGHT BRACKET | 63231C | (202201,999999,_59,_114986,_0509983,RM10000000207A8_01_0018,)
|
- | - |
| *A | for Roof Sunshade | *B | for Sliding Roof Glass |
| *1 | SLIDING ROOF HOUSING SUB-ASSEMBLY | - | - |
|
|
N*m (kgf*cm, ft.*lbf): Specified torque | 
|
MP grease |
| ● | Non-reusable part | - | - |
PROCEDURE

 63233C
1.INSTALL REAR SLIDING ROOF HOUSING PANEL (for GTMC Made)
63233C
1.INSTALL REAR SLIDING ROOF HOUSING PANEL (for GTMC Made)
- Torque:
- 4.0 N*m (41 kgf*cm, 35 in.*lbf)
2.INSTALL SHADE SHOE (for GTMC Made)
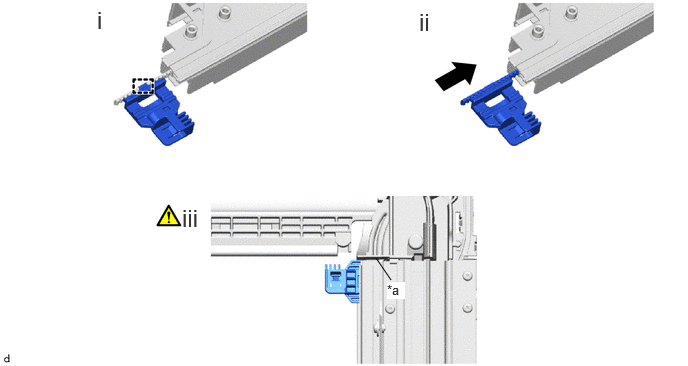
| *a | Edge of Sliding Roof Rail Sub-assembly | - | - |
Engage the guide to install the shade shoe to the sliding roof drive cable.
Install the shade shoe with the sliding roof drive cable to the sliding roof rail sub-assembly.
Align the shade shoe to the edge of sliding roof rail sub-assembly as shown in the illustration.
Use the same procedure as for the opposite side.
3.INSTALL SLIDING ROOF DRIVE CABLE SUB-ASSEMBLY (for GTMC Made)
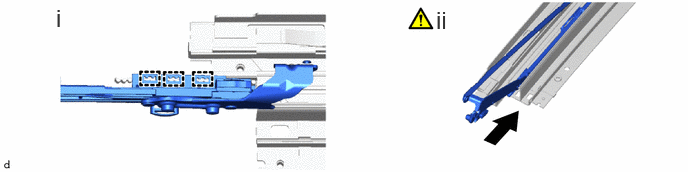
Engage the guides to install the sliding roof drive cable sub-assembly to the sliding roof drive cable.
Install the sliding roof drive cable sub-assembly with the sliding roof drive cable as shown in the illustration.
- NOTICE:
-
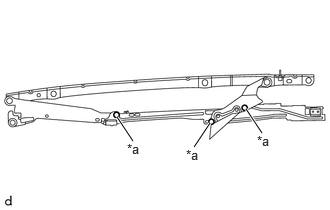 2.021,1.531 2.188,1.281 true 1.385,1.469 1.219,1.219 true 2.729,1.385 2.563,1.135 true 1.323,1.469 1.635,1.625 0.313,0.156 10 false *a 1.938,1.531 2.25,1.688 0.313,0.156 10 false *a 2.677,1.385 2.99,1.542 0.313,0.156 10 false *a
*a Link
-
Align the link of the sliding roof drive cable sub-assembly as shown in the illustration.
Use the same procedure as for the opposite side.
4.INSTALL RAIL END (for GTMC Made)
5.INSTALL STOPPER (for GTMC Made)
63233C
6.INSTALL FRONT SLIDING ROOF HOUSING PANEL (for GTMC Made)
- Torque:
- 4.0 N*m (41 kgf*cm, 35 in.*lbf)
63306
7.CONNECT SUNSHADE TRIM SUB-ASSEMBLY
8.INSTALL SUNSHADE PLATE
9.INSTALL SUNSHADE TRIM BRACKET
for LH Side:

Engage the pin to install the sunshade trim bracket.
Using a T25 "TORX" socket wrench, install the 4 screws.
for RH Side:

Engage the guide to install the sunshade trim bracket.
Using a T25 "TORX" socket wrench, install the 4 screws.
63306
10.INSTALL SUNSHADE TRIM SUB-ASSEMBLY
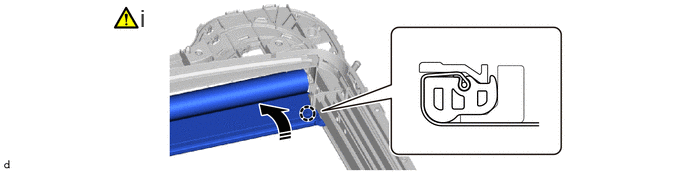

|
Install in this Direction | - | - |
Engage the claw to install the sunshade trim sub-assembly as shown in the illustration.
- NOTICE:
-
Make sure the sunshade trim sub-assembly is in the groove of the sliding roof housing sub-assembly.
Use the same procedure as for the opposite side.
63209
11.INSTALL ROOF WIND DEFLECTOR PANEL SUB-ASSEMBLY
63251H
12.INSTALL SLIDING ROOF WEATHERSTRIP
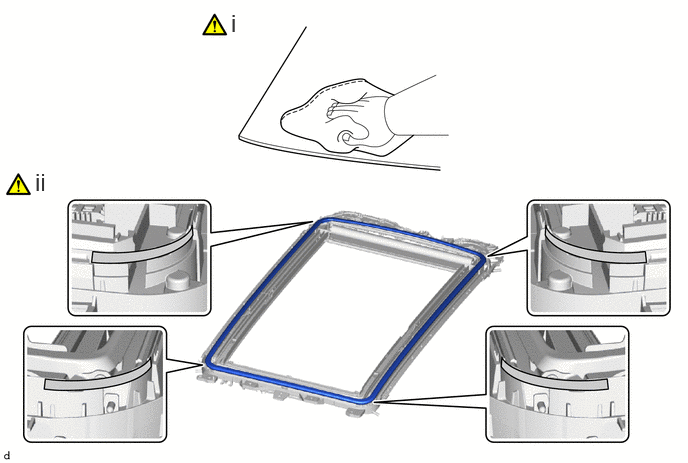

|
Primer | - | - |
Clean the sliding sliding roof housing sub-assembly.
1. Remove any remaining double-sided tape from the sliding roof housing sub-assembly.
2. Wipe off any tape adhesive residue with cleaner.
- NOTICE:
- ·
Installing the sliding roof weatherstrip with some double-sided tape remaining may cause poor adhesion. Perform this procedure until the tape is sufficiently removed.
·Make sure to use a cloth when removing. Using a screwdriver, etc., may cause damage and poor adhesion.
Apply primer to the sliding roof housing sub-assembly.
1. Apply primer to the sliding roof housing sub-assembly on the installation area of the Sliding Roof Weatherstrip using a brush or felt.
- NOTICE:
- ·
Replace the brush or felt if it is dirty or has become hardened.
·Do not touch surfaces to which primer has been applied until the sliding roof housing sub-assembly has been attached.
2. Let the primer dry sufficiently.
- Recommended drying time:
10 minutes or more (at 23°C (73°F))
- NOTICE:
-
Do not touch applied surfaces until the primer is dry.
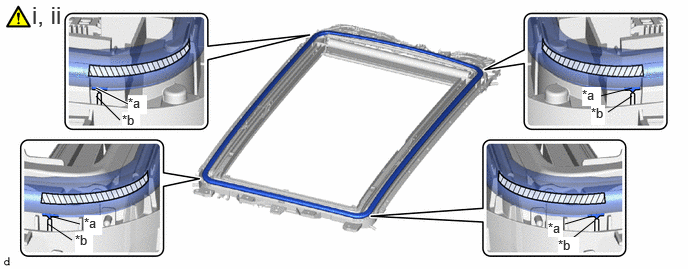
| *a | Mark of Sliding Roof Weatherstrip | *b | Mark of Sliding Roof Housing Sub-assembly |

|
Double-sided Tape | - | - |
Temporarily install a new sliding roof weatherstrip as shown in the illustration.
Remove the release paper from the sliding roof weatherstrip and install the sliding roof weatherstrip.
- NOTICE:
-
Press the sliding roof weatherstrip firmly to install it.
82172
13.INSTALL NO. 2 ROOF WIRE
14.ADJUST FULLY CLOSED POSITION
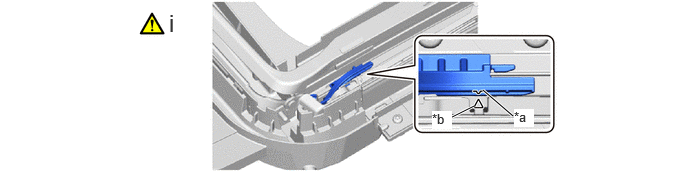
| *a | Mark of Rail End | *b | Mark of Sliding Roof Housing Sub-assembly |
Align the mark of rail end with the mark of sliding roof housing sub-assembly as shown in the illustration.
Use the same procedure as for the opposite side.
63260J
15.INSTALL SLIDING ROOF DRIVE GEAR SUB-ASSEMBLY (for Roof Sunshade)
- Torque:
- 5.4 N*m (55 kgf*cm, 48 in.*lbf)
63260H
16.INSTALL SLIDING ROOF DRIVE GEAR SUB-ASSEMBLY (for Sliding Roof Glass)
- Torque:
- 5.4 N*m (55 kgf*cm, 48 in.*lbf)
63231C
17.INSTALL ROOM LIGHT BRACKET

Engage the guide to install the room light bracket.
Using a T25 "TORX" socket wrench, install the 2 screws.
- Torque:
- 4.0 N*m (41 kgf*cm, 35 in.*lbf)