☰ Toyota Frontlander☰ فهرستVehicle Exterior › EXTERIOR PANELS / TRIM › WHEEL OPENING MOULDING(for Front)
RM38T0EC
_59
Vehicle Exterior
_114126
EXTERIOR PANELS / TRIM
_0505938
WHEEL OPENING MOULDING(for Front)
A
EXTERIOR PANELS / TRIM WHEEL OPENING MOULDING(for Front) REMOVAL
CAUTION / NOTICE / HINT
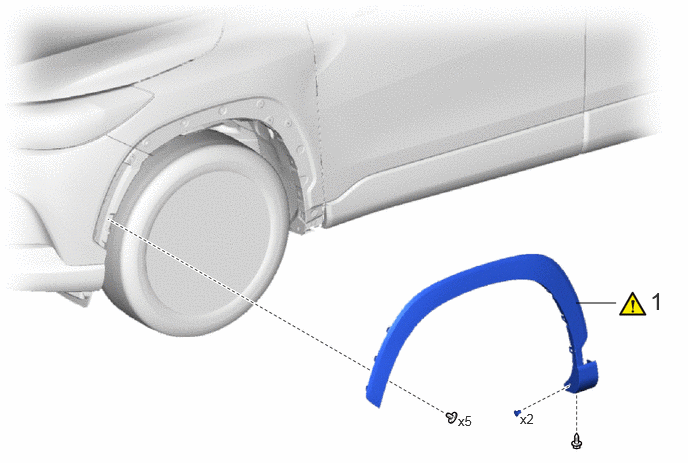
COMPONENTS (REMOVAL)
6,3.156 6.417,3.156
false
4.771,4.302 5.083,4.5
0.313,0.198
10
false
x5
5.417,4.281 5.729,4.479
0.313,0.198
10
false
x2
6.771,2.99 6.958,3.344
0.188,0.354
18
false
1
| Procedure | Part Name Code | 
|

|

|
|
|---|---|---|---|---|---|
| 1 | FRONT FENDER MOULDING SUB-ASSEMBLY | 75602A | ( 202201,999999,_59,_114126,_0505938,RM100000001ZPFZ_02_0004,) 202201,999999,_59,_114126,_0505938,RM100000001ZPFZ_02_0004,)
|
- | - |
CAUTION / NOTICE / HINT
- HINT:
- ·
Use the same procedure for the RH side and LH side.
·The following procedure is for the LH side.
PROCEDURE

 75602A
1.REMOVE FRONT FENDER MOULDING SUB-ASSEMBLY
75602A
1.REMOVE FRONT FENDER MOULDING SUB-ASSEMBLY
a.
0.083,0.031 0.448,0.292
0.365,0.26
18
false
i
i.
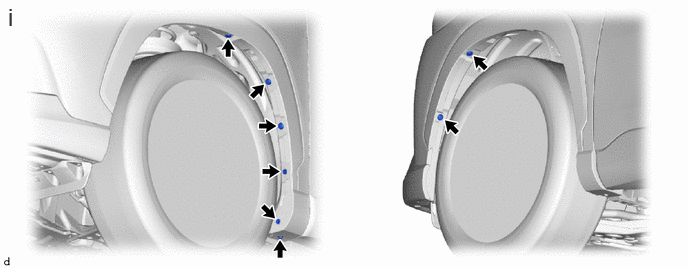
Remove the screw, 5 clips and 2 grommets.
b.
0.76,0.01 1.083,0.344
0.323,0.333
18
false
i
4.094,0.031 4.417,0.365
0.323,0.333
18
false
ii
0.813,2.99 1.135,3.323
0.323,0.333
18
false
iii

|
Push | 
|
Place Hand Here |

|
Remove in this Direction (1) | 
|
Remove in this Direction (2) |
i.
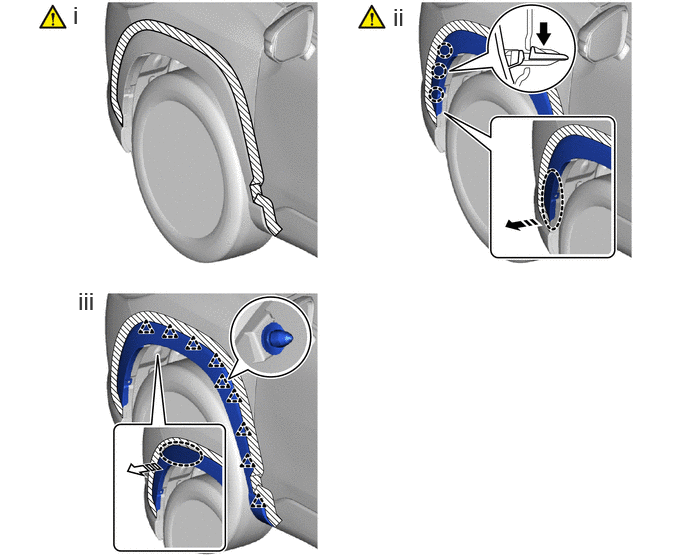
Apply protective tape around the front fender moulding sub-assembly as shown in the illustration.
ii.
Pull back the edge of the front fender liner and disengage the claws by pushing the area indicated by the arrow in the illustration with a finger.
- NOTICE:
- ·
Do not apply excessive force when pulling back the front fender liner.
·To avoid damaging the claws, do not forcibly pull the front fender moulding sub-assembly.
iii.
Disengage the clips to remove the front fender moulding sub-assembly as shown in the illustration.