EXTERIOR PANELS / TRIM ROOF DRIP SIDE FINISH MOULDING INSTALLATION
CAUTION / NOTICE / HINT
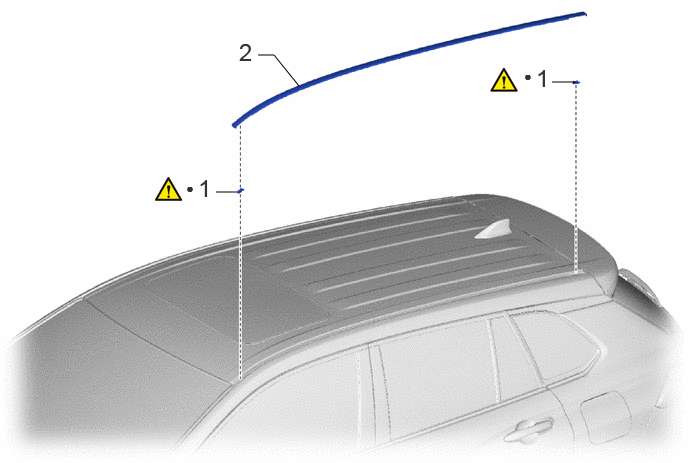
| Procedure | Part Name Code | 
|

|

|
|
|---|---|---|---|---|---|
| 1 | ROOF DRIP SIDE FINISH MOULDING CLIP | 75561A | ( 202201,999999,_59,_114126,_0505937,RM100000001ZPFY_01_0060,) 202201,999999,_59,_114126,_0505937,RM100000001ZPFY_01_0060,)
|
- | - |
| 2 | CENTER ROOF DRIP SIDE FINISH MOULDING | 75556C | - | - | - |
| ● | Non-reusable part | - | - |
CAUTION / NOTICE / HINT
- HINT:
- ·
Use the same procedure for the RH side and LH side.
·The following procedure is for the LH side.
PROCEDURE

 75561A
1.INSTALL ROOF DRIP SIDE FINISH MOULDING CLIP
75561A
1.INSTALL ROOF DRIP SIDE FINISH MOULDING CLIP
|
|
|
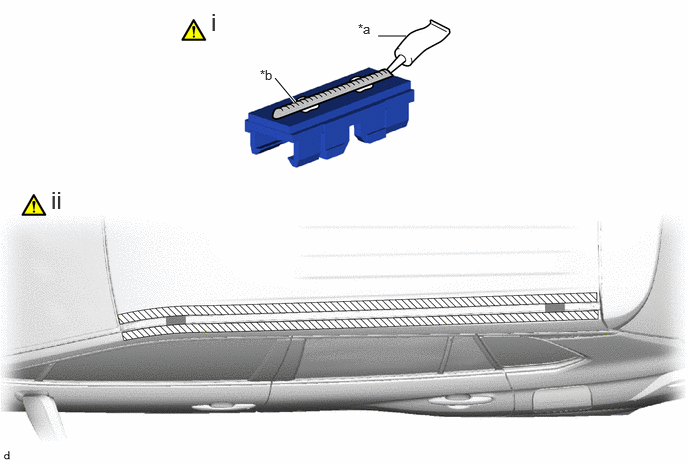
| *a | Adhesive | *b | 2.0 to 3.0 mm Bead of Adhesive |

|
Primer Application | - | - |
Apply a 2.0 to 3.0 mm (0.0787 to 0.118 in.) bead of adhesive (3M DP-105 or equivalent) to 2 new roof drip side finish moulding clips as shown in the illustration.
- HINT:
-
Adhesive strength (tensile strength): 13.7 Mpa (140.0 kgf/cm2, 1987 psi) or more (when the temperature is 23°C (73°F).)
Apply primer to the vehicle body where the roof drip side finish moulding clip will be installed.
- NOTICE:
-
Do not let the primer dry.
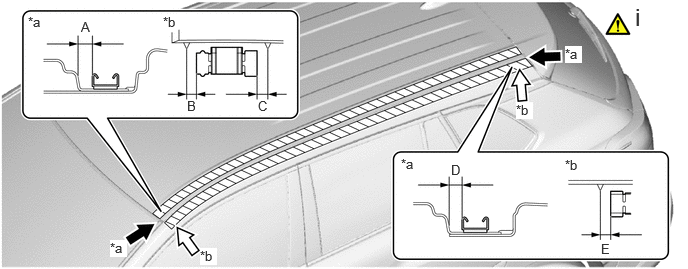
| *a | View A | *b | View B |
Install 2 roof drip side finish moulding clips to the positions on the roof panel as shown in the illustration. Determine the locations and firmly press and install 2 roof drip side finish moulding clips.
- HINT:
- ·
Install the roof drip side finish moulding clip when 40 minutes or more have elapsed since the roof drip side finish moulding clip were installed.
·Initial hardening time: 40 minutes
·Complete hardening time: 24 hours
- Standard Measurement:
Area Measurement Area Measurement A 5.7 to 6.7 mm (0.224 to 0.264 in.) B 4.7 mm (0.185 in.) C 5.1 mm (0.201 in.) D 4.4 to 5.4 mm (0.173 to 0.213 in.) E 4.5 to 5.5 mm (0.177 to 0.217 in.) - -
75556C
2.INSTALL CENTER ROOF DRIP SIDE FINISH MOULDING