INTERIOR PANELS / TRIM ROOF HEADLINING REASSEMBLY
CAUTION / NOTICE / HINT
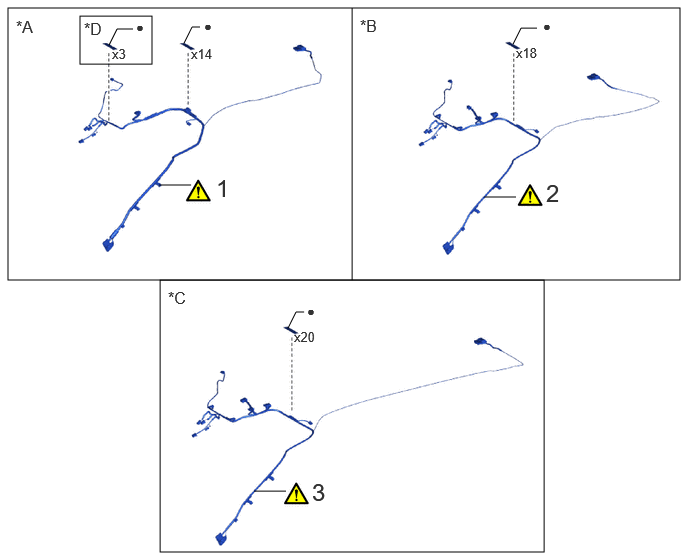
| Procedure | Part Name Code | 
|

|

|
|
|---|---|---|---|---|---|
| 1 | NO. 1 ROOF WIRE | 82171 | ( 202201,999999,_58,_112291,_0501087,RM100000001Z4VQ_01_0056,) 202201,999999,_58,_112291,_0501087,RM100000001Z4VQ_01_0056,)
|
- | - |
| 2 | NO. 1 ROOF WIRE | 82171 | (202201,999999,_58,_112291,_0501087,RM100000001Z4VQ_01_0084,)
|
- | - |
| 3 | NO. 1 ROOF WIRE | 82171 | (202201,999999,_58,_112291,_0501087,RM100000001Z4VQ_01_0090,)
|
- | - |
| *A | for Normal Roof | *B | for Moon Roof |
| *C | for Panoramic Moon Roof | *D | w/ Electronic Toll Collection System |
| *E | w/ Pre-collision System | *F | w/o Pre-collision System |
| ● | Non-reusable part | - | - |
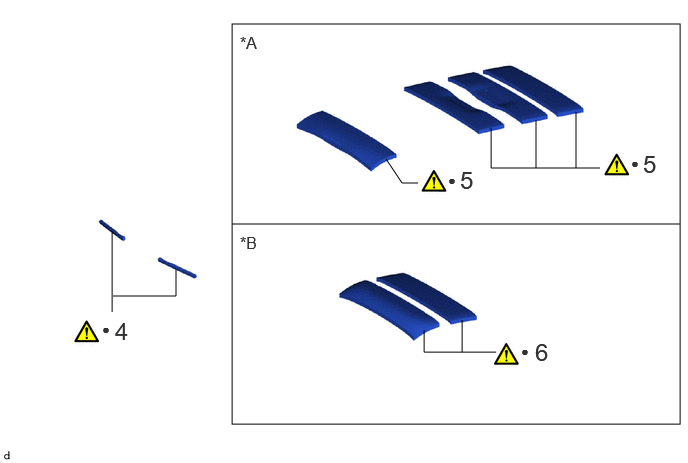
| Procedure | Part Name Code |
|
|
|
|
|---|---|---|---|---|---|
| 4 | ROOF HEADLINING PAD | 63351B | (202201,999999,_58,_112291,_0501087,RM100000001Z4VQ_01_0089,)
|
- | - |
| 5 | NO. 2 ROOF HEADLINING PAD | 63342 | (202201,999999,_58,_112291,_0501087,RM100000001Z4VQ_01_0088,)
|
- | - |
| 6 | NO. 2 ROOF HEADLINING PAD | 63342 | (202201,999999,_58,_112291,_0501087,RM100000001Z4VQ_01_0087,)
|
- | - |
| *A | for Normal Roof | *B | for Moon Roof |
| ● | Non-reusable part | - | - |
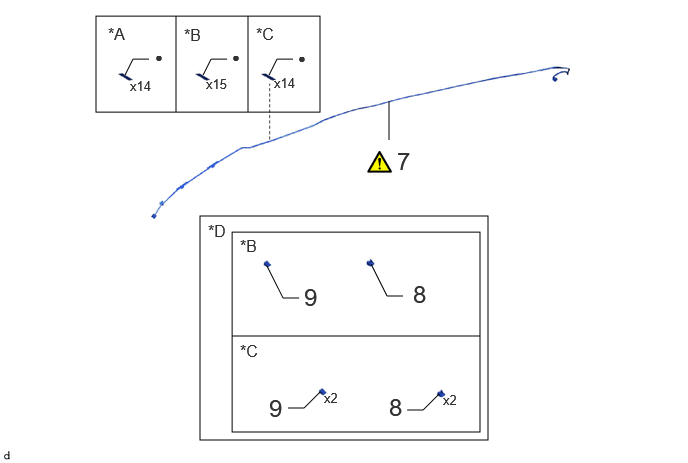
| Procedure | Part Name Code |
|
|
|
|
|---|---|---|---|---|---|
| 7 | NO. 2 ANTENNA CORD SUB-ASSEMBLY | 86101J | (202201,999999,_58,_112291,_0501087,RM100000001Z4VQ_01_0058,)
|
- | - |
| 8 | MICROPHONE CASE | 85255F | - | - | - |
| 9 | TELEPHONE MICROPHONE ASSEMBY | 86730A | - | - | - |
| *A | for Normal Roof | *B | for Moon Roof |
| *C | for Panoramic Moon Roof | *D | w/ Microphone |
| ● | Non-reusable part | - | - |
PROCEDURE

 82171
1.INSTALL NO. 1 ROOF WIRE (for Normal Roof)
82171
1.INSTALL NO. 1 ROOF WIRE (for Normal Roof)
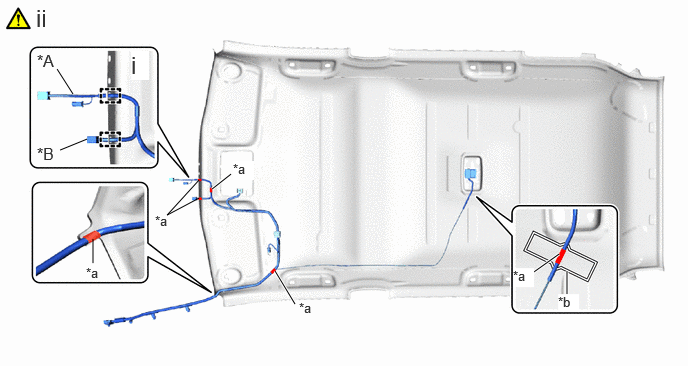
| *A | w/ Pre-collision System | *B | w/ Electronic Toll Collection System |
| *a | Marking Tape | *b | Marking |
w/ Electronic Toll Collection System or Pre-collision System:
1. Engage each guide.
Align the marking tape on the No. 1 roof wire with the roof headlining marking.
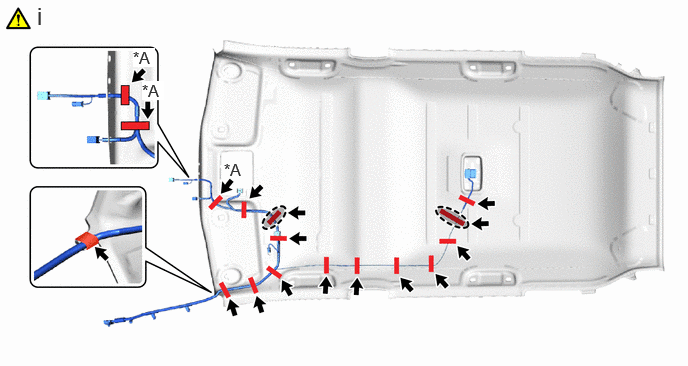
| *A | w/ Pre-collision System | - | - |

|
Adjustment Area | - | - |
Install the No. 1 roof wire to the roof headlining assembly with new adhesive tapes.
- NOTICE:
- ·
Apply the tape securely in place.
·Do not touch the adhesive surface when applying the tape to prevent adhesion failure.
- HINT:
-
Adjust the slack of the No. 1 roof wire as shown in the adjustment area of illustration.
82171
2.INSTALL NO. 1 ROOF WIRE (for Moon Roof)
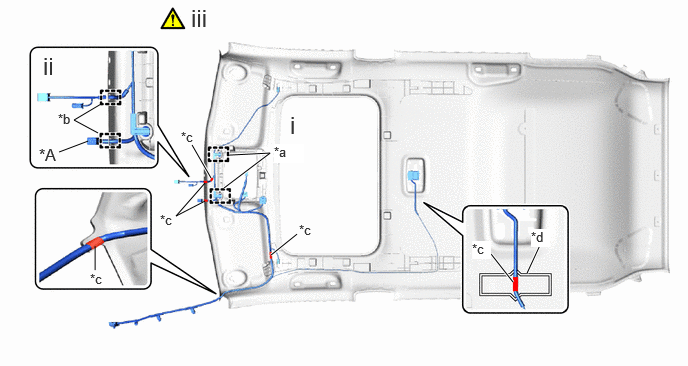
| *A | w/ Electronic Toll Collection System | - | - |
| *a | Clamp | *b | Guide |
| *c | Marking Tape | *d | Marking |
Engage the clamps
Engage each guide.
Align the marking tape on the No. 1 roof wire with the roof headlining markings.
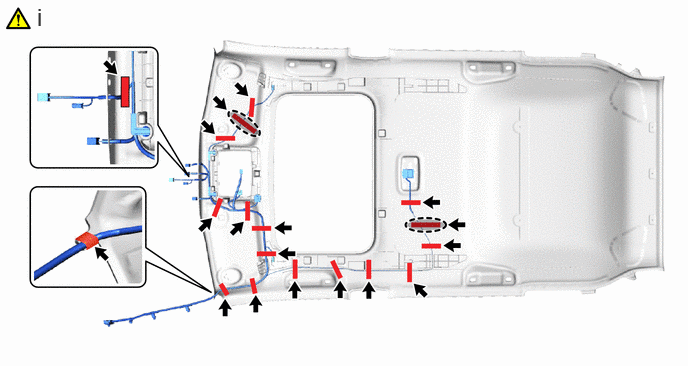
|
|
Adjustment Area | - | - |
Install the No. 1 roof wire to the roof headlining assembly with new adhesive tapes.
- NOTICE:
- ·
Apply the tape securely in place.
·Do not touch the adhesive surface when applying the tape to prevent adhesion failure.
- HINT:
-
Adjust the slack of the No. 1 roof wire as shown in the adjustment area of illustration.
82171
3.INSTALL NO. 1 ROOF WIRE (for Panoramic Moon Roof)
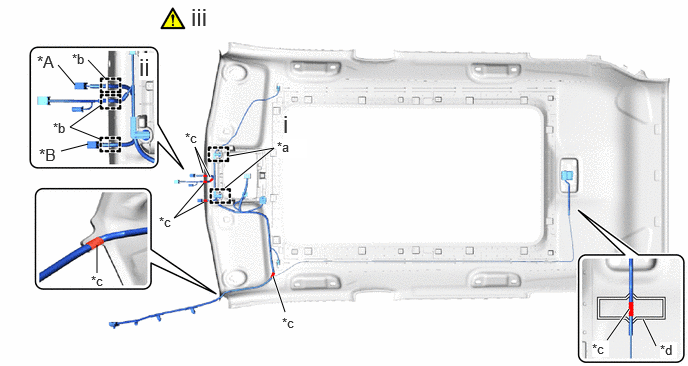
| *A | w/ EC Mirror | *B | w/ Electronic Toll Collection System |
| *a | Clamp | *b | Guide |
| *c | Marking Tape | *d | Marking |
Engage the clamps
Engage each guide.
Align the marking tape on the No. 1 roof wire with the roof headlining markings.
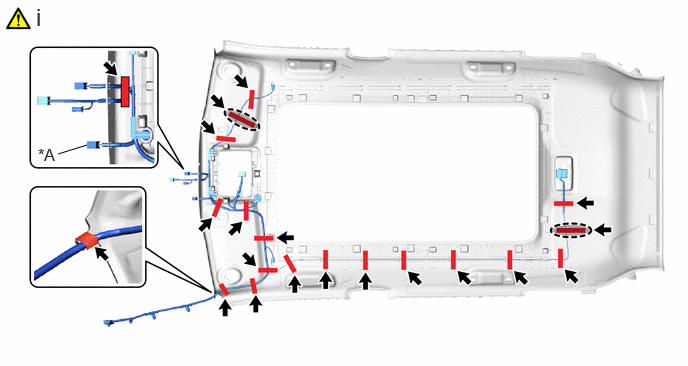
| *A | w/ Electronic Toll Collection System | - | - |
|
|
Adjustment Area | - | - |
Install the No. 1 roof wire to the roof headlining assembly with new adhesive tapes.
- NOTICE:
- ·
Apply the tape securely in place.
·Do not touch the adhesive surface when applying the tape to prevent adhesion failure.
- HINT:
-
Adjust the slack of the No. 1 roof wire as shown in the adjustment area of illustration.
63351B
4.INSTALL ROOF HEADLINING PAD
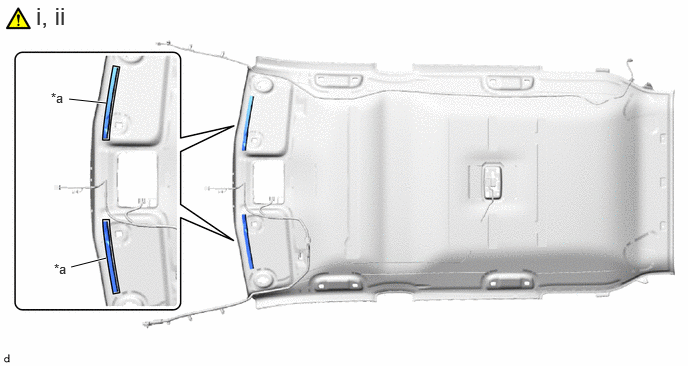
| *a | Marking | - | - |
Remove the release paper from 2 new roof headlining pads.
- HINT:
-
After removing the release paper, keep the exposed adhesive free from foreign matter.
Align the 2 roof headlining pads with the markings on the roof headlining assembly and install it as shown in the illustration.
63342
5.INSTALL NO. 2 ROOF HEADLINING PAD (for Normal Roof)
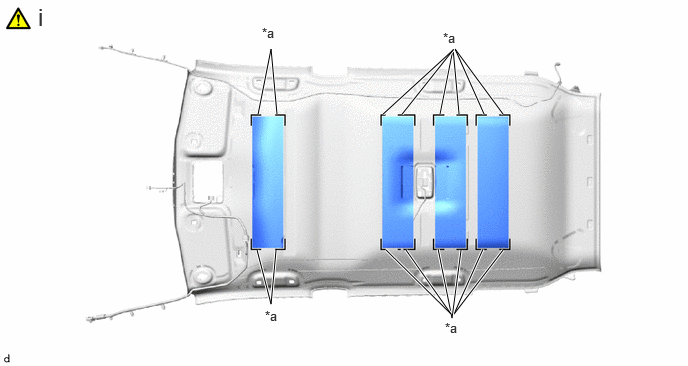
| *a | Marking | - | - |
Align 4 new No. 2 roof headlining pads with the markings on the roof headlining assembly and install them using hot-melt glue as shown in the illustration.
63342
6.INSTALL NO. 2 ROOF HEADLINING PAD (for Moon Roof)
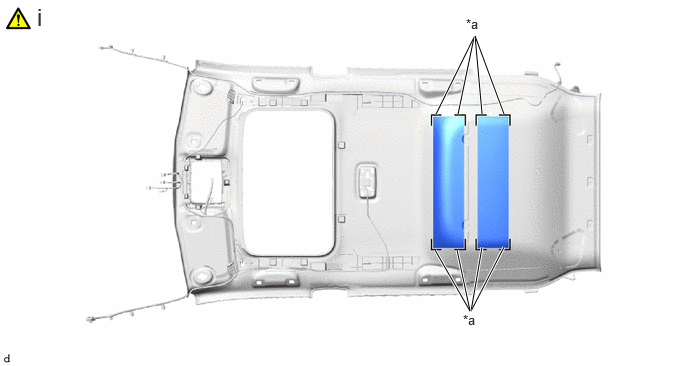
| *a | Marking | - | - |
Align 2 new No. 2 roof headlining pads with the markings on the roof headlining assembly and install them using hot-melt glue as shown in the illustration.
86101J
7.INSTALL NO. 2 ANTENNA CORD SUB-ASSEMBLY
86255F
8.INSTALL MICROPHONE CASE (w/ Microphone)
86730A
9.INSTALL TELEPHONE MICROPHONE ASSEMBLY (w/ Microphone)